Arduino Push Button Switch wiring and code “Beginners level”
Table of Contents
Arduino Push Button Tutorial Description:
Arduino Push Button Switch wiring and code– this is a very detailed getting started tutorial on How to use a Push Button Switch with Arduino Uno. As this tutorial is for beginners, so, I will try to cover the extreme basics.
No doubt when we first start learning any microcontroller, the very first electronic component that we are introduced to is the LED, and of course, the second component is the Push-button. Every beginner love to learn, how to control an LED using a Push Button. Using a Push Button is very simple in the beginning but as you dig further the things become a little complicated; because there are things that you need to take care of which I will explain in a minute.
In this tutorial, I will cover,
- What is a Push Button and how it works?
- Push Button connection with Arduino Uno or Mega.
- Basic Push Button program to control an LED.
- Why we use a resistor with the Push Button?
- What is a Pull Up resistor?
- What is Push Button debounce?
- Push Button debounce programming.
- How to use the Arduino’s Internal Pull Up resistor?
Without any further delay, let’s get started!!!
Amazon Purchase Links:
Arduino Nano USB-C Type (Recommended)
Other Tools and Components:
ESP32 WiFi + Bluetooth Module (Recommended)
Super Starter kit for Beginners
PCB small portable drill machines
DISCLAIMER:
Please Note: these are affiliate links. I may make a commission if you buy the components through these links. I would appreciate your support in this way!
What is a Push Button and how it works:
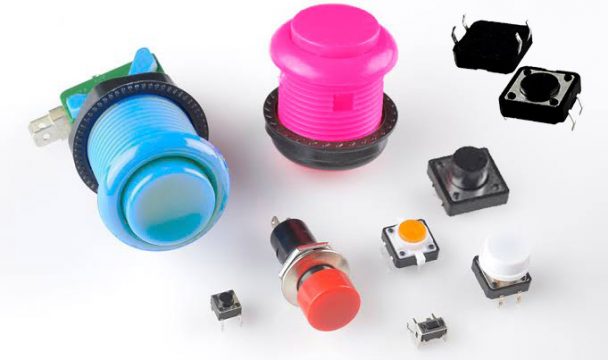
A Push Button which is also spelled Pushbutton is a simple switch mechanism which is used for controlling a process; it can be a small LED or a big machine. Push Buttons are available in different shapes, sizes, and colors. The working principle of all the Push buttons is exactly the same. Some Push Buttons have 2 legs, some have 3 legs, and some have 4 legs or even more. Using a digital multimeter you can easily find which legs are internally connected. Push buttons are most commonly used in Calculators, cell phones, TV remote controllers, kitchen appliances, industrial machines, keypads etc.
A Push Button is made up of hard material usually plastic or metal. A Push Button is used to complete an electric circuit when you press on it. Inside a Push Button there is a small spring which makes contact with two wires, allowing electricity to flow when you press it. When you release the pressure, the spring retracts and the contact is interrupted due to which the current flow immediately stops.
These Push Buttons are also known as the Momentary contact switches. The Momentary switches work only as long as you press on them. The momentary switches can be subdivided into normally open and normally close types. The push button switch that I am going to use in this tutorial is of the type normally open. Now let’s start with the very basic connection diagram and Arduino program. For the best explanation I am going to use the Proteus simulation software.
Arduino Push Button Wiring:
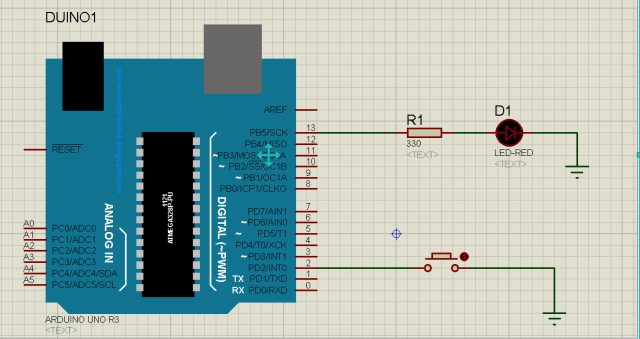
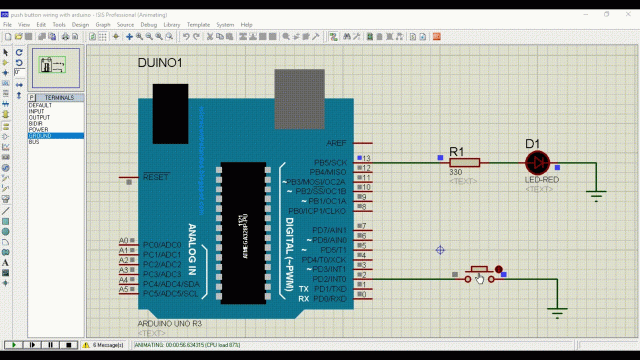
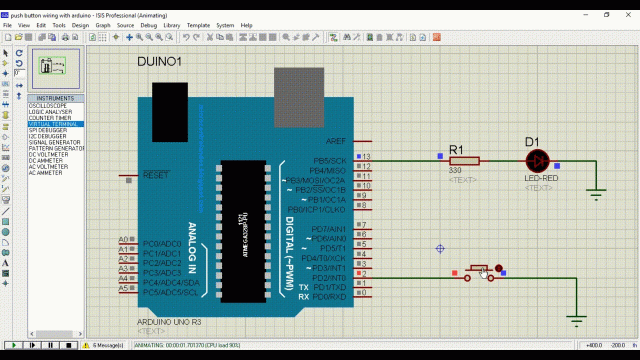
This is the basic and simplest connection diagram that I can start with. As you can see for now I am not using any Pull Up resistor with the Push Button. As you can see one side of the Push Button is connected with the ground while the other side of the Push Button Switch is connected with the Arduino’s pin number 2. The same connections will also work with the Mega. An LED is connected with pin number 13 of the Arduino through a 330 ohm resistor. This is a current limiting resistor.
One more thing that I would like to talk about, I am sure you might be thinking about, why I have connected ground with the Push Button switch?
Why I have not connected 5 volts with the Push Button?
You know, Push Button is also a sensor. You know we have two types of the Sensors. There are some types of the Sensors which gives you ground or 0 as the output signal and the other types of the Sensors give you 1 or 5v as the output signal. I will explain both the types.
Now let’s write a very basic Arduino program which turns on the LED when we press the push button switch and turns OFF the LED as we release the pressure applied on the Push Button.
Arduino Push Button Programming:
|
1 2 3 4 5 6 7 8 9 10 11 12 13 14 15 16 17 18 19 20 21 22 23 |
int LED = 13; int PUSH_BUTTON = 2; void setup() { pinMode(LED, OUTPUT); pinMode(PUSH_BUTTON, INPUT); digitalWrite(LED,LOW); } void loop() { if (digitalRead(PUSH_BUTTON) == LOW) { digitalWrite(LED, HIGH); } if (digitalRead(PUSH_BUTTON) == HIGH) { digitalWrite(LED, LOW); } } |
Arduino Push Button Program Explanation:
This tutorial can be a bit longer as I am going to explain the extreme basics.
Any electronic component or device that you want to use with the Arduino Uno or Mega or any other controller board, you will need to define a pin for that component or device. As in this example I am using two components which are the LED and a Push Button Switch. So, that’s why I started off by defining two pins for the LED and Push Button.
LED is connected with the Arduino’s pin number 13. Whenever you define a pin for any component you start with the int then the variable name followed by the equal sign and then the pin number. Push Button is connected with the Arduino’s pin number 2.
int LED = 13;
int PUSH_BUTTON = 2;
In every Arduino or Mega program we have at least two functions, which are the void setup and void loop functions. The void setup function is executed only one time when the Arduino or Mega board is first turned ON. In the void setup function we tell the controller which are the input pins, and which the output pins are.
void setup() {
pinMode(LED, OUTPUT);
pinMode(PUSH_BUTTON, INPUT);
digitalWrite(LED,LOW);
}
As you know LED is an output device so, that’s why the LED is set to output using the pinMode function. The pinMode function is the built-in function and it takes two arguments as the input. The pin name or pin number and the status which can be INPUT or OUTPUT. As the Push Button is an input device or component, that’s why it is set to input. Finally, using the digital write function I turned OFF the LED. Whenever you need to turn ON or Turn OFF a pin use the digialWrite().
The void loop function runs infinite times. We place our main code inside this loop. As you can see currently inside this loop we have only two IF conditions. These IF conditions are used to check if the button is pressed or not. As you can see in the circuit diagram above the Push Button Switch is connected with the ground. So it means in this example we are giving ground as the signal to the Arduino pin.
To check the status of any pin whether it is HIGH or LOW we use the function digitalRead().
void loop() {
if (digitalRead(PUSH_BUTTON) == LOW)
{
digitalWrite(LED, HIGH);
}
The above condition means, if the button is pressed and Arduino has detected LOW signal on pin number 2, then turn ON the LED.
if (digitalRead(PUSH_BUTTON) == HIGH)
{
digitalWrite(LED, LOW);
}
This condition means, if the button is released and Arduino has detected HIGH signal on pin number 2, then turn OFF the LED.
}
Ground to the Arduino as input video:
PULLDOWN & PULLUP resistors with the Push Button:
PULLDOWN resistor:
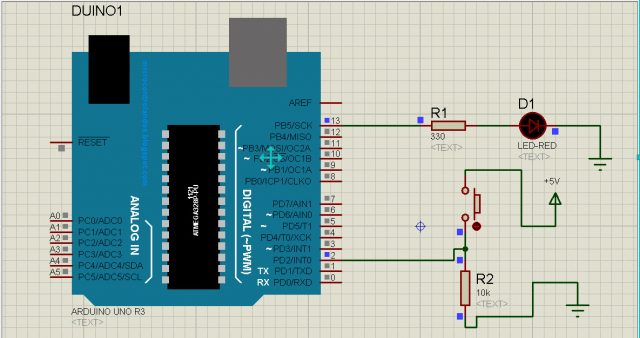
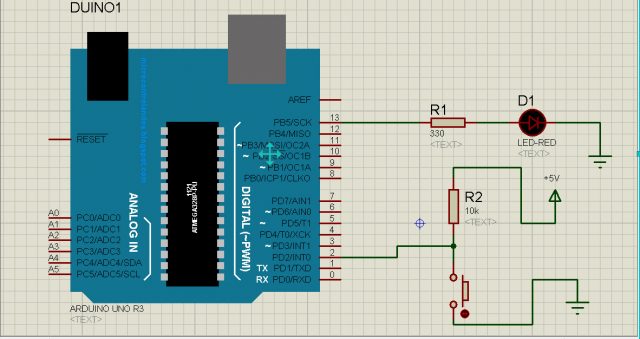
As you can see in the circuit diagram above, this time I am using 5 volts as the signal to the Arduino. This time the circuit will be a little bit modified. As you can see I have added a 10k resistor, which is also known as the Pulldown resistor. So how this works?
When you press the button it gives 5 volts to the Arduino pin and when you release the button it gives ground to the Arduino’s pin.
Push Button Switch Arduino programming:
|
1 2 3 4 5 6 7 8 9 10 11 12 13 14 15 16 17 18 19 20 21 22 23 |
int LED = 13; int PUSH_BUTTON = 2; void setup() { pinMode(LED, OUTPUT); pinMode(PUSH_BUTTON, INPUT); digitalWrite(LED,LOW); } void loop() { if (digitalRead(PUSH_BUTTON) == HIGH) { digitalWrite(LED, HIGH); } if (digitalRead(PUSH_BUTTON) == LOW) { digitalWrite(LED, LOW); } } |
As you can see this program is exactly the same as the previous one, but with only two modifications which you can find in the programming. Tell me in the comment.
PULLDOWN Resistor with Push Button Video:
PULLUP Resistor with the Push Button:
As you can see the PULLUP resistor configuration is just opposite of the PULLDOWN resistor configuration. In normal condition 5 volts are connected with the Arduino’s pin and when the Push Button is press then ground is connected with the Arduino’s pin number 2.
PULLUP Resistor with Push Button Arduino Programming:
|
1 2 3 4 5 6 7 8 9 10 11 12 13 14 15 16 17 18 19 20 21 22 23 |
int LED = 13; int PUSH_BUTTON = 2; void setup() { pinMode(LED, OUTPUT); pinMode(PUSH_BUTTON, INPUT); digitalWrite(LED,LOW); } void loop() { if (digitalRead(PUSH_BUTTON) == LOW) { digitalWrite(LED, HIGH); } if (digitalRead(PUSH_BUTTON) == HIGH) { digitalWrite(LED, LOW); } } |
Arduino’s internal PULLUP resistor:
Instead of using the PULLUP resistor externally, we can also use the Arduino’s internal pull up resistor.
Arduino internal PULLUP resistor programming:
|
1 2 3 4 5 6 7 8 9 10 11 12 13 14 15 16 17 18 19 20 21 22 23 |
int LED = 13; int PUSH_BUTTON = 2; void setup() { pinMode(LED, OUTPUT); pinMode(PUSH_BUTTON,INPUT_PULLUP); digitalWrite(LED,LOW); } void loop() { if (digitalRead(PUSH_BUTTON) == LOW) { digitalWrite(LED, HIGH); } if (digitalRead(PUSH_BUTTON) == HIGH) { digitalWrite(LED, LOW); } } |
As you can see the programming is exactly the same as the previous one, but this we used
pinMode(PUSH_BUTTON,INPUT_PULLUP);
Before I explain how to use a Push Button as the Toggle switch, first, I would like to explain what is switch bounce?
Switch bounce:
During the testing you will come to know, while using the Push Button, you do not get a clean closed contact when you press the Push Button Switch, you get a very short transition period where the switch very quickly closes, opens, closes, opens and closes before settling down and becoming fully closed. As the Push Button has the mechanical parts inside so that’s why the contacts bounce a bit before becoming fully closed. This is called the switch bounce.
There are many solutions both on the hardware side and on the software side, called debouncing. For a Push Button where we don’t need super fast switching speed, I prefer to go with the software solution. Without the switch debouncing, you never get the accurate results. Sometimes when you press the Push Button instead of turning OFF the LED it will turn ON the LED and this is just because of the switch bounce phenomena.
Push Button as the Toggle Switch:
Now let’s make things a little complex and which of course you would love to learn. In the next example I am going to use the Push Button as the Toggle switch. One time you press the button the LED is turned ON and the second time you press the Push Button the LED is turned OFF. Toggle switches are most commonly used in load automation projects where you need to turn ON and turn OFF a load using only one Push Button. This example without the button debouncing will not be accurate, so, I am going to use the button debouncing as well to get 100% accurate result.
I will go with the last circuit diagram and will modify the last program.
Arduino Push Button Toggle Switch programming:
|
1 2 3 4 5 6 7 8 9 10 11 12 13 14 15 16 17 18 19 20 21 22 23 24 25 26 27 28 29 30 31 32 33 34 35 36 37 |
int LED = 13; int PUSH_BUTTON = 2; int flag = 0; int sflag = 0; void setup() { pinMode(LED, OUTPUT); pinMode(PUSH_BUTTON, INPUT_PULLUP); digitalWrite(LED, LOW); } void loop() { if( (digitalRead(PUSH_BUTTON) == LOW) && (flag == 0) && (sflag == 0) ) { flag = 1; digitalWrite(LED, HIGH); sflag = 1; } if( (digitalRead(PUSH_BUTTON) == LOW) && (flag == 1) && (sflag == 0) ) { flag = 0; digitalWrite(LED, LOW); sflag = 1; } if( (digitalRead(PUSH_BUTTON) == HIGH)) // if there is nothing in front of the sensor { sflag = 0; delay(100); } } |
Push Button Toggle Switch Explanation:
Following is the perfect program that solves the Push Button debounce problem. You can turn ON and turn OFF the LED without any false switching.
int LED = 13;
int PUSH_BUTTON = 2;
this time I defined the following two variables flag and sflag. These variables will be used as the flags.
int flag = 0;
int sflag = 0;
void setup()
{
pinMode(LED, OUTPUT);
pinMode(PUSH_BUTTON, INPUT_PULLUP);
digitalWrite(LED, LOW);
}
void loop()
{
The following condition is used to check if the Push Button is pressed and the flag is zero and the sflag is also zero, which means that the button is pressed. The flag status is changed from 0 to 1, the LED is turned on and the sflag status is also changed from 0 to 1.
if( (digitalRead(PUSH_BUTTON) == LOW) && (flag == 0) && (sflag == 0) )
{
flag = 1;
digitalWrite(LED, HIGH);
sflag = 1;
}
The following condition is also used to check if the Push Button is pressed but this time we check for flag == 1. Then we change the flag status and turn OFF the LED. These flags will remain the same until the button is released.
if( (digitalRead(PUSH_BUTTON) == LOW) && (flag == 1) && (sflag == 0) )
{
flag = 0;
digitalWrite(LED, LOW);
sflag = 1;
}
The following checks if the button is released. As soon as the button is release the sflag status is changed from 1 to zero. And the Push Button is ready for the next press.
if( (digitalRead(PUSH_BUTTON) == HIGH)) // if the button is not pressed
{
sflag = 0;
delay(100);
}
}
