Arduino Software Serial”SoftwareSerial” Multiple Serial Ports
Last Updated on August 18, 2024 by Engr. Shahzada Fahad
Table of Contents
Description:
Arduino Software Serial” SoftwareSerial” Multiple Serial Ports- This article is all about the SoftwareSerial library which is most frequently used in Arduino programming. Why is it used in the Arduino Uno or Arduino Nano programming? How do we know when to use this library? You will get answers to these questions. I will explain this with the help of a Proteus simulation and will share with you some advanced level projects in which the SoftwareSerial library is used.
Without any further delay, let’s get started!!!
Amazon Purchase Links:
Arduino Nano USB-C Type (Recommended)
*Disclosure: These are affiliate links. As an Amazon Associate I earn from qualifying purchases.
SofwareSerial:
The SoftwareSerial is basically a library that enables the Serial Communication on digital pins other than the Serial Port. Using the SoftwareSerial library we can create multiple software serial ports with speeds up to 115200bps.
When and why we need the SoftwareSerial?
It’s based on your choice, if you want to use Arduino Mega then I don’t think so you will need the SoftwareSerial library, as in Arduino Mega we have a total of 4 hardware serial ports that can communicate with different serial communication supported devices.
So using the Arduino Mega you can communicate with 4 serial devices at the same time.
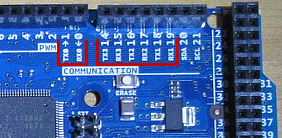
In the case of Arduino Uno, we have only one serial port which is available on Pin0 and Pin1.
Pin0 = RX
Pin1 = TX
Using the Arduino’s default Serial Port we can connect only one serial communication supported device. But when it comes to the multiple Serial devices then the Arduino default serial port becomes insufficient.
Let’s for example you are working on a project in which you are required to connect two serial devices GSM Sim900A and a Bluetooth module HC-05 or HC-06, or any other serial device. You can connect any of the two devices with the Arduino’s default serial port, but, what about the other serial device?
At this point you will need the SoftwareSerial library which can be used to create multiple serial ports. While using the Arduino Uno or Arduino Nano even if you are using one serial device never use the Arduino’s default serial port for the communication with other devices. The Arduino’s default serial port should only be used for the debugging purposes.
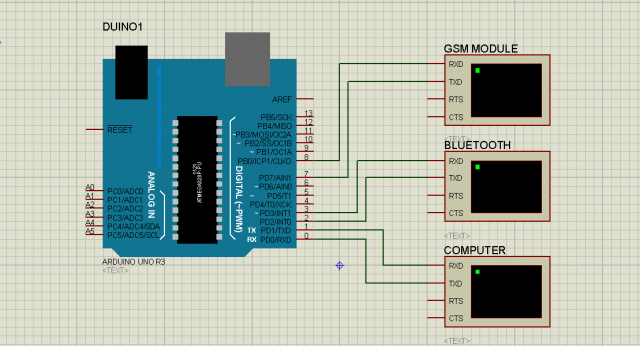
Multiple Serial Ports Proteus Simulation:
For the best understanding I am going to explain this with the help of a Proteus simulation.
Download the Proteus Simulation: SoftwareSerial
As you can see I have connected a Bluetooth module and a GSM module with the Arduino’s pins 2, 3, 7, and 8. Bluetooth module is connected with pin number2 and pin number3 while the GSM module is connected with pin number 7 and pin number 8. While, the Arduino default serial port is going to be used for the debugging purposes. Now I will write a simple program to send some text messages to these terminals.
Multiple Serial Ports Arduino Programming using SoftwareSerial Library:
|
1 2 3 4 5 6 7 8 9 10 11 12 13 14 15 16 17 18 19 20 21 22 23 24 25 |
// multiple serial ports #include "SoftwareSerial.h" SoftwareSerial blue(2,3) ; // rx , tx SoftwareSerial gsm(7,8); // rx , tx void setup() { Serial.begin(9600); blue.begin(9600); gsm.begin(9600); } void loop() { Serial.println(" message from Computer"); blue.println(" message from bluetooth"); gsm.println(" message from gsm module"); delay(1000); } |
Multiple Serial Ports Arduino Program explanation:
I started off by adding the SoftwareSerial library.
#include “SoftwareSerial.h”
SoftwareSerial blue(2,3) ; // rx , tx
SoftwareSerial gsm(7,8); // rx , tx
Defined two Serial ports for the Bluetooth Module and GSM module with names blue and gsm.
void setup()
{
Serial.begin(9600); // activated the serial communication
blue.begin(9600); // activated the serial communication for Bluetooth
gsm.begin(9600); // activated the serial communication for GSM
you can use different baud rates as per your requirement.
}
void loop()
{
The following instructions are used to send messages using the Serial.println().
Serial.println(” message from Computer”);
blue.println(” message from bluetooth”);
gsm.println(” message from gsm module”);
delay(1000);
}
After compiling the code I copied the hex file link and pasted it in the Proteus simulation. Double click on the Arduino in the Proteus simulation and paste the link in the program file text box. Then click on the play button.
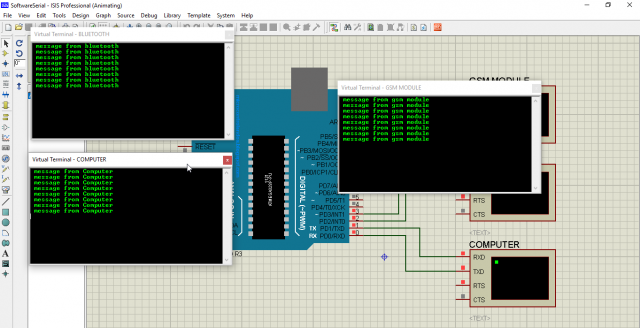
As you can see we send data serially to multiple serial communication supported devices. Some advanced level projects in which the SoftwareSerial library is used are given below.
SoftwareSerial Related Projects:
How to use GSM and Bluetooth Together To monitor Any Sensors wirelessly using Arduino
DIY IoT Weighing Scale using HX711 Load Cell, Nodemcu ESP8266, & Arduino
Flood Monitoring System with SMS Alert using Arduino and GSM
Arduino Gas leakage detection and SMS alert MQ-2 sensor
Discover more from Electronic Clinic
Subscribe to get the latest posts sent to your email.


Thank you very much.
I spent hours and hours before finding your software serial.
And This is working 😉
I have now 4 serial + the original one on my ESP32.
Thank you Thank you Thank you
Apparently there is a limit, in addition to the hardware, no more than three virtual ones work
Thank you
Great post! I love how you explained the intricacies of using SoftwareSerial for multiple serial ports. The example code was especially helpful for my project. Keep up the good work!