Dust Sensor SDS011 Interfacing with Arduino, Air Quality Monitoring
Last Updated on August 17, 2024 by Engr. Shahzada Fahad
Table of Contents
Dust sensor SDS011 with Arduino:
Dust Sensor SDS011 Interfacing with Arduino, Air Quality Monitoring- In this tutorial, you will learn how to make Air Quality Monitoring system using Arduino and the Dust Sensor SDS011. This is going to be a very detailed tutorial explaining the very basics. We will first take a closer look at the module, understand how it works, look at some images to get an idea of the construction and we will finally use an Arduino to obtain the sensor readings.
Amazon Links:
Arduino Nano USB-C Type (Recommended)
*Disclosure: These are affiliate links. As an Amazon Associate I earn from qualifying purchases.
Why we need dust sensor?
The air around us is made up of gasses and several other elements that are invisible to our eyes when viewed directly. Particulates are microscopic particles of solid or liquid matter that are suspended in air. These are extremely tiny, in the micrometer range so we cannot see them directly but we can inhale them which can give rise to a lot of health issues. The exposure to high levels of particulate matter is the sixth leading risk factor for premature deaths globally and some of these illnesses include heart disease, stroke, lung cancer, chronic lung disease, and other respiratory infections.
Categories of the Particles:
The particles themselves have been grouped into two categories based on their size. The ones that have a diameter between 2.5 and 10 micrometers are called coarse particles and these are represented by PM10. The ones that have a diameter of 2.5 micrometers or less are called ultrafine particles and are denoted by PM2.5. We can compare these diameters with that of a human hair which is 50-70 micrometers in diameter. We are dealing with particles that are very tiny. Based on the concentration of these particles we can categorize the air quality by determining the air quality index. Different countries have thresholds to determine this but they usually fall in the same ballpark figure.
SDS011 Dust Sensor:
After knowing all of this, it definitely is a good idea to monitor the concentration of these particles and the SDS011 Dust sensor that we will be using does a pretty good job at this. It can measure both PM2.5 and PM10 particle and has a range of 0 – 999.9 ug/m3. The sensor output can be obtained as a PWM signal over the serial port. The response time is below 10 seconds which is definitely good.
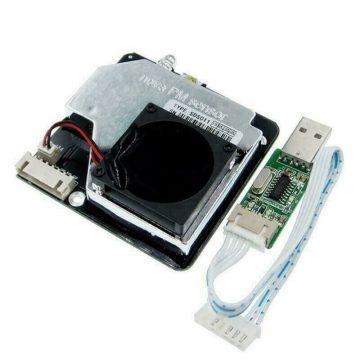
For this project we require the main sensor module which of course is the Dust Sensor SDS011, a USB to serial converter, and a connecting cable. The connector is labeled on both sides and we also have a small fan that is used for air circulation. This sensor consists of the air inlet port, which means that when the fan is switched ON, air will flow from air inlet, through the sensor and out this way. Since we have a fan here there will be a slight hum from the blades but that’s unavoidable for a sensor like this. I have tested it for a few hours and it is not that noisy at all, but I am not sure how loud it will get over the sensor lifetime.
Specification of the Dust Sensor SDS011:
Measurement output: PM2.5, PM10
Measuring range: PM2.5: 0.0-999.9μg/ m3PM10: 0.0-1999.9 micrograms/cubic meter
Rated voltage: 5V
Rated current: 70mA±10mA
Temperature range: Storage environment: -20~+60℃
Working environment: -10~+50℃
Humidity range: storage environment: up to 90%
Working environment: up to 70%
Working pressure: 86KPa~110KPa
Response time: 1s
The serial number exceeds the frequency: 1Hz
Minimum particle size: 0.3μm
Relative error: ±15% and ±10μg/m3 maximum -25 degrees, 50%RH
Product size: 71x70x23mm
Power requirements
Power supply voltage: 4.7~5V
Power supply: greater than 1W (current greater than 200mA)
The power supply voltage ripple is less than 20mV
Features:
100% brand new and high quality
Made of high-quality materials, durable
SDS011 adopts the principle of detection, which can suspend the particle concentration of 0.3 to 10 microns in the air, and the data is
stable and reliable; built-in fan, digital output, highly integrated
Data accuracy: detection, stability, consistency
Quick response: data update frequency is 1Hz
Easy to integrate: serial output (or IO port output can be customized), with fan
High resolution: particles with the smallest diameter can be resolved up to 0.3 microns
Standard certification: The product has passed CE / FCC / RoHS certification
Scope of application: PM2.5 detector, purifier.
Using the principle of scattering:
The detection of particulate matter will produce weak light scattering, the light scattering waveform and particle size in a specific direction, through the waveform statistics and conversion formulas of different particle sizes, the particle number concentration can be obtained in real time after different particle diameters. Unify the mass concentration according to the calibration method and the official unit.
Working of the Dust Sensor SDS011:
The main sensing components are the laser light and a diode for detection. Both of these are contained inside the enclosure which means that they are not affected by external light. The fan pulls in air from the port, and this passes between the laser and the diode. It is then pushed out from the top. The amount of light received that falls on the diode will depend on the particulate matter that is present in the air. This signal is then amplified and processed to give us the final output.
Reading the Dust Sensor SDS011 using USB to Serial Converter:
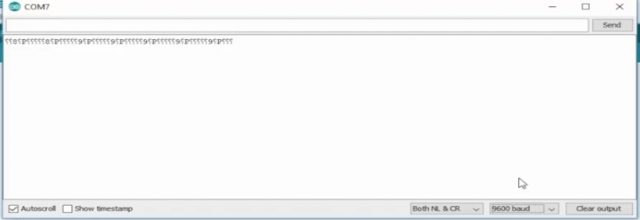
Now that we know how this sensor works, let us quickly try to obtain the output values. First, let’s use the USB to serial converter module which used the CH430G IC. One end of the cable plugs into the sensor and the other, plugs into the converter module. You can then plug this into your computer. The first thing we need to do is make sure that the USB to serial port driver is installed, so open up device manager to check its status. If the driver is not installed download it and install it.
Now, open up the Arduino IDE, make sure you select the correct COM port and then use the tools menu to open up the Serial monitor. The baud rate needs to be set to 9600 bits per second as that is the default setting for the module. You will obtain something like this and these are the raw sensor readings, which means that they are numbers and not a text string that we can read.
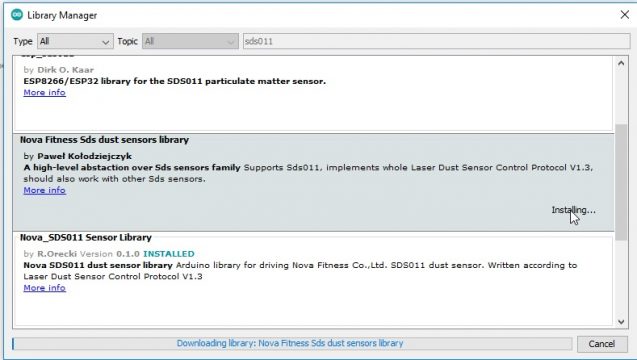
That is the reason why we would need to use an Arduino to obtain the values. So disconnect the module from the computer and follow along. I will be using an Arduino Nano for this and I will use some jumper cables to connect the module to the Arduino. Go back to the Arduino IDE and use the tools menu to open up the library manager. Type in SDS011 to give you a list of suitable libraries and install this library shown here.
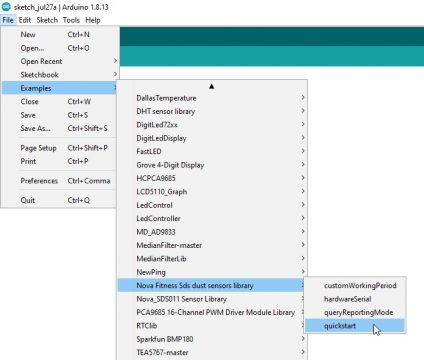
Now plug in the Arduino Uno and make sure you select the right board and COM port. Then, use the file menu to open up the quickstart example as seen here.
The first thing we need to do is change the RX pin to 0 and the TX pin to 1. These are the default pins for the serial port. The sketch simply initializes the serial port, then initializes the sensor, obtains the readings and then prints them out to the serial port.
Dust Sensor SDS011 Arduino Code:
|
1 2 3 4 5 6 7 8 9 10 11 12 13 14 15 16 17 18 19 20 21 22 23 24 25 26 27 28 29 30 31 32 33 |
#include "SdsDustSensor.h" int rxPin = 0; int txPin = 1; SdsDustSensor sds(rxPin, txPin); void setup() { Serial.begin(9600); sds.begin(); Serial.println(sds.queryFirmwareVersion().toString()); // prints firmware version Serial.println(sds.setActiveReportingMode().toString()); // ensures sensor is in 'active' reporting mode Serial.println(sds.setContinuousWorkingPeriod().toString()); // ensures sensor has continuous working period - default but not recommended } void loop() { PmResult pm = sds.readPm(); if (pm.isOk()) { Serial.print("PM2.5 = "); Serial.print(pm.pm25); Serial.print(", PM10 = "); Serial.println(pm.pm10); // if you want to just print the measured values, you can use toString() method as well Serial.println(pm.toString()); } else { // notice that loop delay is set to 0.5s and some reads are not available Serial.print("Could not read values from sensor, reason: "); Serial.println(pm.statusToString()); } delay(500); } |
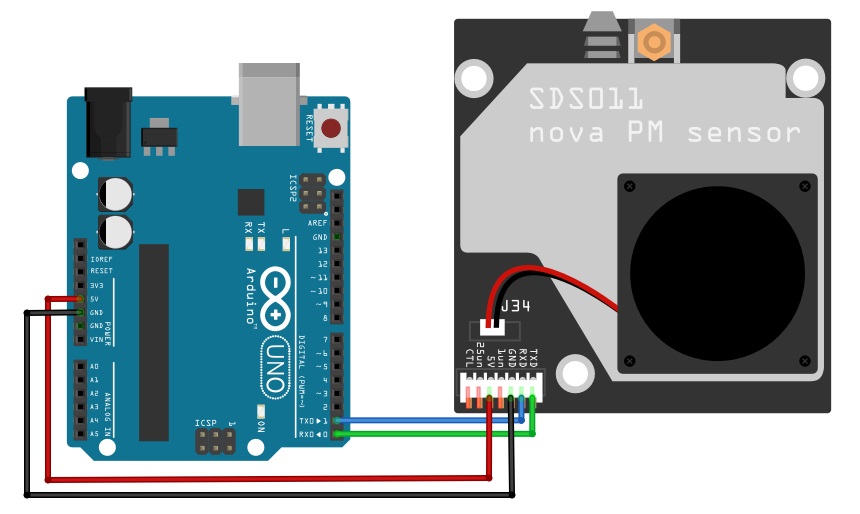
You can then hit the upload button and wait for it to complete. Once done, disconnect the board and connect the Arduino board with the sensor. Such that connect the RX of the sensor with the digital pin 0 and TX of the sensor with the digital pin 1 of the Arduino. I am going to directly use jumper cables.
You can then plug in the module to hear the fan spin. Then, make sure you still have the correct COM port selected and use the tools menu to open the serial monitor where you will obtain an output like this.
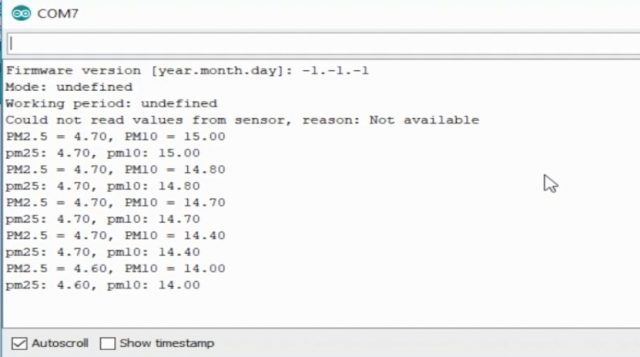
Both the values are extremely low and these are within the safe or low pollution levels which is good. One thing to keep in mind is that you will have to disconnect the serial port cables in order to upload a new sketch. If you do not do this then you will get an upload error in the Arduino IDE. So there you have it, an extremely easy and accurate way of obtaining the concentration of particulate matter using the SDS011 module. We will take a look at different modules like this one in the future.
About service life of the SDS011 Dust Sensor:
Life is one of the key indicators of dust sensors. The dust sensor uses high-quality, long-life imported diodes, with a service life of up to 8000 hours. For short-term continuous use (such as detectors), the default configuration is 1 continuous measurement per second. For continuous use applications (such as purifiers, air quality monitoring, etc.) Indirect power-on measurement can be used to extend the service life, for example, the power-on time is 20 minutes and 1 minute, and the power-off life time is 3 times longer than 40 seconds.
Discover more from Electronic Clinic
Subscribe to get the latest posts sent to your email.


