Java Hello World First Program and Java Vm Error Fixing
Table of Contents
Java Hello World First Program:
Java Hello World:- In this tutorial I will show you how to write your first java program in notepad and then how to compile the program. As usual we will start with the standard Hello World project first.
Amazon Purchase Links:
*Please Note: These are affiliate links. I may make a commission if you buy the components through these links. I would appreciate your support in this way!
Steps of writing your Java Hello World first Program:
Java Hello World First Program Step1:
Create a new folder for your work and set the folder name in my case I set the name demo. You can simply start by clicking the mouse right key, point to New and then folder. Rename the folder as Demo.
Java Hello World First Program Step2:
Open Notepad or any other text editor
Java Hello World First Program Step3:
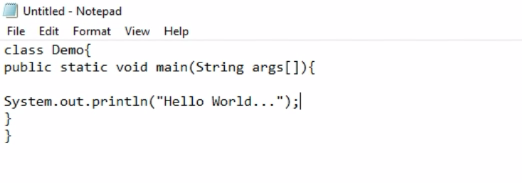
And paste the below code in the notepad.
|
1 2 3 4 5 6 |
class Demo{ public static void main(String args[]) { System.out.println("Hello World…"); } } |
For the most computer languages, the name of the file that clenches the source code to a program is immaterial. However, this is not the case with java. First of all, the most important thing that you should learn when you start learning Java is how to name your source file, this is really important. For this Demo, the name of the source file should be Demo.java. Let’s see why.
Java Hello World First Program Step4:
In java, a source file is functionary called a compilation unit. It is a text file that holds one or more class definitions. The java compiler requires that a source file use the .java filename extension as you can see in below image and then click save.
As you can see in the program, the name of the class defined by the program is also Demo. This is not a coincidence. In java, all code must live inside a class. By convention, the name of that class should same the name of the file that holds the program.
You should also make sure that capitalization of the filename matches the class name. The reason for this is that java is case-sensitive. At this point, the convention that filename correspond to class name may seem arbitrary. However, this assembly makes it easier to maintain and organize your programs.
Java Hello World First Program Step5:
Compiling the Java First Program Hello World:
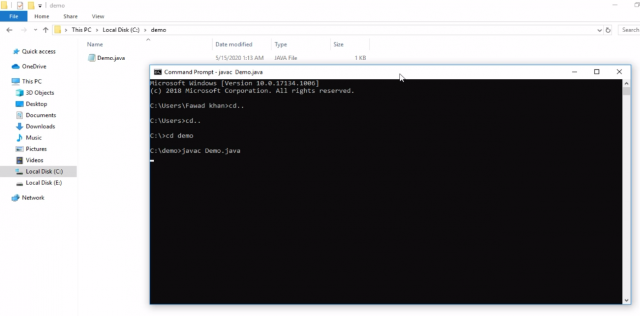
To compile the Demo program, execute the compiler, javac specifying the name of the source file on the command line as shown below:
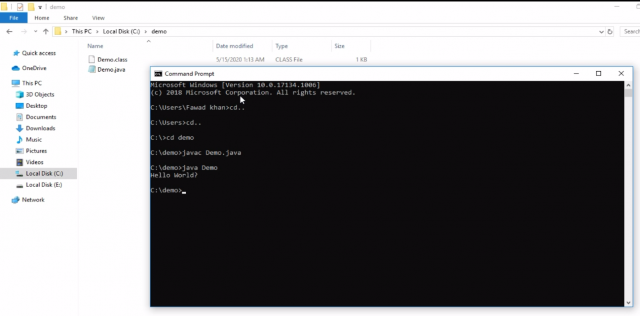
First of all you can set the command prompt where you can save your file in my case I save the file in c drive. In c drive I created a folder named demo
C:\demo> javac Demo.java
Java Hello World First Program Step6:
The javac compiler create a file called Demo.class as you can see below
Demo.class contains the bytecode version of the program. As discussed earlier, the java bytecode is the intermediate representation of your program that contains instructions the java virtual machine will execute, thus, the out of javac is not code that can be directly executed.
Java Hello World First Program Step7
To run the java program you must start the java application launcher called java. To do so, pass the class name Demo as a command line argument as shown below:
C:\demo> java Demo
When the java first program hello world is run the following output is displayed:
Hello World…
When java source code is compiled, every class is put into its own output file named after the class and using the .class extension. This is why it is a good idea to give your java source file the same name as the class.
Step by Step Explanation of Java Hello World First Program:
Class Demo{
This line uses the keyword class to announce that a new class is being defined. Demo is an identifier that is the name of the class. The whole class definition, including all of its members, will be between the opening curly brace({) and the closing curly brace (}). For the moment, don’t worry too much about the entireties of a class except to note that in java all program activity occurs within one. This is one reason why all java program are object-oriented.
public static void main(String args[])
this line begins the main() methods. All java application begin execution by calling main(). The full meaning of each part of this line cannot be given now, since it involves an explanation understanding of java’s approach to encapsulation. The public keyword is an access specifier, which permits the programmer to control the visibility of class members. When a class member is anteceded by public then that member may be accessed by code outside the class in which it is declared. In this case main() must be announce as public, since it must be called by code outside of its class when the program is started. The static keyword allows main() to be called without having to instantiate a particular instance of the class. This is necessary since main() is called by the java virtual machine (JVM) before any object are made.
As stated, main() is the method or function called when a java application begins. Keep in mind that java is case-sensitive. Thus, Main is different form main. It is important to know that the java compiler will compile classes that do not contain a main() method. But java has no way to execute or run these classes. So, if you had typed Main rather than main, the compiler would still compile your program. However java would report an error because it would be unable to search or find the main() method.
In main(), there is only one parameter, albeit a complicated one. String args[] declare a parameter named args, which is an array of instances of the class String.
System.out.println(“Hello World…”);
This line outputs the string “Hello World…” followed by a new line on the screen. Output is actually accomplished by the built-in println() method. In this case, println() display the string which is passed to it. As you will see, println() can be use to display other types of information, too. The line begins with System.out. System is a predefined class that provides access to the system, the out is the output stream that is connected to the console.
Java VM (Java Virtual Machine ) Error Fixing:
How to fix java vm issue ‘javac’ is not recognized as an internal or external command:
To solve this java vm (java virtual machine) issue you will follow the following steps:
Java VM Error Fixing Step1:
First of all close your command prompt window and then click on drive c
Java VM Error Fixing Step2:
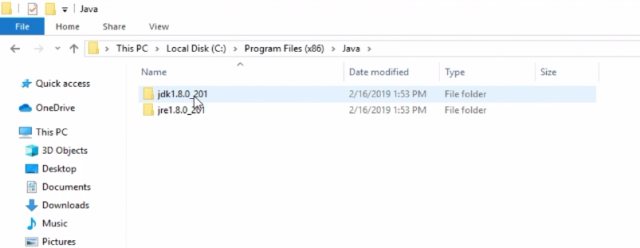
Then click on program files(x86)
Java VM Error Fixing Step3:
Then click on java. In java folder click on jdk1.8.0_201
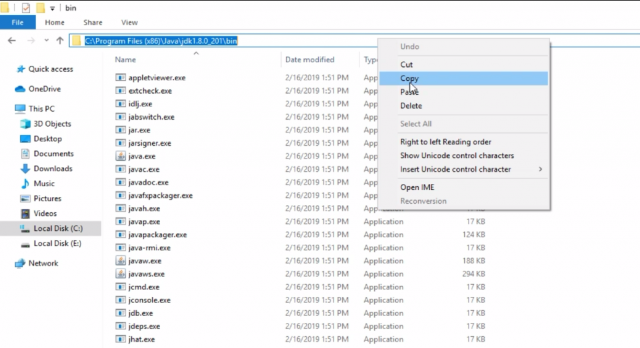
In jdk1.8.0_201 folder click on bin folder.
Java VM Error Fixing Step4:
When the bin folder is opened just copy the location address of the bin folder.
Java VM Error Fixing Step5:
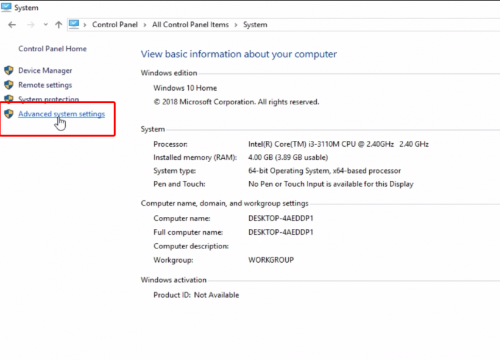
Open control panel. In control panel click on system
Java VM Error Fixing Step6:
Click on advance system setting.
A system properties window will opened. In system properties window click on advance tab. In advance tab click on Environment Variable.
Java VM Error Fixing Step7:
When you click on Environment Variable, The Environment Variable window will be opened, in that window click on a new button.
When click on new button a New user Variable window will be opened. In that window set the variable name as Path and in variable value field past the bin folder location address as i show in the start. And then click ok.
As you can see the address is added in the Environment Variable now again click on ok.
Java VM Error Fixing Step8:
Open the command prompt again and set the command prompt address where you save your file and compile the file using javac command and the program will be compile without showing any error and Demo.class file will be created in the folder.
Java VM Error Fixing Step9:
Now run the program using java command and see the output on the black screen.
As you can see java vm ‘javac’ is not recognized as an internal or external command error is solved and displayed the output message Hello World…


