Arduino GSM Motor speed controller and monitoring System
Last Updated on August 16, 2024 by Engr. Shahzada Fahad
Table of Contents
Arduino GSM Motor Speed Controller:
Arduino GSM Motor speed controller and monitoring- In today’s article, you will learn how to make a highly secured Motor speed controller and Monitoring system using Arduino and a GSM module SIM900A.

Before, I practically demonstrate its functionality; first I would like to talk about some basic things which I believe as a beginner you should know.
As usual, I am using my designed Arduino Nano Development board but you can also use Arduino Uno. The reason I am using this development board is because it has this 5V and 3A regulated power supply.
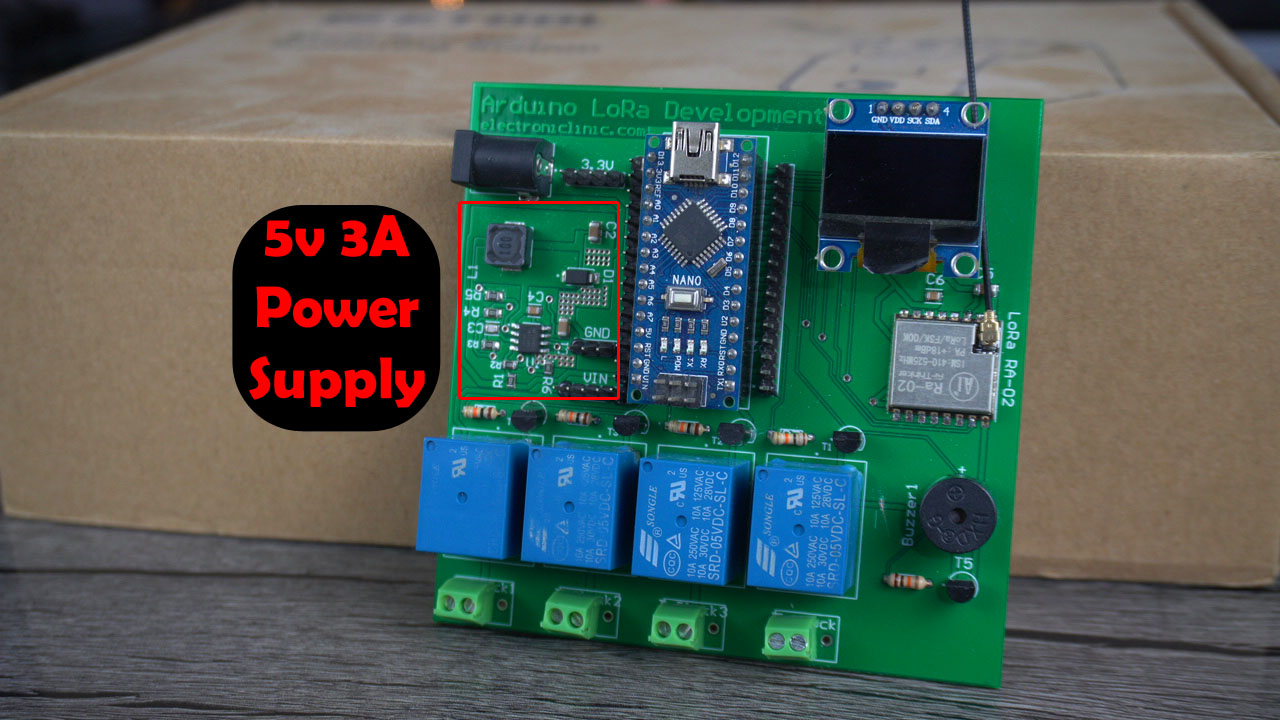
I am going to need this power supply to power up the GSM Sim900A module. Because, the Arduino onboard voltage regulator isn’t powerful enough to supply the required current to the GSM module. So, this is the main reason I built myself this Arduino development board and now I can power up GSM modules, high torque servos, and other input and output devices.
So, just drop the idea of using the Arduino Nano or Arduino Uno onboard voltage regulator to power up the GSM module, because if you do so,
- Your Arduino board will keep restarting and
- Your GSM module won’t able to connect to the GSM network and even if it connects; it will disconnect in no time when trying to send or receive an SMS.
So, if you want your GSM module to work smoothly; get yourself a readymade 5V and 2 to 3A power supply, and if you are good at making things then you can make this development board, or you can only make a dedicated 5V and 3A power supply.
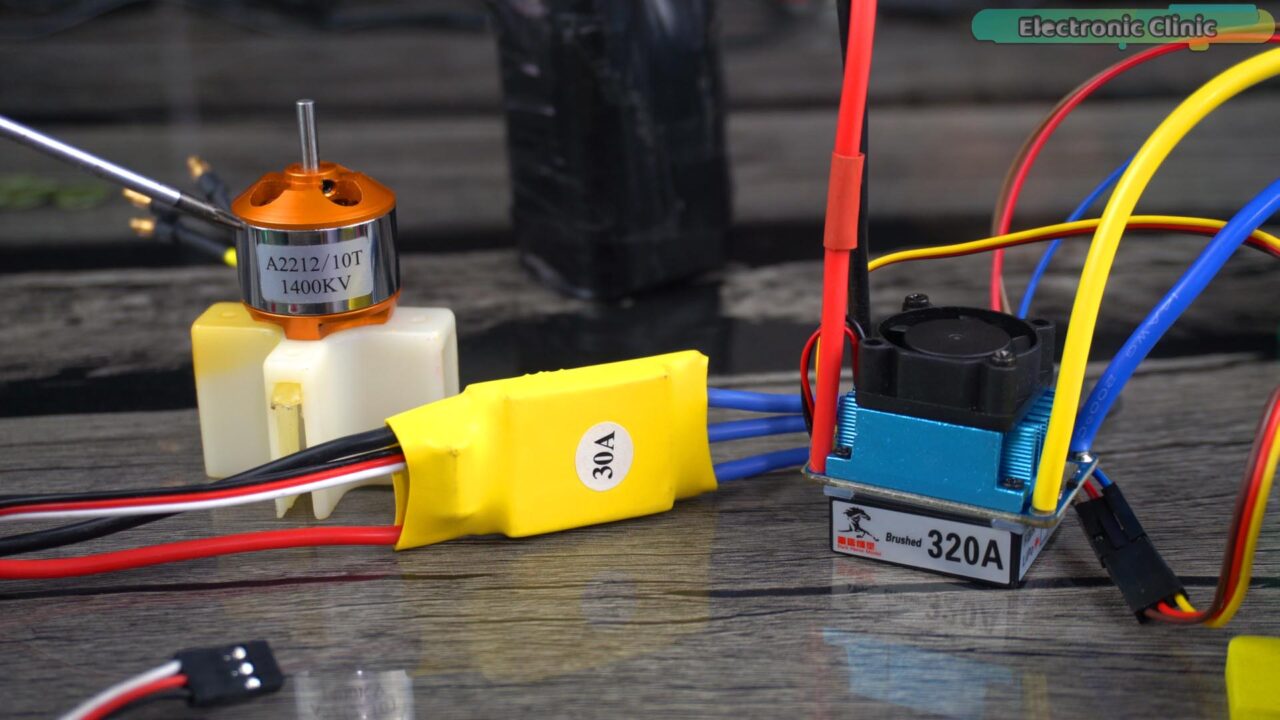
Anyway, instead of using the 320A Brushed DC Motor controller; you can use any DC motor controller and the same thing applies to the 775 Dc Motor, you can start with any small DC motor, and even if you want you can also use a Brushless DC motor but then you will have to use this type of the ESC as you can see in the image below “30A”.
I am going to use my created 4S lithium Ion battery to power up the 320A Motor driver and I am going to power up the Arduino board using a 12V adaptor.
Well, I can power up this entire system using a 4S lithium Ion Battery, but it’s a good practice to keep the motor supply separate.
If you remember, in the start of the article, I said this is the highly secured motor speed controller and monitoring system.

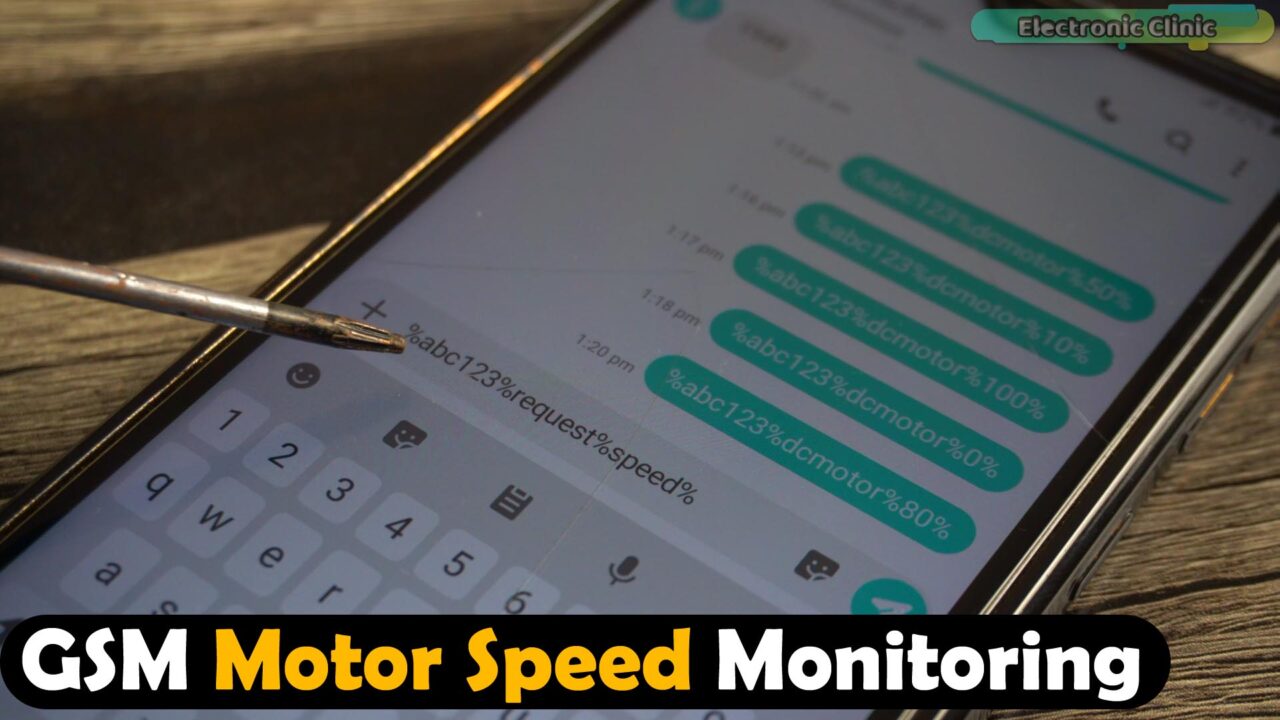
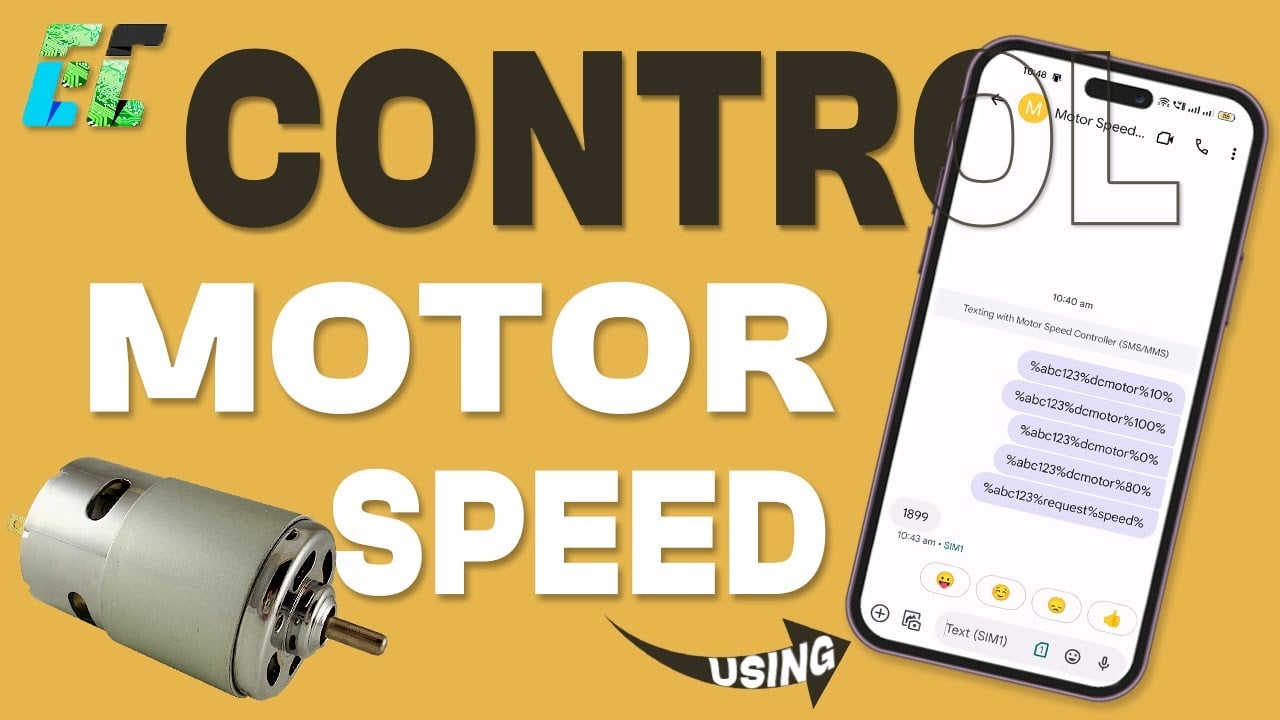
Because, to control the motor speed, first you will have to enter the password. This password can consist of letters, numbers, and special characters. Without a password, nobody would be able to control the motor speed or request the motor speed value from the Arduino.
Then the word dcmotor, and finally the speed value. The speed value should be between 0 and 100. 0 means OFF and 100 means full motor speed.
You might be thinking why am I using percentage signs; well I am doing this because when the Arduino receives the message. Then the Arduino can easily split the message using % sign as the delimiter. Anyway, the message is ready, and I am going to send it to the Arduino.
Note: for the practical demonstration watch the video tutorial given at the end of this article.
During the practical demonstration, I run the motor at 50% speed, 10% speed, 100%, and I also turned off the motor.
Next, I demonstrated, how to request the motor speed value from the Arduino, for this, first I set the motor speed to 80%.
Now, to request the speed value, for this, first we type the password, then the word request followed by the word speed. When the Arduino receives this message, it knows the person is requesting the motor speed value. The message is ready and let’s send it to the Arduino.

This value is in microseconds and falls within the range of 1500 to 2000. A value of 1500 microseconds turns off the motor, while a value of 2000 microseconds sets the motor speed to 100%. In the programming, the map function has been utilized to convert a range of 0 to 100 into the range of 1500 to 2000. Anyway, now let’s go ahead and take a look at the connections.
Amazon Links:
Arduino Nano USB-C Type (Recommended)
*Disclosure: These are affiliate links. As an Amazon Associate I earn from qualifying purchases.
For the Beginners:
If you guys are new to the Arduino then I highly recommend read my articles on
- Arduino Course for Beginners
- About the GSM module, Technical specification, & AT commands.
- Different types of Motor drivers and how to use them.
- How to design your own Arduino Board.
- SMD soldering Tutorial for beginners.
- PCB designing using Altium Designer.
Arduino GSM Motor Controller Circuit Diagram:
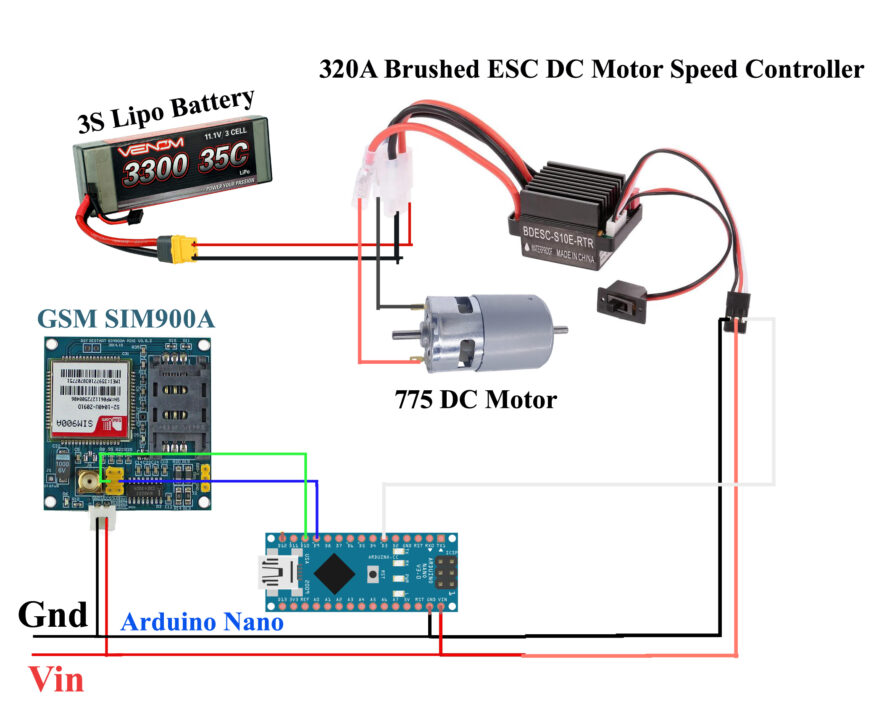
The VCC and GND wires of the Brushed Motor Controller are connected to the Vin and GND pins. The signal Wire is connected to the Arduino PWM Pin 3.
These Red and Black wires with the XT60 connector are used to connect a 3S, 4S, or 5S Lipo or Lithium Ion battery to power up the DC Motor. In my case, I have connected the 775 Brushed DC motor with the controller output wires.
Connect the power supply pins of the GSM Sim900a module to the regulated 5v and 3A power supply. The 5V and GND wires from the 5V and 3A power supply are connected to the Arduino Vin and Gnd pins.
Connect the GSM module TXD 5V pin to the Arduino digital pin D9 and connect the RXD 5V pin to the Arduino digital pin D10.

For the 5V and 3A power supply, you can follow this circuit diagram. Now, let’s go ahead and take a look at the programming.
Arduino GSM Motor Controller Programming:
|
1 2 3 4 5 6 7 8 9 10 11 12 13 14 15 16 17 18 19 20 21 22 23 24 25 26 27 28 29 30 31 32 33 34 35 36 37 38 39 40 41 42 43 44 45 46 47 48 49 50 51 52 53 54 55 56 57 58 59 60 61 62 63 64 65 66 67 68 69 70 71 72 73 74 75 76 77 78 79 80 81 82 83 84 85 86 87 88 89 90 91 92 93 94 95 96 97 98 99 100 101 102 103 104 105 106 107 |
#include <SoftwareSerial.h> #include <Servo.h> SoftwareSerial SIM900(9, 10); // TXpin=9 RXpin=10 Servo ESC; // create servo object to control the ESC int mspeed = 0; // motor speed String passcode="abc123"; String incoming = ""; String textForSMS; void setup() { // put your setup code here, to run once: Serial.begin(9600); ESC.attach(3);///DC Motor SIM900.begin(9600); // original 19200 randomSeed(analogRead(0)); SIM900.print("AT+CMGF=1\r"); // set SMS mode to text delay(1000); SIM900.print("AT+CNMI=2,2,0,0,0\r"); // blurt out contents of new SMS upon receipt to the GSM shield's serial out delay(1000); SIM900.println("AT+CMGD=1,4"); // delete all SMS delay(5000); Serial.println("Ready..."); } void loop() { if(SIM900.available() >0) { incoming=SIM900.readString(); Serial.println(incoming); String fulldata = getValue(incoming, '%', 0); String password = getValue(incoming, '%', 1); //contains password String mtype= getValue(incoming, '%', 2); //contains motor type dc motor or servo motor String mvalue= getValue(incoming, '%', 3);// contains motor speed or servo motor angle //Serial.print("value 1: "); //Serial.println(password); //Serial.print("value 2: "); //Serial.println(mtype); //Serial.print("value 3: "); //Serial.println(mvalue); if((password==passcode)&&(mtype=="dcmotor")) { int motorvalue = mvalue.toInt(); if(motorvalue==0) { mspeed=1500; ESC.writeMicroseconds(mspeed); } mspeed = map(motorvalue, 1, 100, 1501, 2000); // scale it to use it with the servo library (value between 0 and 180) // Serial.println(mspeed); ESC.writeMicroseconds(mspeed); } else if((password==passcode)&&(mtype=="request")&&(mvalue=="speed")) { textForSMS =mspeed; sendSMS(textForSMS); // Serial.println("message send"); } } } void sendSMS(String message) { SIM900.print("AT+CMGF=1\r"); // AT command to send SMS message delay(1000); SIM900.println("AT + CMGS = \"+923348912230\""); // recipient's mobile number, in international format delay(1000); SIM900.println(message); // message to send delay(1000); SIM900.println((char)26); // End AT command with a ^Z, ASCII code 26 delay(1000); SIM900.println(); delay(100); // give module time to send SMS } String getValue(String data, char separator, int index) { int found = 0; int strIndex[] = { 0, -1 }; int maxIndex = data.length() - 1; for (int i = 0; i <= maxIndex && found <= index; i++) { if (data.charAt(i) == separator || i == maxIndex) { found++; strIndex[0] = strIndex[1] + 1; strIndex[1] = (i == maxIndex) ? i+1 : i; } } return found > index ? data.substring(strIndex[0], strIndex[1]) : ""; } |
I started off by adding the SoftwareSerial.h and Servo.h header files. With the help of SoftwareSerial; I can defined multiple serial ports. As you can see using the SoftwareSerial I have defined another serial port using the Arduino pins 9 and 10. I could also connect the GSM module to the Arduino default Serial port, but I used it for the debugging purposes.
A “Servo” object named “ESC” is created to control the speed of DC motor using 320A Brushed Motor controller.
I also defined a variable mspeed of the type integer. I have used it to store the Mapped value.
I also defined a variable passcode of the type String, so that I can use a combination of letters, numbers, and characters. So, my password is “abc123”. If I want to change my password then I can simply change this passcode.
I also defined variables for storing the incoming and outgoing messages.
Code in the void setup() function is exactly the same, as used in my previous GSM based Home Automation project. So, let’s go to the loop() function.
We simply check if a message is received then store the entire string message in the variable incoming, and then using the % sign as the delimiter we split the message, and store the corresponding values in variables password, mtype, and mvalue.
And then I have used two conditions that check if the user want to set the motor speed or if the user is requesting the motor speed value.
sendSMS() function is a user-defined function and it has no return type and it takes one argument as the input and it’s the text message we want to send. Make sure you change this number.
The getValue() function is used to split the message using any character as the delimiter. So, that’s all about the programming.
Watch Video Tutorial:
Discover more from Electronic Clinic
Subscribe to get the latest posts sent to your email.


