ESP32 HX711 and Load cell based Digital Weighing Scale, IoT Weighing Scale
Last Updated on October 21, 2024 by Engr. Shahzada Fahad
Table of Contents
ESP32 HX711 Weighing Scale, Description:
ESP32 HX711 and Load cell based Digital Weighing Scale– Building a highly accurate and cheap Digital Weighing Scale is quite a challenge and it takes hours to perfectly calibrate your load cell or strain gauge. Previously, I used the same HX711 and Load cell with the Arduino and explained the most basic things including how to calibrate the HX711, Load Cell wiring, and its programming.
Arduino Uno and ESP32 are completely different controller boards. ESP32 is much faster than the Arduino boards and this is the reason the calibration value of the HX711 and Load cell that works with the Arduino won’t work with the ESP32 Controller board. For ESP32 we will need to repeat the same calibration procedure and we will also need to reduce the speed of the ESP32 which I will explain in the programming.
Before I am going to explain how to make such an efficient and low-cost digital Weighing Scale using ESP32, HX711 Amplifier module, Load cell or Strain Gauge, and I2C supported Oled Display module; first let me explain how I get started and I am also going to share with you the final measured values and you will see how accurate is my ESP32 based Weighing Scale.
Altium Designer:

Altium Designer is the world’s most trusted PCB design system. Altium Designer enables engineers to effortlessly connect with every facet of the electronics design process. Over 35 years of innovation and development focused on a truly unified design environment makes it the most widely used PCB design solution. With Altium Designer you can create PCB designs with an intuitive and powerful interface that connects you to every aspect of the electronics design process. Route it your way through any angle, tune for the delay, Push, Slide, and Walkaround faster than ever. Interact and collaborate with mechanical designers like never before in a photo-realistic, 3D design environment. If you want to get started with the Altium designer, you can click on the get started.
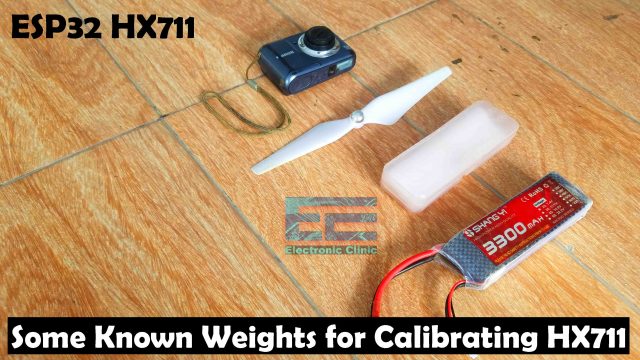
In order to perfectly calibrate your HX711 and Load cell you should have some known weights. I started off with these 4 different items and measured their weights with standard electric weighing scale.
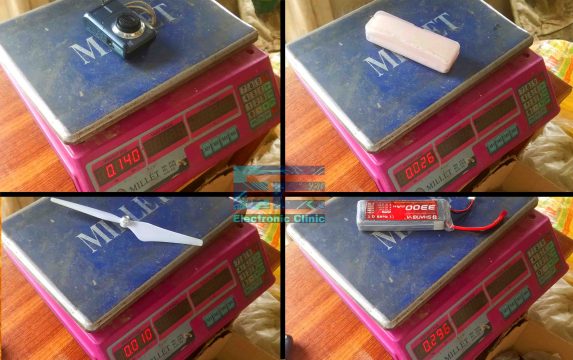
The Lipo battery weighs 296 grams, the prop weighs 10 grams, the plastic casing weighs 26 grams, and the camera weighs 140 grams. I used these items and calibrated my HX711 and Load cell and it took me around 1 hour to find the best calibration factor value. Now, let’s measure their weights with my designed digital weighing scale using ESP32 WiFi Module. Let’s start with the Lipo battery.
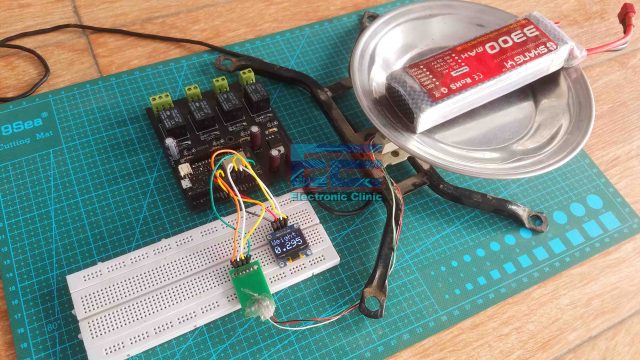
It’s simply amazing, it’s pretty close to 296 grams and it’s really not bad at all. Because I measured the weight of the same Lipo battery with another scale and the 3rd digit after the decimal point wasn’t the same. If you measure the same weight with different electric scales you will always see a difference in the 3 or 4th digit after the decimal point. But if you can spend one more hour on the Calibration you can further fine-tune your calibration factor value. You might have noticed the value sometimes changes to 296 grams, I am going to add some more weight to check how much my measured value is drifting from the actual measured value.
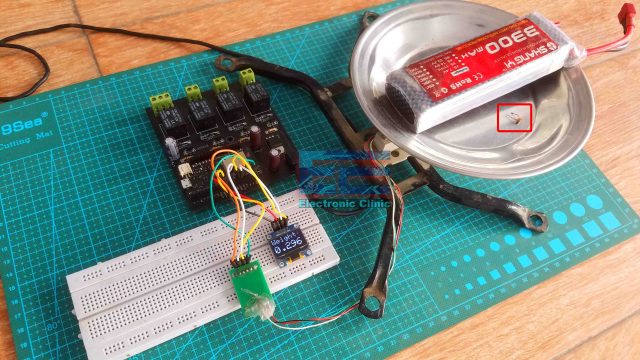
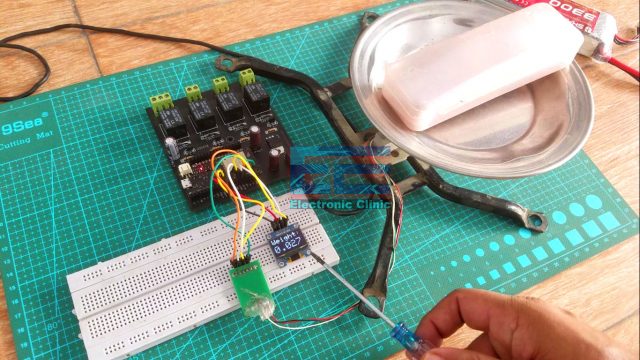
Only by adding an LDR, you can see the value is changed to 296 grams. To me, the LDR seems quite weightless but my scale can detect its weight. So, far I am quite happy with the value, now let’s measure the weight of the plastic casing.
My scale shows that it weighs 27 grams. One more thing that I would like to talk about is that, the 3rd digit is a rounded digit. So, I am happy with this value. Now, let’s measure the weight of a propeller.
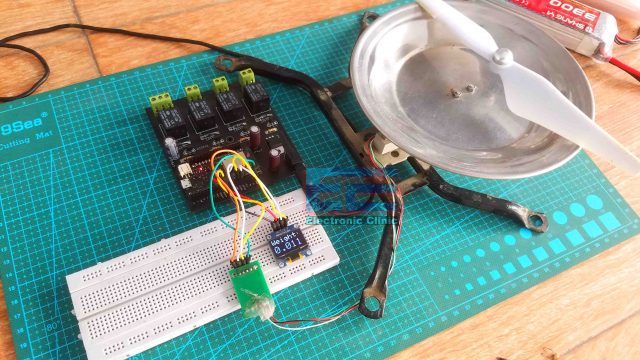
It’s 11 grams, which is also correct as per the datasheet value, It’s a branded DJI propeller and as per the datasheet, this prop is around 13 grams, not exactly 13 grams. So my measured value is accurate than that commercial scale. Again I must say, you can spend some time fine-tuning your calibration factor value. Now, let’s measure the weight of a camera.
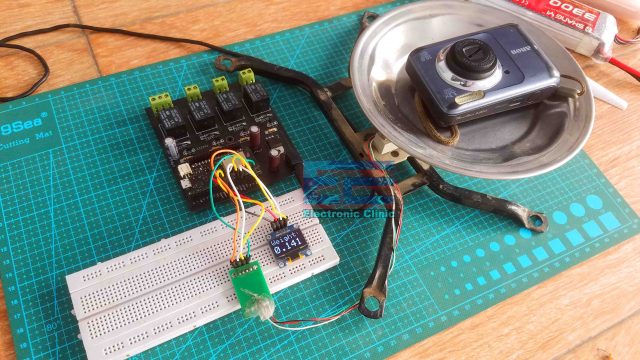
You can see it measures 141 grams which is again pretty close to the weight measured with a commercial level electric weighing scale. To further ensure if my ESP32 based weighing scale is good enough, I am going to measure the weights of two different lighters individually, and then I will place both the lighters at the same time and see if the total measured weight is equal to their combined weight.
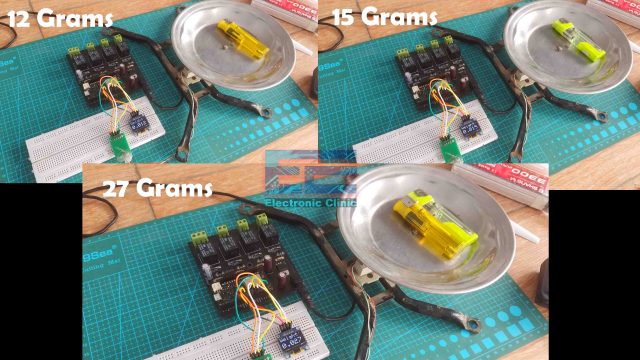
The one lighter weighs 15 grams and the other one weighs 12 grams and then I measured their combined weight. It’s simply amazing; the combined weight is 27 grams. This means my ESP32 based Weighing Scale is just amazing.
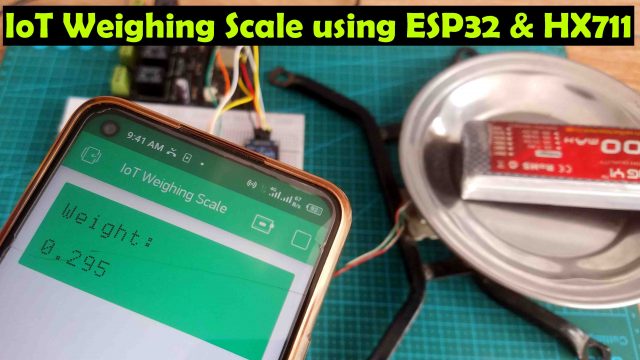
After performing all the required tests, I also decided why not to convert this ESP32 based Weighing Scale into an IoT weighing scale, this way we can monitor the Weight values from anywhere in the world.
Now, let’s take a look at the circuit diagram and programming. Without any further delay, let’s get started!!!
Note: this old version of the Blynk app is no more functional. For the blynk mobile App setup and Blynk.cloud dashboard setup ready my article on the New Blynk V2.0. In this article I have explained how to migrate your projects from Blynk 1.0 to the new Blynk V2.0. You can also watch the video.
IoT Weighing Scale using ESP32 and the New Blynk V2
Amazon Links:
ESP32 WiFi + Bluetooth Module(Recommended)
HX711 Load cell / Strain Gauge:
SSD1306 128×64 Oled i2c display Module
*Disclosure: These are affiliate links. As an Amazon Associate I earn from qualifying purchases.
HX711 Amplifier Module:
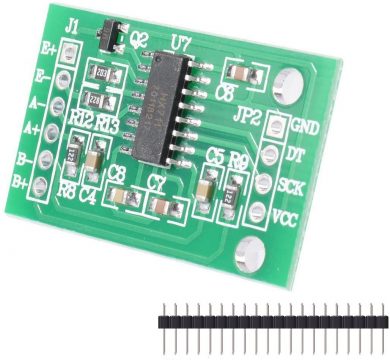
Hx711 Amplifier Module has different gain values which are selectable 32, 64, and 128. Any of the mentioned gains can be selected and used in the programming. The hx711 is a 24 bit analog to digital converter “ADC”. Which has an amplifier, which gives a maximum gain of 128 as per the datasheet. As you can see on the right side we have ground, DT, Sck, and Vcc. While on the left side we have E+, E-, A-, A+, B-, and B+. The load cell will be connected with E+, E-, A-, and A+.
Load Cell or Strain Gauge:
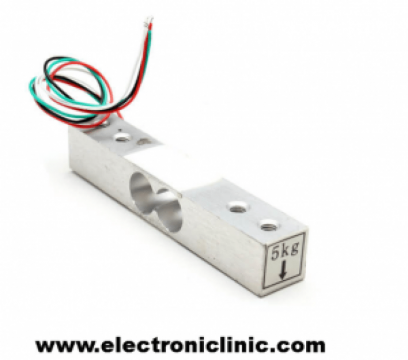
A load cell or a Strain Gauge is basically a Transducer that generates an electrical signal whose magnitude is proportional to the force applied. The various load cell types include Pneumatic, Hydraulic, and strain gauge.
ESP32 HX711 Weighing Scale Circuit Diagram:
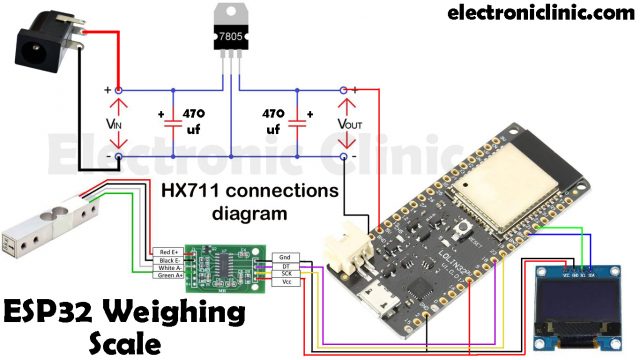
The 5V regulated power supply is used to power up the ESP32 WiFi + Bluetooth Module and all the other electronics. Don’t forget to add these 470uF decoupling capacitors with the input and output legs of the 7805 regulator.
The Red and Black wires from the load cell or strain gauge are connected with the E+ and E- pins of the HX711 Amplifier module, while the White and Green wires of the Load cell are connected with the A- and A+ pins of the HX711 Module. The GND and VCC pins of the HX711 module are connected with the 3.3V and GND pins of the ESP32 module. The DT and SCK pins of the HX711 module are connected with the ESP32 pins 23 and 19.
The SDA and SCL pins of the I2C supported Oled display module are connected with the I2C pins of the ESP32 Module which are I/O pins 21 and 22. While the VCC and GND pins of the Oled display module are connected with the ESP32 3.3V and GND pins.
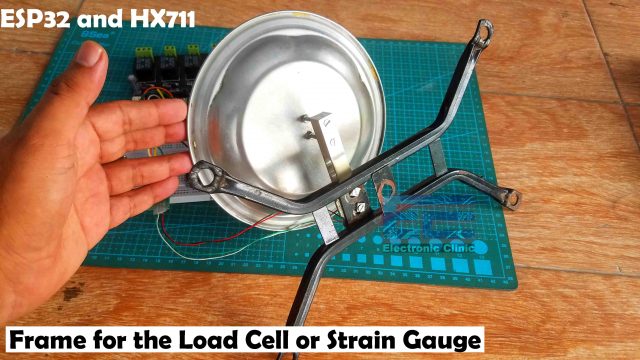
This frame I salvaged from an Old scale to which I screwed my 5kg Load cell and the arrowhead on the Load cell or strain gauge should be pointing in the downward direction. This is the same setup I used in my IoT based Weighing Scale using Arduino and ESP8266 WiFi Module.
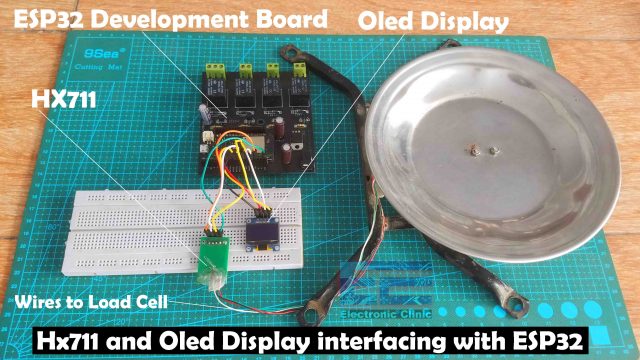
I am going to use the same ESP32 development board which I have been using in different projects and as you can see I have already connected everything. I have added female headers so I can easily connect jumper wires. Pay no attention to these relays, in this project these relays are not used. Just follow the connections which I explained in the circuit diagram. Now, let’s take a look at the programming.
Before, you start the programming first you will need to install the ESP32 board, and you will also need to install the Blynk Library. I have a very detailed tutorial on how to get started with the ESP32 WiFi + Bluetooth module. I Highly recommend to read this article.
ESP32 HX711 Weighing Scale Programming:
|
1 2 3 4 5 6 7 8 9 10 11 12 13 14 15 16 17 18 19 20 21 22 23 24 25 26 27 28 29 30 31 32 33 34 35 36 37 38 39 40 41 42 43 44 45 46 47 48 49 50 51 52 53 54 55 56 57 58 59 60 61 62 63 64 65 66 67 68 69 70 71 72 73 74 75 76 77 78 79 80 81 82 83 84 85 86 87 88 89 |
<span style="font-size: 14pt; font-family: 'times new roman', times, serif;">#include "HX711.h" #include "soc/rtc.h" #include <stdlib.h> #include <Wire.h> #include <Adafruit_GFX.h> #include <Adafruit_SSD1306.h> #include <SimpleTimer.h> #define DOUT 23 #define CLK 19 HX711 scale(DOUT, CLK); int rbutton = 18; // this button will be used to reset the scale to 0. String myString; String cmessage; // complete message char buff[10]; float weight; float calibration_factor = 206140; // for me this vlaue works just perfect 206140 SimpleTimer timer; // for the OLED display #define SCREEN_WIDTH 128 // OLED display width, in pixels #define SCREEN_HEIGHT 64 // OLED display height, in pixels // Declaration for an SSD1306 display connected to I2C (SDA, SCL pins) #define OLED_RESET -1 // Reset pin # (or -1 if sharing Arduino reset pin) Adafruit_SSD1306 display(SCREEN_WIDTH, SCREEN_HEIGHT, &Wire, OLED_RESET); void setup() { Serial.begin(9600); rtc_clk_cpu_freq_set(RTC_CPU_FREQ_80M); pinMode(rbutton, INPUT_PULLUP); scale.set_scale(); scale.tare(); //Reset the scale to 0 long zero_factor = scale.read_average(); //Get a baseline reading display.begin(SSD1306_SWITCHCAPVCC, 0x3C); timer.setInterval(1000L, getSendData); display.clearDisplay(); display.setTextColor(WHITE); } void loop() { timer.run(); // Initiates SimpleTimer scale.set_scale(calibration_factor); //Adjust to this calibration factor weight = scale.get_units(5); //5 myString = dtostrf(weight, 3, 3, buff); cmessage = cmessage + "Weight" + ":" + myString + "Kg"+","; Serial.println(cmessage); cmessage = ""; Serial.println(); if ( digitalRead(rbutton) == LOW) { scale.set_scale(); scale.tare(); //Reset the scale to 0 } } void getSendData() { // Oled display display.clearDisplay(); display.setTextSize(3); display.setCursor(0,0); // column row display.print("Weight:"); display.setTextSize(4); display.setCursor(0,30); display.print(myString); display.display(); } </span> |
ESP32 Weighing Scale Code Explanation:
This code is the modified version of the code I used in my Arduino based Weighing scale. This time I made a few changes.
|
1 |
<span style="font-size: 14pt; font-family: 'times new roman', times, serif;">#include "soc/rtc.h"</span> |
I added this header file for reducing the speed of the ESP32 module.
|
1 2 3 4 5 6 7 |
<span style="font-family: 'times new roman', times, serif; font-size: 14pt;">#include <stdlib.h> #include <Wire.h> #include <Adafruit_GFX.h> #include <Adafruit_SSD1306.h></span> |
I added these header files for the Oled display module and this SimpleTimer.h for creating a timer. Download the Libraries.
|
1 2 3 4 5 |
<span style="font-family: 'times new roman', times, serif; font-size: 14pt;">#define DOUT 23 #define CLK 19 HX711 scale(DOUT, CLK);</span> |
I defined pins to which the DT and SCK pins are connected.
|
1 |
<span style="font-size: 14pt; font-family: 'times new roman', times, serif;">int rbutton = 18;</span> |
You can use a pushbutton with pin 18 of the ESP32 module to reset the scale to 0 value and I also defined some variables.
|
1 2 3 4 5 6 7 8 9 |
<span style="font-size: 14pt; font-family: 'times new roman', times, serif;">String myString; String cmessage; // complete message char buff[10]; float weight; float calibration_factor = 206140;</span> |
The calibration factor which I was talking about is this value. You will need to change this value if your measured value differs from the actual measured value. For this you will need some known weights.
|
1 2 3 4 5 6 7 8 9 10 11 12 13 14 |
<span style="font-size: 14pt; font-family: 'times new roman', times, serif;">SimpleTimer timer; // for the OLED display #define SCREEN_WIDTH 128 // OLED display width, in pixels #define SCREEN_HEIGHT 64 // OLED display height, in pixels // Declaration for an SSD1306 display connected to I2C (SDA, SCL pins) #define OLED_RESET -1 // Reset pin # (or -1 if sharing Arduino reset pin) <span style="font-family: 'times new roman', times, serif;">Adafruit_SSD1306 display(SCREEN_WIDTH, SCREEN_HEIGHT, &Wire, OLED_RESET);</span> </span> |
All these other instructions are used with the Oled display module, which I have already explained in my previous tutorials based on the Oled display module.
|
1 |
<span style="font-size: 14pt; font-family: 'times new roman', times, serif;"> Serial.begin(9600);</span> |
Inside the setup() function, I activated the serial communication and you will need to add the following line of code to reduce the speed of the ESP32 module.
|
1 |
<span style="font-size: 14pt; font-family: 'times new roman', times, serif;">rtc_clk_cpu_freq_set(RTC_CPU_FREQ_80M);</span> |
you can try the following lines well
|
1 2 3 4 |
<span style="font-size: 14pt; font-family: 'times new roman', times, serif;">//rtc_clk_cpu_freq_set(RTC_CPU_FREQ_2M); // rtc_clk_cpu_freq_set(RTC_CPU_FREQ_80M); // rtc_clk_cpu_freq_set(RTC_CPU_FREQ_160M); // rtc_clk_cpu_freq_set(RTC_CPU_FREQ_240M);</span> |
You can select different frequencies.
|
1 |
<span style="font-size: 14pt; font-family: 'times new roman', times, serif;">timer.run(); // Initiates SimpleTimer</span> |
Inside the loop() function I activated the timer. This timer actually controls a function that prints data on the Oled display module.
The rest of the code is exactly the same as used in the Arduino-based weighing scale project.
getSendData() function is a user-defined function, it has no return type and does not take any arguments as the input. This is the function that is controlled by the timer and its purpose is to print the Weight value on the Oled display module.
|
1 2 3 4 5 6 7 8 9 10 11 12 13 14 15 16 17 18 19 20 21 22 23 24 25 26 27 28 29 30 31 |
<span style="font-size: 14pt; font-family: 'times new roman', times, serif;">void getSendData() { // Oled display display.clearDisplay(); display.setTextSize(3); display.setCursor(0,0); // column row display.print("Weight:"); display.setTextSize(4); display.setCursor(0,30); display.print(myString); display.display(); }</span> |
So, that’s all about the programming.
IoT Weighing Scale using ESP32 & HX711:
Now, we are going to convert this ESP32 Weighing Scale into an IoT-based Weighing Scale; for this, we don’t need to do anything on the hardware side. We will do some changes to the Code and of course, we will need an IoT platform, for this project I selected Blynk, but if you want you can also use Thingspeak, Ubidots, Arduino IoT Cloud, etc.
IoT Weighing Scale Blynk Application:
The Blynk application designing for the IoT weighing scale hardly takes 1 minute. We will only need to add the LCD widget and on the settings, we will need to select virtual pins V2 and V3. If you still find it hard to understand you can watch my 2nd video tutorial given at the end of this article. The first video is about the simple Weighing scale while the 2nd video is about the IoT based Weighing Scale. I highly recommend you should watch both the video tutorials.
IoT Weighing Scale Code, ESP32:
|
1 2 3 4 5 6 7 8 9 10 11 12 13 14 15 16 17 18 19 20 21 22 23 24 25 26 27 28 29 30 31 32 33 34 35 36 37 38 39 40 41 42 43 44 45 46 47 48 49 50 51 52 53 54 55 56 57 58 59 60 61 62 63 64 65 66 67 68 69 70 71 72 73 74 75 76 77 78 79 80 81 82 83 84 85 86 87 88 89 90 91 92 93 94 95 96 97 98 99 100 101 |
<span style="font-size: 14pt; font-family: 'times new roman', times, serif;">#define BLYNK_PRINT Serial #include <BlynkSimpleEsp32.h> #include "HX711.h" #include "soc/rtc.h" #include <stdlib.h> #include <Wire.h> #include <Adafruit_GFX.h> #include <Adafruit_SSD1306.h> #include <SimpleTimer.h> #define DOUT 23 #define CLK 19 HX711 scale(DOUT, CLK); int rbutton = 18; // this button will be used to reset the scale to 0. String myString; String cmessage; // complete message char buff[10]; float weight; float calibration_factor = 206140; // for me this vlaue works just perfect 206140 SimpleTimer timer; // for the OLED display #define SCREEN_WIDTH 128 // OLED display width, in pixels #define SCREEN_HEIGHT 64 // OLED display height, in pixels // Declaration for an SSD1306 display connected to I2C (SDA, SCL pins) #define OLED_RESET -1 // Reset pin # (or -1 if sharing Arduino reset pin) Adafruit_SSD1306 display(SCREEN_WIDTH, SCREEN_HEIGHT, &Wire, OLED_RESET); // You should get Auth Token in the Blynk App. char auth[] = "SQPCAqTecEFGUs5UO7_wnDLQPrtCqx-h"; // Your WiFi credentials. // Set password to "" for open networks. char ssid[] = "fawadkhan"; char pass[] = "computer12ec"; void setup() { Serial.begin(9600); Blynk.begin(auth, ssid, pass); rtc_clk_cpu_freq_set(RTC_CPU_FREQ_80M); pinMode(rbutton, INPUT_PULLUP); scale.set_scale(); scale.tare(); //Reset the scale to 0 long zero_factor = scale.read_average(); //Get a baseline reading display.begin(SSD1306_SWITCHCAPVCC, 0x3C); timer.setInterval(1500L, getSendData); display.clearDisplay(); display.setTextColor(WHITE); } void loop() { Blynk.run(); timer.run(); // Initiates SimpleTimer } void getSendData() { scale.set_scale(calibration_factor); //Adjust to this calibration factor weight = scale.get_units(5); //5 myString = dtostrf(weight, 3, 3, buff); cmessage = cmessage + "Weight" + ":" + myString + "Kg"+","; if ( digitalRead(rbutton) == LOW) { scale.set_scale(); scale.tare(); //Reset the scale to 0 } Blynk.virtualWrite(V2,"Weight:"); Blynk.virtualWrite(V3,myString); // Oled display display.clearDisplay(); display.setTextSize(3); display.setCursor(0,0); // column row display.print("Weight:"); display.setTextSize(4); display.setCursor(0,30); display.print(myString); display.display(); } </span> |
You can compare the above two codes and you will find the differences. I have already explained everything in the Videos given below. Anyways, I successfully tested my IoT based Weighing Scale using ESP32 WiFi + Bluetooth module.
Read my article on how to make a DIY commercial-level Weighing Scale using Arduino. I compared my created Diy weighing scale with the commercial scale and was amazed by the final results. Diy Scale Vs. Comercial Scale.
Watch Video Tutorial1:

Watch Video Tutorial2:

Discover more from Electronic Clinic
Subscribe to get the latest posts sent to your email.


