Qt Creator: Signal Widgets and Slot Widgets with Example programs
Table of Contents
Creating own Slots Widgets in Qt Creator C++:
Often you will want to add your own slots to your widgets. Take a look at the following example code.
QObject :: connect (button, SIGNAL (clicked ()),
label, SLOT (setText (“new text”)));
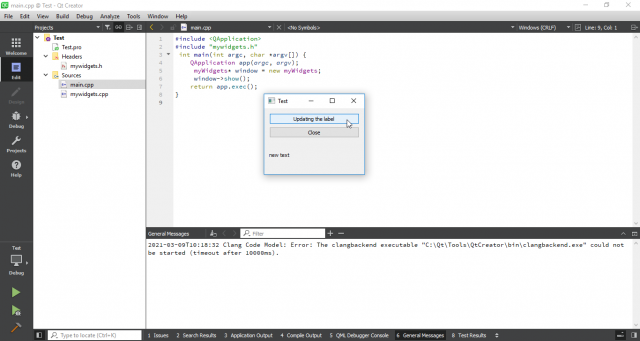
Here we have tried a signal-slot link. The aim of these two lines of code is when the button is pressed (e.g QPushButton) the text of the label (QLabel) is changed. The button uses the clicked() signal and the label uses the slot setText(). clicked() does not give any arguments to the slot setText(). To implement the following example, let’s direct our new class MyWidgets from QWidget.
Amazon Purchase Links:
*Please Note: These are affiliate links. I may make a commission if you buy the components through these links. I would appreciate your support in this way!
|
1 2 3 4 5 6 7 8 9 10 11 12 13 14 15 16 17 18 19 20 21 22 23 24 |
#ifndef MYWIDGETS_H #define MYWIDGETS_H #include <QWidget> #include <QVBoxLayout> #include <QPushButton> #include <QLabel> #include <QObject> #include <QApplication> class myWidgets : public QWidget { Q_OBJECT public: myWidgets(QWidget *parent=0); private: QLabel *label; QPushButton *button0; QPushButton *button1; QVBoxLayout* layout; private slots: void setText(); }; #endif // MYWIDGETS_H |
Compared to the example as explained in my previous article, in which we used our own signals and slots, You won’t find anything new here either, except that we’re now out of the class QWidget (line 9) – instead of QObject – and here only one slot (line 18 and 19) is used. The definition of the constructor and the slot event function can be found in the following mywidgets.cpp source file:
|
1 2 3 4 5 6 7 8 9 10 11 12 13 14 15 16 17 18 19 20 21 |
#include "mywidgets.h" #include <QApplication> myWidgets::myWidgets(QWidget *parent): QWidget(parent) { label = new QLabel("old text"); button0 = new QPushButton ("Updating the label"); button1 = new QPushButton ("Close"); layout = new QVBoxLayout(this); layout->addWidget(button0); layout->addWidget(button1); layout->addWidget(label); setLayout(layout); connect( button0, SIGNAL( clicked() ), this, SLOT( setText() ) ); connect( button1, SIGNAL( clicked() ), qApp, SLOT( quit() ) ); } void myWidgets::setText() { label->setText("new text"); } |
First, as usual, the individual widgets such as buttons (QPushButton) and label (QLabel) are added to the vertical box (QVBoxLayout). Then (lines 11 and 12) the signal-slot links are set up. Particular attention should be paid to the slot in line 11. This is no longer the one provided by QLabel Slot setText(), but our self-defined slot without arguments, You can find the implementation in lines 14 to 16. If you now click on the button with the label »old text« in the example, it will Signal clicked() triggered. However, this signal is not connected to the label, but with the window or QWidget. Therefore you will find here too the pointer. Only with the slot event function MyWidgets :: setText() the text label is changed.
Now create the main.cpp file and paste the below code:
|
1 2 3 4 5 6 7 8 |
#include <QApplication> #include "mywidgets.h" int main(int argc, char *argv[]) { QApplication app(argc, argv); myWidgets* window = new myWidgets; window->show(); return app.exec(); } |
output:
Creating own Signal Widgets:
Of course, I want to demonstrate something similar to you with a signal. Therefore we want to add the signal clicked(int) to the QPushButton class. Originally, this class only had the clicked() signal without an argument. We want to add a new clicked(int) with the argument, which when a button is pressed, a signal with an identification number(ID) of the button is send.
First of all, the MyClass.h class, which we derive from the QPushButton class:
|
1 2 3 4 5 6 7 8 9 10 11 12 13 14 15 16 17 18 19 20 21 22 23 24 25 26 27 28 29 |
#ifndef MYCLASS_H #define MYCLASS_H #include <QString> #include <QWidget> #include <QPushButton> // A class that has signals and slots. class MyClass: public QPushButton { Q_OBJECT public: MyClass( const QString& text, int id, QWidget* parent = NULL ); MyClass( const QString& text, QWidget* parent = NULL ); private: static int nextId; int m_id; public slots: // overwrite click () void click(); signals: // add a new signal void clicked(int id); }; #endif // MYCLASS_H |
In addition to a new signal that is defined herein lines 17 to 19, we overwrite the slot click() defined in the QAbstractButton class. The click() slot literally performs a click. Of course, you need still no definition of the signal, as this, as already described, is the Meta-Object Compiler takes over for us. To better understand the process, you need the implementation of the MyClass.cpp class:
|
1 2 3 4 5 6 7 8 9 10 11 12 13 |
#include "myclass.h" int MyClass::nextId = 0; MyClass::MyClass( const QString& text, int id, QWidget* parent ) : QPushButton(text, parent), m_id(id) { connect(this, SIGNAL(clicked()), this, SLOT(click())); } MyClass::MyClass(const QString& text, QWidget* parent ) : QPushButton(text, parent), m_id(nextId++) { connect(this, SIGNAL(clicked()), this, SLOT(click())); } void MyClass::click() { emit clicked(m_id); } |
The two connect() in the constructors are also noticeable (line 04 and 07). With this we connect the old (or call it the real one) clicked() – Signal with its own home-made slot click() of the MyClass.cpp class. The decisive factor here is that the slot element function really is by MyClass.cpp (lines 9 to 11) is executed. Would be the super method Using QPushButton :: click() would result in an infinite recursion, because QPushButton :: click() triggers the clicked() signal again. As soon as the slot MyClass :: click() was triggered, you can send the new signal with the identification number Send (ID) (line 10). To make a stylish Qt program out of this example, let’s do this Another class MyWindow (derived from QWidget) with our own buttons (MyButton) and a slot that deals with the output on the Screen cares. Here is the header file of our class mywindow.h:
|
1 2 3 4 5 6 7 8 9 10 11 12 13 14 15 16 |
#ifndef MYWINDOW_H #define MYWINDOW_H #include <QWidget> #include<QObject> #include "myclass.h" class MyWindow : public QWidget { Q_OBJECT public: MyWindow(QWidget* parent = NULL); private: MyClass* myButton[3]; public slots: // slot for the output void myMessageBox(int id); }; #endif |
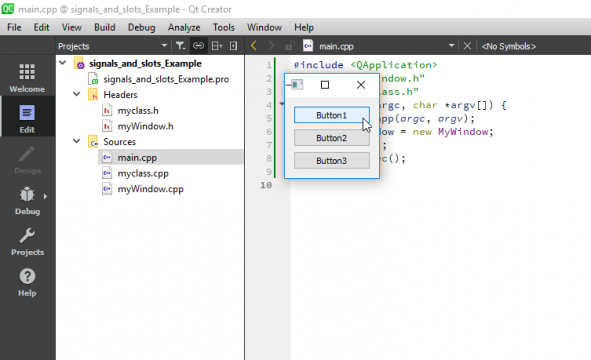
You can find our button in line 10 MyButton with its own implemented Signal, again in lines 11 to 13 we declare a separate slot for the class MyWindow. The slot member function is basically a simple one Message box (QMessageBox), which contains the identification number of the signal clicked(int) of our buttons. To do this, the implementation of the MyWindow.cpp class:
|
1 2 3 4 5 6 7 8 9 10 11 12 13 14 15 16 17 18 19 20 21 22 23 24 25 |
#include "myWindow.h" #include "myclass.h" #include <QtCore> #include <QtGui> #include<QWidget> #include <QVBoxLayout> #include<QMessageBox> MyWindow::MyWindow(QWidget* parent) : QWidget(parent) { myButton[0] = new MyClass(tr("Button1")); myButton[1] = new MyClass(tr("Button2")); myButton[2] = new MyClass(tr("Button3")); QVBoxLayout* layout = new QVBoxLayout(this); for (int i = 0; i < 3; ++i) { layout->addWidget(myButton[i]); connect( myButton[i], SIGNAL( clicked(int) ), this, SLOT( myMessageBox(int) ) ); } } void MyWindow::myMessageBox(int id) { QMessageBox::information( this, tr("A button was pressed"), QString(tr("Button ID: %1")).arg(id), QMessageBox::Ok ); } |
In line 12, our new clicked(int) signal is sent to the output slot myMessageBox connected. So as soon as our new signal arrives, a Message box with the ID of the button is displayed.
Finally, our main.cpp class code:
|
1 2 3 4 5 6 7 8 9 |
#include <QApplication> #include "myWindow.h" #include "myclass.h" int main(int argc, char *argv[]) { QApplication app(argc, argv); MyWindow* window = new MyWindow; window->show(); return app.exec(); } |
Output:


That is really attention-grabbing, You are a very
skilled blogger. I have joined your feed and look ahead to seeking more of your magnificent post.
Also, I’ve shared your site in my social networks