Arduino ISD1820 Voice Recorder & Playback Module
Last Updated on August 18, 2024 by Engr. Shahzada Fahad
Table of Contents
Description
Arduino ISD1820 Voice Recorder & Playback Module- In this tutorial, you will learn how to interface the ISD1820 Voice Recorder and Playback Module with Arduino and play different recorded messages using different Sensors. In this tutorial, we will cover both the manual and automatic control of the ISD1820 Module.
There are situations when you need to play a specific recorded voice message depending on the situation. Like for example, in case if someone ends up in a car accident when a sensor detects a strong hit a pre-recorded voice message is played endlessly.
The ISD1820 Voice Recorder and Playback Module can also be used in Security based projects. When an intruder is detected a voice message is played endlessly.
The ISD1820 module can be used in offices where you need to play different voice messages, for example when someone opens the door; a welcome message is played only one time.
If it’s a break time you can record a new message, now this time if someone opens the door the break time voice message will be played. You can record different messages depending on the situation.
Without any further delay let’s get started!!!
Amazon Purchase Links:
Arduino Nano USB-C Type (Recommended)
ISD1820 Voice Recording Playback Module:
*Disclosure: These are affiliate links. As an Amazon Associate I earn from qualifying purchases.
About the ISD1820 Voice Recorder and Playback Module:
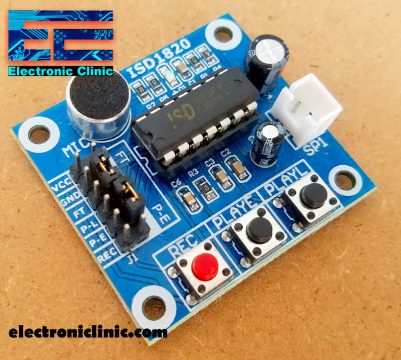
This is the ISD1820 Voice Recorder and Playback Module. This voice recorder module comes with a non-volatile storage and playback capability for 8 to 20 seconds. The recording time can be changed which I will discuss in a minute.
As you can see this voice recorder module is provided with push buttons which means you can directly or manually control this module. This voice recorder module is also provided with male headers due to which it can be interfaced with different types of controller modules such as Arduino, STM32, 8051 family of controllers, PIC microcontrollers and so on. This module is also provided with an On-chip audio amplifier that can drive a .5W 8-ohm speaker directly without the need for any external amplifier circuit.
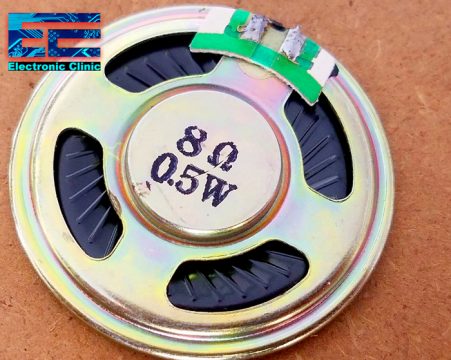
This speaker is good for testing purposes but if you are planning to use this module in a real project then you will need to connect the output of this module to an external amplifier IC like for example LM386.
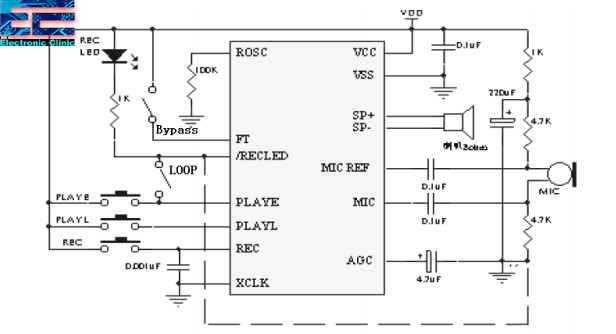
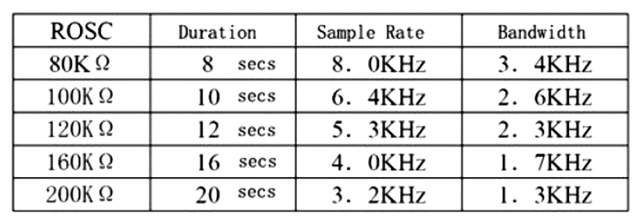
If you want to change the record duration, an external resistor is necessary to select the record duration and sampling frequency, which can range from 8 to 20 seconds. Currently, the record duration of this module is 10 seconds as this module by default comes with a 100k resistor ROSC. As per the datasheet, you can select any of these resistors to select a record duration of your choice.
By following this typical schematic you can also make this module by yourself.
ISD1820 Datasheet: isd1820 datasheet
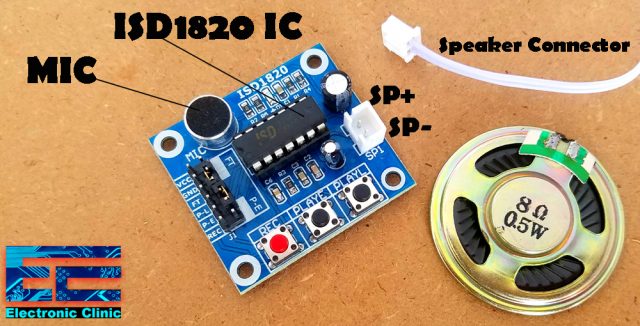
This is the ISD1820 IC, a Microphone, this is where we connect the positive and ground wires of the speaker.
As you can see the three push buttons and male headers are clearly labeled as REC, PLAYE, PLAYL, VCC, GND, FT, P-L, P-E, and REC.
ISD1820 manual control:
First, let’s check how this module can be manually controlled. Connect 5 volts and ground from the Arduino or a power supply with the VCC and ground pins. Now press the record button and start talking. To play the entire voice message press PLAYE. You need to push and hold the PLAYL button and the message starts playing and if you want to stop the playback at any time, simply release the button.
During the testing, it was hard to hear anything. The .5w 8-ohm speaker is not going to work in real projects, so, before I am going to explain how this module can be automatically controlled using Arduino and sensors, first I replaced the .5w 8-ohm speaker with the external speakers powered up using a 12 volts power supply.
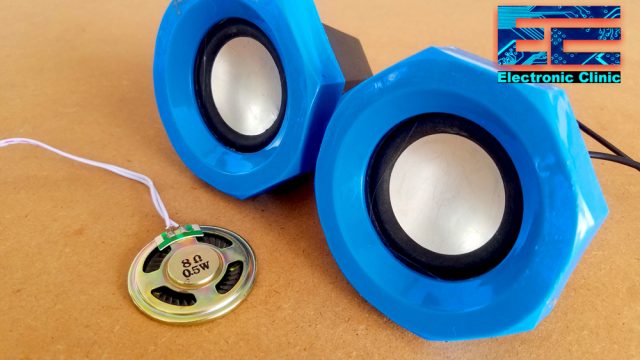
I played the same message again, and this time it was pretty cool. You can even use very high power speakers, so far you are able to provide the desired power needed for the speakers.
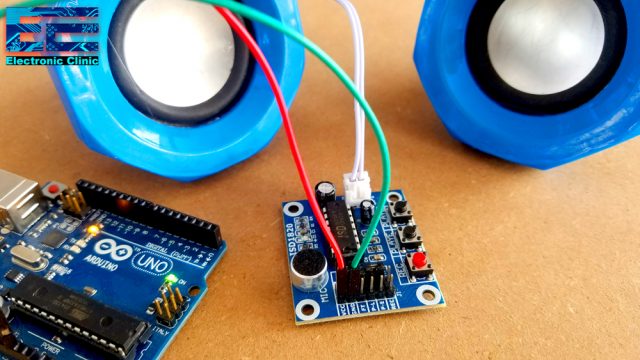
While using the ISD1820 manually, you don’t need the Arduino or any other controller board. All you need is the 5 volts power supply. In the picture above, I am only using the Arduino to power up the ISD1820 Voice Recorder and Playback Module.
Playing voice message endlessly using Arduino:
Using the male headers the ISD1820 can be easily interfaced with the Arduino. The circuit diagram and programming is explained below, or you can also watch a video available at the end of this article.
ISD1820 interfacing with Arduino Circuit Diagram:
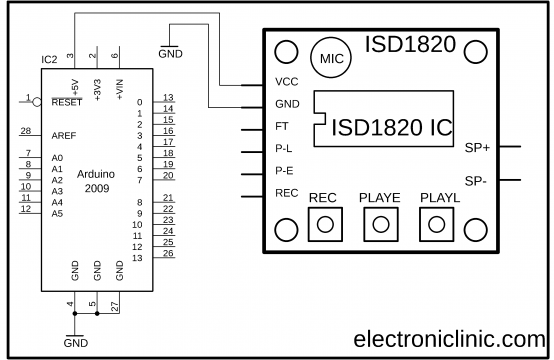
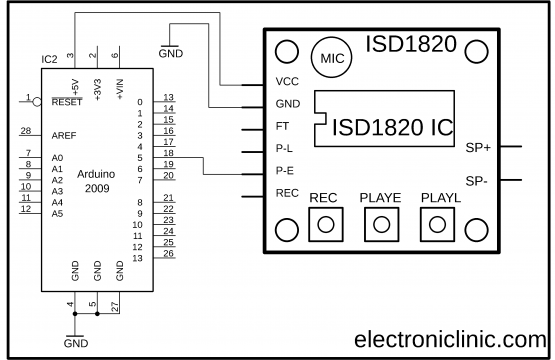
The circuit diagram is very simple. The VCC and GND pins of the ISD1820 Voice recorder and Playback module are connected with the Arduino’s 5 volts and GND. While the P-E pin is connected with the Arduino’s pin number 5. Now let’s write a simple Arduino program to play a recorded voice message again and again.
Arduino ISD1820 Programming:
|
1 2 3 4 5 6 7 8 9 10 11 12 13 14 15 16 17 18 19 20 |
// Arduino ISD1820 Voice Recorder & Playback Module // www.electroniclinic.com int P_E = 5; void setup() { pinMode(P_E, INPUT_PULLUP); delay(5000); } void loop() { digitalWrite(P_E, HIGH); delay(100); digitalWrite(P_E, LOW); delay(1000); } |
Arduino ISD1820 program explanation:
For the ISD1820 Voice recorder module, you don’t need any library. As you can see the P_E pin of the voice recorder module is connected with the Arduino’s pin number 5. The pin is set as the input using the pinMode() function. Now to play a voice message endlessly you need to change the pin status.
Now let’s make this a little bit complex by making a hit detection system for a car. So, when a hit is detected a voice message will be played endlessly.
Car Accident Detection System:
If some end up in a car accident, along with text message to the parents/guardians a voice message can be played to inform the people far away from the accident location. I have a detailed tutorial in which a message is sent to the parents along with the GPS location. In the following project, I am not using the gsm module. But you can add this project with my previous project based on the Car accident location tracking.
Arduino Car Accident detection circuit diagram:
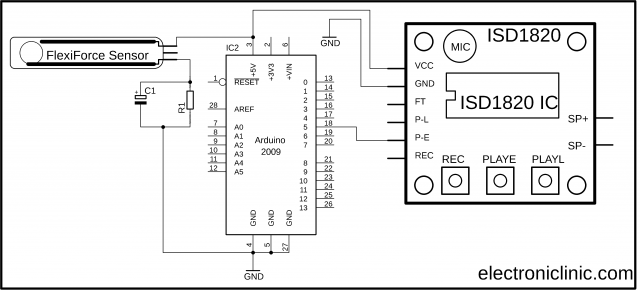
This time I added the FlexiForce sensor which is also known as the force sensitive resistor. One leg of the FlexiForce sensor is connected with the Arduino’s 5 volts while the other leg of the FlexiForce sensor is connected with a 10k resistor. A wire from the middle of the FlexiForce sensor and a 10k resistor is connected with the Arduino’s analog pin A0. A 47uf electrolyte capacitor is connected in parallel with the 10k resistor. If you want to learn in detail about the FlexiForce sensor then watch my tutorial on the FlexiForce sensor.
voice message Arduino programming:
|
1 2 3 4 5 6 7 8 9 10 11 12 13 14 15 16 17 18 19 20 21 22 23 24 25 26 27 28 29 30 31 32 33 34 35 36 37 38 39 40 41 |
//Arduino ISD1820 Voice Recorder int P_E = 5; float cf = 190.5; // 19.5 calibration factor int ffs1 = A0; // FlexiForce sensor is connected analog pin A0 of Arduino or mega. int ffsdata = 0; float vout; void setup() { Serial.begin(9600); pinMode(ffs1, INPUT); pinMode(P_E, INPUT_PULLUP); } void loop() { ffsdata = analogRead(ffs1); vout = (ffsdata * 5.0) / 1023.0; vout = vout * cf ; Serial.print("Flexi Force sensor: "); Serial.print(vout); Serial.println(""); delay(100); if ( vout >= 3 ) { while(1) { digitalWrite(P_E, HIGH); delay(100); digitalWrite(P_E, LOW); delay(1000); } } } |
I am using the same Arduino pin number 5. Rest of the programming I have already explained in the FlexiForce getting started tutorial, in the code I did a little modification, I added the if condition which means if the force value is greater than or equal to 3 then enter into an infinite while loop which plays the voice message again and again.
For the practical demonstration, watch video give at the end of this article.
Laser Security system using Arduino:
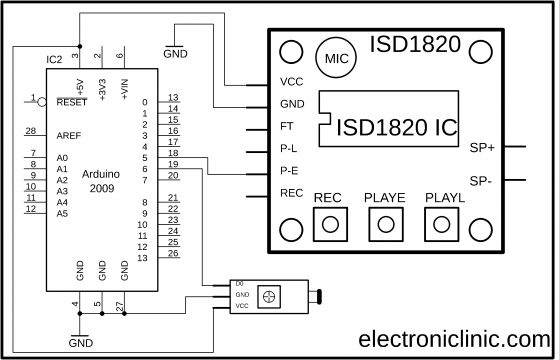
This time an LDR module is connected with the Arduino. The LDR module VCC and GND pins are connected with the Arduino’s 5 volts and ground. while the D0 pin of the LDR module is connected with the Arduino’s pin number 6. Using this variable resistor the sensitivity of the LDR module can be adjusted. A laser module will be placed in front of this module. So, anyone crossing the laser will block the light falling on the LDR. Which signals the microcontroller to play the voice message. Now let’s have a look at the Arduino programming.
Arduino ISD1820 security system Programming:
|
1 2 3 4 5 6 7 8 9 10 11 12 13 14 15 16 17 18 19 20 21 22 23 24 25 26 |
// Arduino ISD1820 Voice Recorder & Playback Module // www.electroniclinic.com int P_E = 5; int ldr = 6; void setup() { pinMode(P_E, INPUT_PULLUP); pinMode(ldr, INPUT_PULLUP); delay(5000); } void loop() { if( digitalRead(ldr) == HIGH) { while(1) { digitalWrite(P_E, HIGH); delay(100); digitalWrite(P_E, LOW); delay(1000); } } } |
As you can see the LDR module D0 pin is connected with the Arduino’s pin number 6. Using the if condition we check if the light falling on the LDR is blocked. So, if someone has blocked the light then the controls enter into an infinite while loop and play the voice message endlessly.
For the practical demonstration watch video available at the end.
Door Opening Voice Message system:
This is an amazing project and can be used in offices, Doctor’s clinics, shops, malls, etc where multiple voice messages are played as per the requirement. When someone enters the office or shop, a welcome message can be played, or if it’s the break time and someone enters into the shop a break time message can be played. The working is explained in the video.
ISD1820 and Reed Sensor with Arduino:
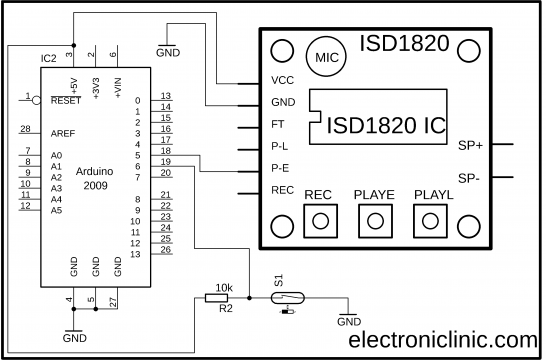
This time a Reed switch/sensor is connected in series with a 10k resistor. This is a Pull-Up resistor. When the door is closed GND is connected with the Arduino’s pin number 6. When the door is opened 5 volts are connected with the Arduino’s pin number 6. Now, let’s have a look at the Arduino Programming.
ISD1820 Voice Message Arduino Programming:
|
1 2 3 4 5 6 7 8 9 10 11 12 13 14 15 16 17 18 19 20 21 22 23 24 25 26 27 28 29 |
// Arduino ISD1820 Voice Recorder & Playback Module // www.electroniclinic.com int P_E = 5; int reed_sensor = 6; void setup() { pinMode(P_E, INPUT_PULLUP); pinMode(reed_sensor, INPUT_PULLUP); delay(5000); } void loop() { if( digitalRead(reed_sensor) == LOW) { digitalWrite(P_E, LOW); delay(1000); } if( digitalRead(reed_sensor) == HIGH) { digitalWrite(P_E, HIGH); delay(1000); } } |
This is the same program, this time I only changed the pin name from the LDR to reed_sensor, and I deleted the infinite while loop. I am using two if the conditions to check if the door is closed or the door is opened. This way the voice message is played only one time when the door is opened. To play the same message again, first, the door should be closed and then open again.
This project can be used in offices, where multiple messages can be played depending on the situation. The controller programming remains the same. Different voice messages can be recorded. Each time the door is opened a message will be played only one time. This is practically demonstrated in the video given below.
About the Sponsor DigitSpace:
The ISD1820 voice recorder and playback module used in this tutorial is sponsored by the DigitSpace. DigitSpace is an open-source hardware provider. They supply innovative, user-friendly open-source hardware products at extremely low prices.
Watch Video Tutorial:
Discover more from Electronic Clinic
Subscribe to get the latest posts sent to your email.


Hi Shahzada, can you help me please. I wish use 4 of these controlled by 1 Arduino uno, so I can have 4 separate messages playing back in a controlled sequence. Would that be possible? Thanks in advance, Murray
yes it is possible, but I think you should use MP3 player like DFPlayer mini mp3. You can save multiple mp3 files. And you will be able to play any sound file of any duration. You can read my article on DFPlayer. I have also used it in Sports bike for playing different sounds.
check this out
https://www.electroniclinic.com/dfplayer-mini-mp3-and-arduino-based-rfid-bike-access-system/
Thanks so much for your quick reply. Firstly, I think your MP3 lock/message with RFID is great!
However, I’m a complete beginner, and have managed (with 10 yo grandaughters’ help) to follow your excellent instructions and assemble and code a MEGA2560 r3 and ISD1820 successfully. I only need “PLAY_E” function from the ISD.
I need about 8 diferent functions from the mega, such as – seat sensor turns power on – short voice, then start button – then voice/noise then – noise etc… I may only need guidance to connect the ISD’s, and I will learn more and try and connect relays/sensors myself. The voluntary project is a children’s playpark with a carrot rocket and the cockpit needs action/sound. I hope it’s OK using your code for this.
Thanks again for your help!
can 2 or more isd1820 ics be connected in parallel on their outputs via resistors into a power amplifier, and then recorded individually, and of course played individually, and also be paralleled into their audio inputs from a common audio source
Quienes me vendieron el módulo mencionaron una determinada cantidad de grabaciones…
algo asi como un especifico uso limitado… ¿ es asi realmente ?
muchas gracias y espero una respuesta