Arduino OTA Over The Air Programming using Bluetooth
Table of Contents
Arduino OTA, Uploading code to Arduino through Bluetooth:
Arduino OTA Over The Air Programming using Bluetooth– The easiest method that you are quite familiar with, is uploading the code using a USB Cable. It has limitations; you will need to connect the Arduino with the laptop or computer to upload the code. OTA programming can be quite handy and can save you much time in situations when your Arduino is installed in locations where you have no access. Like for example inside the Car Dashboard, inside the machine cabinet etc, and you need to make some changes to update the code. Opening the Car Dashboard or the machine cabinet may take a lot of time. In situations like these Arduino OTA programming can be a blessing. So, In this tutorial, we will learn something interesting; we will upload code to Arduino through Bluetooth module. We are not using cable connected to the laptop and Arduino; to upload the code instead of using cable we are using HC05 module to upload code to the Arduino. In order to perform this task we will undergo the following steps:
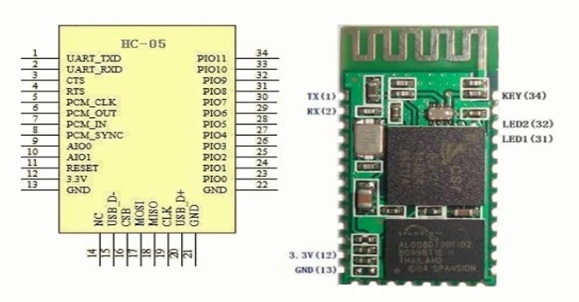
Configuring the HC-05 Bluetooth Module:
Uploading the code to microcontroller without cable is generally done in the case of small microcontrollers which does not have a UART connection or in case of microcontrollers which are fixed on a PCB. The wireless uploading of a code is known as OTA (Over the air) upload.
When the code is sent to Arduino over Bluetooth (HC-05) it should reprogram the Arduino boot loader. The baud rate at which the Arduino boot loader gets programmed is different for different boards. Some of the boards and their respective baud rates are listed for your quick reference.
| Arduino board | Baud Rate |
| Arduino pro or Pro mini (5 V, 16 MHz) w/ atmega328P | 57600 |
| Arduino pro or Pro mini (3.3 V, 8 MHz) w/ atmega328P | 57600 |
| Arduino pro or Pro mini (5 V, 16 MHz) w/ atmega168 | 19200 |
| Arduino pro or Pro mini (3.3 V, 8 MHz) w/ atmega168 | 19200 |
| Arduino Yun | 57600 |
| Arduino / Genuino Uno | 115200 |
| Arduino Duemilanover or Diecimila w/ Atmega328p | 57600 |
| Arduino Duemilanover or Diecimila w/ Atmega168 | 19200 |
| Arduino Nano w/ Atmega328p | 57600 |
| Arduino Nano w/ Atmega168 | 19200 |
| Arduino / Genuino mega w/ Atmega 2560 | 115200 |
| Arduno mega w/ Atmega 1280 | 57600 |
You see that the baud rate at which Arduino Uno boot loader works is at 115200. So for reprogramming the Arduino Uno boot loader we need to set the baud rate of HC-05 at 115200 baud rate. Now we will configure the HC-05, this is very simple. We will take the HC-05 into AT commands mode and type the following commands for programming Arduino Uno through Bluetooth.
|
1 2 3 4 5 |
AT+Name= Electronic clinic AT+UART = 115200, 0, 0 AT + POLAR = 1,0 |
AT+NAME command is optional which is used to set the name of Bluetooth module. AT+UART set the baud rate of HC-05. AT+POLAR is used to control the PIO8 and PIO9 pins on HC-05. The above three commands will be used effectively in the AT mode.
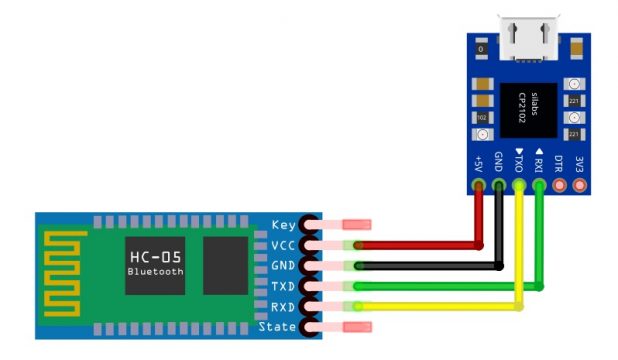
In order to configure Bluetooth module we will use TTL dongle to be interface with the Bluetooth module such that the RX of HC-05 should be connect with the TX of the TTL and TX of the HC-05 should be connected with the RX of the TTL.
The 5V of the TTL should be connected with VCC of the HC-05 and ground of the TTL should be connected with the ground of the HC-05. Now to bring the system in AT mode we will connect the TTL with the laptop or computer. Now in order to set the module in AT mode we will use the software called “Tera term” which is free available software we can download this software from
https://filehippo.com/download_tera_term/post_download/
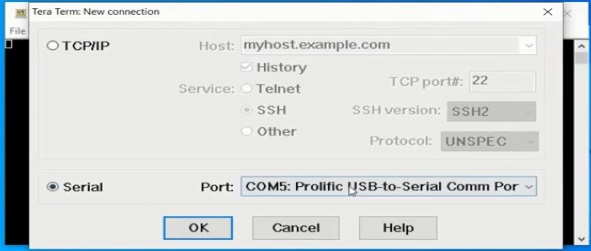
Now open the tera term software after opening the software select the serial and make sure that the com port is properly selected and click on the OK.
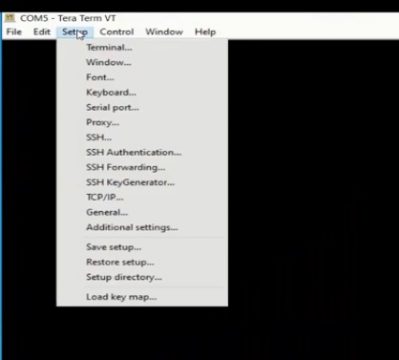
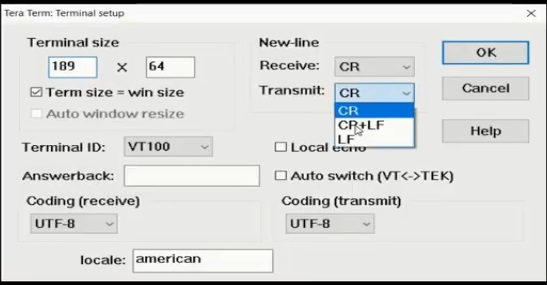
Now go to setup and select the Terminal
After selecting the terminal a dialog box will appear in which change the transmit CR to CR+LF and enabled the Local echo.
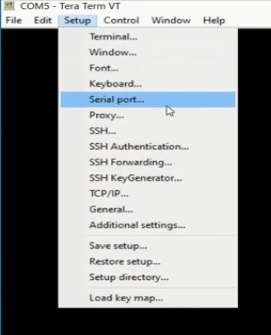
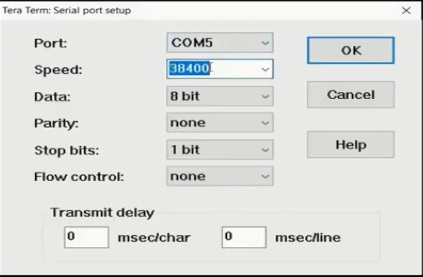
Now again go to setup and click on the serial port
After selecting the serial port a dialog box will appear in which we will make several changes we will change the speed to 38400 and click on OK.
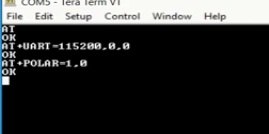
Now black window will appear in which we will write the AT commands:
First we will write AT and press enter, OK will appear on the screen. Now in order to set the baud rate as we are using Arduino Uno whose baud rate is 115200, so we will write the command:
AT+UART = 115200, 0, 0
Now press enter, Ok will appear on the screen
Now I will write the AT+Polar command and press enter:
AT+POLAR = 1,0
Interfacing the Arduino with HC-05 Bluetooth module:
Now as the Bluetooth module is configured we will connect the HC-05 with the Arduino.
Interfacing the HC-05 with Arduino:
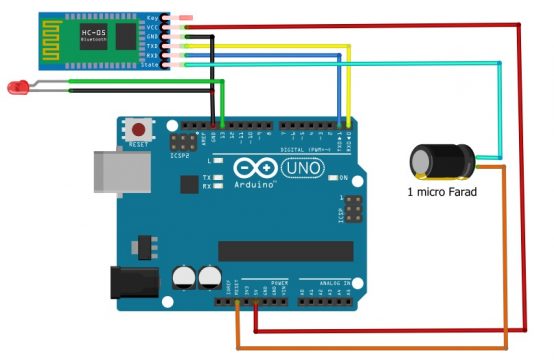
Following steps will be required for the connection of Arduino with HC-05:
- Connect the Arduino to remote power source not to the PC or laptop
- Connect the 5V of the Arduino with the VCC of the HC-05
- Connect the ground pin of the Arduino the ground of the HC-05 Bluetooth module
- Connect the TXD pin of the HC-05 with the RX pin of the Arduino
- Connect the RX of the HC-05 with the TX of the Arduino
- Connect the 10 micro farad capacitor such that positive leg of the capacitor will be connected with the state pin of the Bluetooth module and negative leg of the capacitor will be connected with the reset pin of the Arduino.
- Connect the positive terminal of the led with the pin number 13 of the Arduino and negative terminal with the ground
- Now the circuit is completed
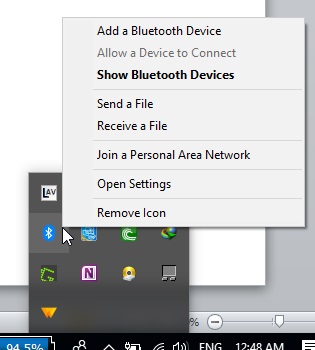
Before we are going upload the code to the Arduino we will first connect the Bluetooth module with the laptop through Bluetooth. Click on the Bluetooth icon and then click on show Bluetooth devices.
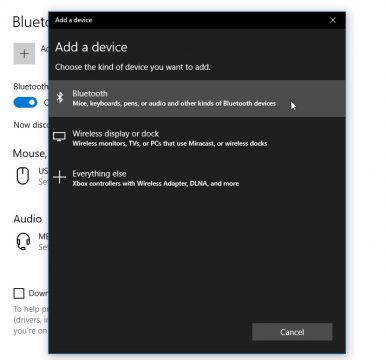
Then click on the add Bluetooth device
After that click on the Bluetooth
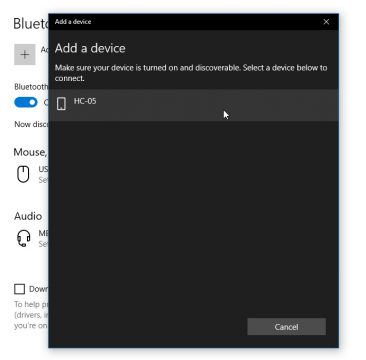
Now click on the HC-05, Bluetooth module will be paired with the laptop
When the Bluetooth module is paired with laptop after that we will upload the code.
Uploading code to the Arduino:
The Arduino is powered with the external power bank and we will upload the code through HC-05 module and this can be used where ever we have complexity.
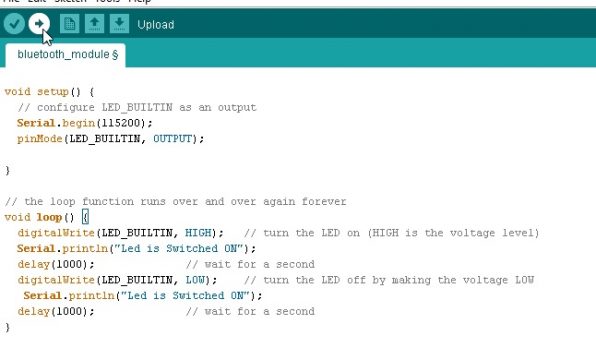
Code:
|
1 2 3 4 5 6 7 8 9 10 11 12 13 14 15 |
void setup() { // configure LED_BUILTIN as an output Serial.begin(115200); pinMode(LED_BUILTIN, OUTPUT); } // the loop function runs over and over again forever void loop() { digitalWrite(LED_BUILTIN, HIGH); // turn the LED on (HIGH is the voltage level) Serial.println("Led is Switched ON"); delay(1000); // wait for a second digitalWrite(LED_BUILTIN, LOW); // turn the LED off by making the voltage LOW Serial.println("Led is Switched ON"); delay(1000); // wait for a second } |
In the above code we are blinking led by uploading the code through the Bluetooth module.
When the code is uploaded to the Arduino Uno the led will start blinking which will shows us that the code is uploaded and working properly.
Arduino OTA programming is simple and takes a few minutes to set up everything. This can be very useful and it will also keep the laptop away from any damage. I remember when my Arduino had a short circuit and it damaged my laptop USB port. Using the OTA will keep your laptop from such risks.



Great tutorial. Please clarify, is it a 10 uF or 1uF cap that is used (see step 6). Is the LED between on pin13 necessary ?
Thanks for this clear tutorial. My configuration was an Arduino Nano with Atmega328p and the baud rate for programming is 115200, not 57600. The board.txt file in the Arduino install directory gives the speed to use for any configuration.
Also to make the programming work, I had to put a resistor in parallel to the 1 uF capa, otherwise the reset pull down was too weak. In my case, I used a 4.7 kOhm resistor which did the trick. It could be fine to update the schematic with such info.
thankyou very much for this information,I have been stucked in this problem, i used to unplug the reset pin but after your everything is working well, deeply than u…
Can you share schematic please. Thanks.