Arduino WS2812B LED Strip connection and Code
Table of Contents
Arduino WS2812B LED Strip:
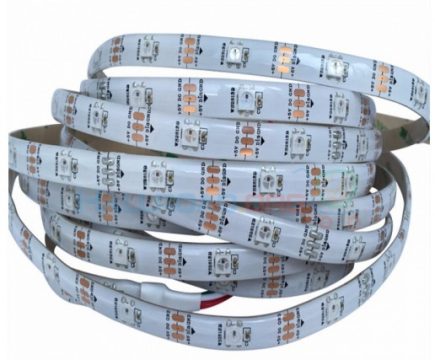
Arduino WS2812B LED Strip connection and Code- in this tutorial, we are going to be looking at the WS2812B Addressable LED Strip, we will go through all the specs, and I will also explain how to use it with the Arduino. DC 5V WS2812B 5 Meter, 60 Addressable LED Strip is the coolest type of LED strips. With the WS2812B Addressable LED Strip, you can control the brightness and the color of each LED individually, which allows you to produce amazing and complex effects in a simple way. This Addressable LED Strip is made by WS2812B LEDs wired in series. These Addressable LED Strips have an IC built right into the LED. This allows communication via a one-wire interface. This means that you can control lots of LEDs using just one digital pin of your Arduino. This kind of strips are very flexible and can be cut to any length you want. As you can see, the strip is divided into segments, and each segment contains one RGB LED.
Features & Specifications of DC5V WS2812B 5 Meter 60 Addressable LED Strip:
- Input voltage: DC 5V
- LED resource: WS2812B LED (SMD 5050 RGB LED with the built-in improved version of WS2811 IC)
- Power: 60LEDS/M—-18watt/M
- FPCB Width: 60LEDS/M—-10mm
- Ingress Protection: IP30 Non-waterproof
- IP65: Waterproof in Silicon Coating
- Colours: Full-color RGB, dream colour changing
- Length: The length of the Addressable LED Strip can be customized.
- Type of IC: Built-in WS2812 / WS2812B
- LED Type: SMD 5050
- PCB Color: White
- DC5V, 0.3watt/LED(Max)
- 60PCS of 5050 inbuilt IC, each LED separately control
- IP65 waterproof 60LED 5Meter
How do we go about controlling individually addressable LEDs using an Arduino uno or Arduino Nano. LEDs can add some pizzazz to your projects, to your home, and if you are not a complete loser to your gaming computer.
Amazon Links:
Arduino Nano USB-C Type (Recommended)
Other Tools and Components:
ESP32 WiFi + Bluetooth Module (Recommended)
Super Starter kit for Beginners
PCB small portable drill machines
*Please Note: These are affiliate links. I may make a commission if you buy the components through these links. I would appreciate your support in this way!
WS2812B LED Strip Connection with Arduino:
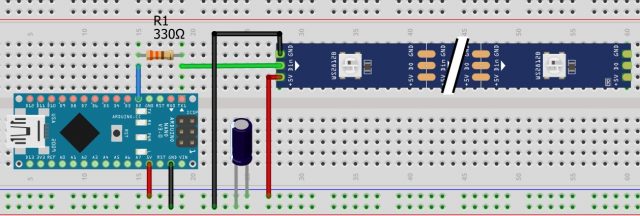
Now to build the circuit we plug in the power rails on the breadboard from the Arduino ground and 5 volt and then we plug the capacitor with a positive end on the 5 volt supply through the power rails and the negative end with the ground. We take digital pin number 2 of the Arduino and set it up through a 330 ohm resistor and then we take the jumper wires from the resistor and connect it to the middle of the led strip which is Din. Now connect the 5V from the bread board to the 5V of the led strip and connect the ground wire from the bread board to the ground of the led strip. You can follow the same exact connections if you plan to use Arduino Uno.
So now that we have the circuit completed let’s jump into the code.
Arduino WS2812B LED Strip Code:
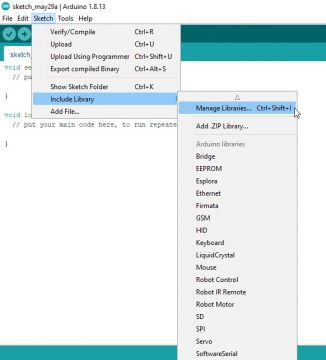
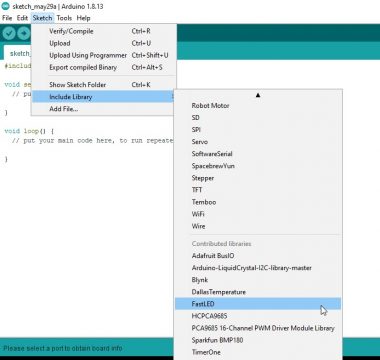
First thing you want to do is to download the FastLED library, open your library manager in the Arduino IDE.
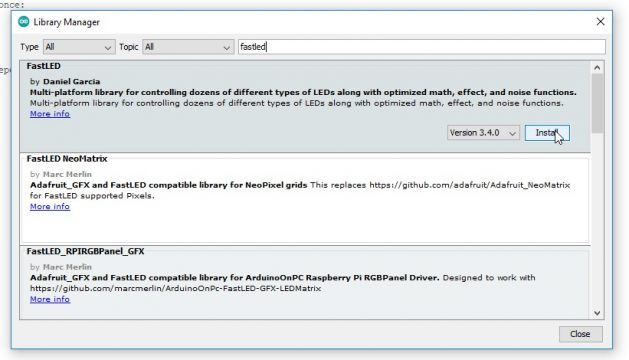
Now type in FastLED and then click install
Once we get the library installed you want to include the FastLED header
Then we want to define the LED data pin which for me it was pin 2 but you can use any pin you would like as long as you set up the circuit that way then we want to define the number of LEDs we use my LED strip came with 60 but in this tutorial we are only going to be using 12 of them.
|
1 2 3 |
#include <FastLED.h> #define LED_PIN 2 #define NUM_LEDS 12 |
Now let’s create an array of type CRGB and the length of that array will be the number of LEDs you have
|
1 |
CRGB leds[NUM_LEDS]; |
Now let’s go to the setup function and set up the LEDs we want to use the FastLED add LEDs method and inside angular brackets we use the type of LEDs. In our case we have ws2812 these are control on the LED pin using the RGB calibration then in parentheses we say that those LEDs will use the array we declared earlier and that there are 12 LEDs present which is NUM LEDs.
|
1 |
FastLED.addLeds<WS2812, LED_PIN, RGB>(leds, NUM_LEDS); |
Next we want to set up a power fail safe by limiting the max power in volts and milliamps to 5 volt and 500 milliamps this just makes sure that the Arduino is not drawing too much current.
|
1 |
FastLED.setMaxPowerInVoltsAndMilliamps(5, 500); |
Then we want to clear the LEDs every time we upload a new code by using FastLED.clear() and FastLED.show().
|
1 2 3 |
FastLED.clear(); FastLED.show(); |
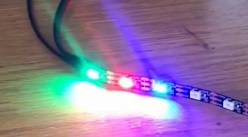
So let’s calibrate the LEDs normally the order when you write the LEDs is first is red, second is green, and third is blue. So, to actually write a single LED we say the LED array at the zeroth element is CRGB the color of to 255 which should correspond to red. We are going to say the second LED will correspond to green only and the third LED will correspond to blue only.
Now we say that FastLED.show() actually show the results on the LEDs and we see that our order is a little bit off instead of having red first we have green first and to fix this we come up into the setup function and say that instead of RGB the order is green red and blue.
|
1 2 3 |
FastLED.addLeds<WS2812, LED_PIN, RGB>(leds, NUM_LEDS); FastLED.addLeds<WS2812, LED_PIN, GRB>(leds, NUM_LEDS); |
Now you justhave two changes to whatever result you get from running the code below since my order is green red blue I change the calibration and whenever I run this code the proper values are spitting out to the LEDs.
Arduino WS2812B LED Strip Calibration Complete code:
|
1 2 3 4 5 6 7 8 9 10 11 12 13 14 15 16 17 18 19 20 21 22 23 24 25 26 27 28 29 30 31 32 |
#include <FastLED.h> #define LED_PIN 2 #define NUM_LEDS 12 CRGB leds[NUM_LEDS]; void setup() { FastLED.addLeds<WS2812, LED_PIN, GRB>(leds, NUM_LEDS); FastLED.setMaxPowerInVoltsAndMilliamps(5, 500); FastLED.clear(); FastLED.show(); } void loop() { // RED Green Blue for (int i=0; i<NUM_LEDS; i++ ) { leds[i] = CRGB(0, 255-2*i, 20*i ); FastLED.setBrightness(6*i); FastLED.show(); delay (50); } for (int i=NUM_LEDS; i> 0; i-- ) { leds[i] = CRGB(20*i, 0, 255-20*i ); FastLED.setBrightness(60-2*i); FastLED.show(); delay (50); } } |
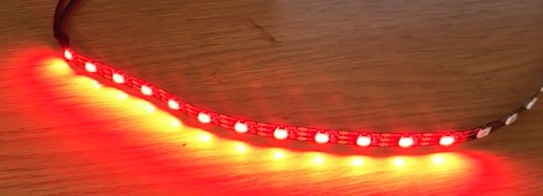
So now that we have the LEDs calibrated let’s turn all the lights on the strip red so that is going to be using a for loop we are iterating through the entire array of LEDs starting at zero up until the length of the array and we are going to say that for every LED we will change the RGB color to red.
|
1 2 3 |
for (int i=0; i<NUM_LEDS; i++ ) leds[i] = CRGB(255, 0, 0 ); |
We say fast LEDs show to actually show the values.
Arduino WS2812B LED Strip Code for only red light:
|
1 2 3 4 5 6 7 8 9 10 11 12 13 14 15 16 17 18 |
#include <FastLED.h> #define LED_PIN 2 #define NUM_LEDS 12 CRGB leds[NUM_LEDS]; void setup() { FastLED.addLeds<WS2812, LED_PIN, GRB>(leds, NUM_LEDS); FastLED.setMaxPowerInVoltsAndMilliamps(5, 500); FastLED.clear(); FastLED.show(); } void loop() { // RED Green Blue for (int i=0; i<NUM_LEDS; i++ ) leds[i] = CRGB(255, 0, 0 ); FastLED.show(); } |
When we upload the code to the Arduino we could see that all the lights turned red
We can change this value around so if we want all the values to be green we change the second value to 255 and the value should turn to green
|
1 |
leds[i] = CRGB(0, 255, 0 ) |
if we want to do a mix of colors to produce let’s say purple we can change the red value to 255 and the blue value to 255.
|
1 |
leds[i] = CRGB(255, 0, 255 ) |
When we upload that code we get somewhat of a purple.
You can see we’re generally getting purple so let’s say we want to keep this purple colour and make the lights flash.
So to add a flash we use the method FastLED.setBrightness() this is actually setting the level the brightness of the lights and we want this to increment starting from zero and it increments based on whatever iteration we are in the for loop.
|
1 |
FastLED.setBrightness(2*i); |
So it’s getting brighter for every iteration we go through and to reverse the flashing effect we copy and paste the for loop down and reverse it so we start at the number of LEDs which is 12 when we decrease the value so the brightness starts high and it goes low as the loop progresses we add a delay just so you can see the effect take place.
|
1 2 3 4 5 6 7 8 9 10 11 12 13 14 15 16 17 18 19 20 21 22 23 24 25 26 27 28 29 30 |
for (int i=0; i<NUM_LEDS; i++ ) { leds[i] = CRGB(255, 0, 255 ); FastLED.setBrightness(2*i); FastLED.show(); delay (20); } for (int i=NUM_LEDS; i> 0; i-- ) { leds[i] = CRGB(255, 0, 255 ); FastLED.setBrightness(2*i); FastLED.show(); delay (20); } |
Arduino WS2812B LED Strip Code for flashing light:
|
1 2 3 4 5 6 7 8 9 10 11 12 13 14 15 16 17 18 19 20 21 22 23 24 25 26 27 28 29 30 31 32 33 |
#include <FastLED.h> #define LED_PIN 2 #define NUM_LEDS 12 CRGB leds[NUM_LEDS]; void setup() { FastLED.addLeds<WS2812, LED_PIN, GRB>(leds, NUM_LEDS); FastLED.setMaxPowerInVoltsAndMilliamps(5, 500); FastLED.clear(); FastLED.show(); } void loop() { // RED Green Blue for (int i=0; i<NUM_LEDS; i++ ) { leds[i] = CRGB(255, 0, 255 ); FastLED.setBrightness(2*i); FastLED.show(); delay (20); } for (int i=NUM_LEDS; i> 0; i-- ) { leds[i] = CRGB(255, 0, 255 ); FastLED.setBrightness(2*i); FastLED.show(); delay (20); } } |
When we upload the code we get this flashing effect but it’s pretty fast so let’s increase the delay and upload the code we could see that the flash slows down a little bit.
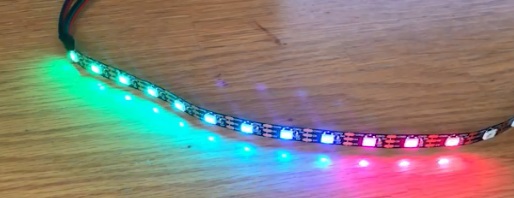
You just had to tweak it to whatever speed you want. So our final task in this tutorial is going to be to turn the lights from green to blue as we progress from left to right and we do that by decreasing the green RGB value by 20 every iteration because after 12 iterations the green value will be close to zero and then we say for the blue value we increase from zero by 20 every iteration because that will end at 240 which is close to blue.
|
1 2 3 4 5 6 7 |
for (int i=0; i<NUM_LEDS; i++ ) { leds[i] = CRGB(0, 255-2*i, 20*i ); FastLED.setBrightness(6*i); FastLED.show(); delay (50); } |
Now for the reverse for loop let’s start at red and transition to magenta. The red value at 255 and gradually decrease it so the red value here will start really high and then gradually get lower because it’s a reverse for loop that starts at 12 and goes all the way down to 1 then we want to increase the blue value as we progress and it looks strange that we are subtracting a value to increase it but that’s just because we start at a high number and we are subtracting it by less and less as we go on.
|
1 2 3 4 5 6 7 8 9 10 11 12 13 |
for (int i=NUM_LEDS; i> 0; i-- ) { leds[i] = CRGB(20*i, 0, 255-20*i ); FastLED.setBrightness(60-2*i); FastLED.show(); delay (50); } |
Arduino WS2812B LED Strip Complete code:
|
1 2 3 4 5 6 7 8 9 10 11 12 13 14 15 16 17 18 19 20 21 22 23 24 25 26 27 28 29 30 31 32 33 |
#include <FastLED.h> #define LED_PIN 2 #define NUM_LEDS 12 CRGB leds[NUM_LEDS]; void setup() { FastLED.addLeds<WS2812, LED_PIN, GRB>(leds, NUM_LEDS); FastLED.setMaxPowerInVoltsAndMilliamps(5, 500); FastLED.clear(); FastLED.show(); } void loop() { // RED Green Blue for (int i=0; i<NUM_LEDS; i++ ) { leds[i] = CRGB(0, 255-2*i, 20*i ); FastLED.setBrightness(6*i); FastLED.show(); delay (50); } for (int i=NUM_LEDS; i> 0; i-- ) { leds[i] = CRGB(20*i, 0, 255-20*i ); FastLED.setBrightness(60-2*i); FastLED.show(); delay (50); } } |
When we upload the code you can see that we have changing colors with respect to time from left to right. We transition from green to blue and from right to left we transition from red to magenta. This tutorial is just the starting point for individually addressable LEDs you can do a lot more with these you can tweak the delay values the brightness and the colors all to make your own custom patterns.
Applications of ws2812b Strip LEDs:
- Architectural decorative lighting
- Canopy and bridge edge lighting
- Amusement park, theatre and aircraft cabin mood lighting
- Cove lighting, ambient lighting, under shelf lighting
- Auditorium walkway lighting
- Indoor / outdoor illumination
- Making led screen
- led wall
- Advertising board
- The city lighting project, entertainment and leisure places lighting.




Please help me for no of programming on Arduino Uno add switch no of 5