DHT11 Vs DHT22, LM35, and DS18B20: Arduino interfacing and Programming
Table of Contents
DHT11:
In DHT11 sensor the “D” means digital, “H” means humidity and “T” means temperature. So from this we can easily understand that this sensor is used to measure the temperature and humidity in the digital form. It is very popular in electronic project because it is very cheap but still providing great performance. Therefor we usually prefer these sensors to measure the humidity and temperature. These sensors are mostly used in field management system and chemical management system. It is very important in weather applications.
Working of DHT sensor:
It consists of three components:
-
Humidity sensing component
This component will be used to measure the humidity. It consists of two electrodes. Substrate is present between these two electrodes which is used to hold the moisture or humidity. When the humidity or moisture changes the conductivity of the substrate will be changing or the resistance between the electrodes changes.
-
NTC temperature sensor
It will be used to measure the temperature. NTC temperature sensor is also called thermistor. This thermistor is actually a variable resistor whose resistance is changing with respect to the temperature. The thermistor is made up of semiconductor material ceramics or poly ceramics. In order to provide larger change in the resistance by just small amount of change in temperature we add these ceramics. NTC means negative temperature coefficient in which resistance decreases with increase in temperature.
-
8 bit microcontroller
8 bit microcontroller IC is present on the back side of the sensor. The change in the resistance is measured by the microcontroller.
Communication with microcontroller:
This sensor use single wire for the communication. The communication consists of three steps:
- The first step is to send request to the DHT11 sensor.
- In the second step the sensor will send response pulse to the microcontroller
- In third step the sending of data will be start.
Amazon Link:
Arduino Nano USB-C Type (Recommended)
*Please Note: These are affiliate links. I may make a commission if you buy the components through these links. I would appreciate your support in this way!
Interfacing of DHT11 sensor with Arduino:
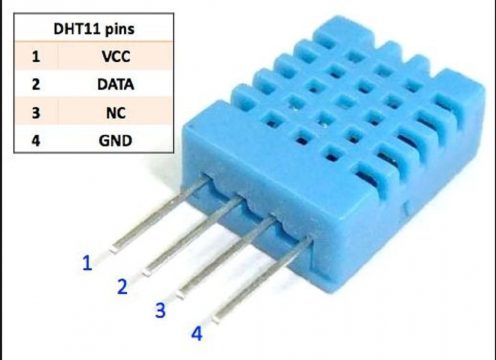
The DHT11 sensor consists of four pins which are:
- VCC
- Data
- NC
- GND
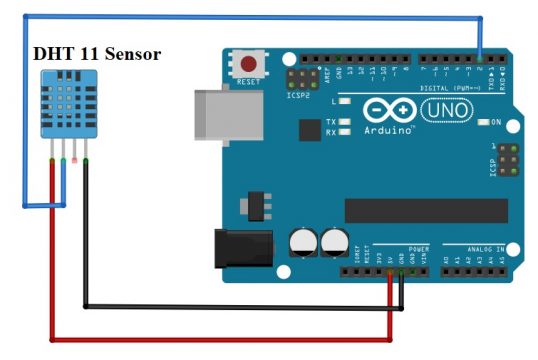
Now to connect this sensor with Arduino we will connect the VCC pin of the sensor with the pin number 5V of the Arduino. Now connect pin number 2 which is data pin of the sensor to the digital pin 2 of the Arduino. Connect the ground pin of the sensor with ground pin of the Arduino. The connection is completed. Now connect the Arduino with the PC using cable.
To use this sensor we will first download the library for this senor from the given link:
https://github.com/markruys/arduino-DHT
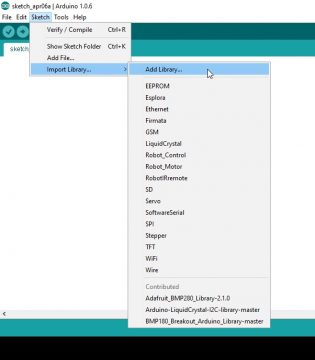
After downloading the library open the Arduino IDE. To add the library in the sketch click on the import library.
A dialog box will appear select the zip file of library and the library will added. Now to use this library in file select examples and select arduino DHT master.
In the programming we can see that digital pin is connected with digital pin 2. To see the reading we will select the serial monitor.
Programming Section:
Programming1:
|
1 2 3 4 5 6 7 8 9 10 11 12 13 14 15 16 17 18 19 20 21 22 23 24 25 26 27 28 |
#include "DHT.h" DHT dht; void setup() { Serial.begin(9600); Serial.println(); Serial.println("Status\tHumidity (%)\tTemperature (C)\t(F)"); dht.setup(2); // data pin 2 } void loop() { delay(dht.getMinimumSamplingPeriod()); float humidity = dht.getHumidity(); float temperature = dht.getTemperature(); Serial.print(dht.getStatusString()); Serial.print("\t"); Serial.print(humidity, 1); Serial.print("\t\t"); Serial.print(temperature, 1); Serial.print("\t\t"); Serial.println(dht.toFahrenheit(temperature), 1); } |
DHT11 VS DHT22:
In this article we will discuss about the comparison of DHT11 and DHT22 humidity sensor and temperature sensor. The dht22 which is an upgraded version of the dht11 and as you can see in the diagram below here they share the same pin outs. They are almost the same size and if you look at the specs.
| DHT11 | Specifications | DHT22 |
| Humidity and temperature | Measurement | Humidity and temperature |
| 0 – 50° C / ± 2° C | Temperature Range | -40 – 125° C / ± 0.5° C |
| 20 – 80 / ± 5 % | Humidity Range | 0 – 100 / ± 2.5 % |
| 1 wire | Communication Protocol | 1 wire |
| 1 Hz one reading every second | Sampling Rate | 0.5 Hz one reading every two second |
| 15.5 mm × 12 mm × 5.5 mm | Body size | 15.1 mm × 25 mm × 7.7 mm |
| 3 – 5 V | Operating Voltage | 3 – 5 V |
| 2.5 mA | Minimum current | 2.5 mA |
The DHT22 sensor is better than DHT11 sensor. The DHT11 sensor is only better in case of the sampling rate. If we want to read data in each second we will use DHT11 sensor. Both the sensor have same operating voltage and have same size. DHT22 has wide range of measuring temperature and pressure. Same code can be used for both sensors. DHT22 is little expensive then DHT11.
DHT11 VS LM35:
The LM35 sensor measures the temperature values in Celsius. To compare both sensor we will see the table. DHT11 can measure both humidity and temperature while LM35 can only measure temperature. Very small amount of current is require to operate for LM35. While on other hand the range of measuring temperature of LM35 is maximum then the DHT11. The DHT11 require less voltage for its operation. It can operate between 3 to 5 V while the range of voltage for LM35 is maximum as it can operate 4 to 30 V.
Interfacing of LM35 sensor with Arduino:
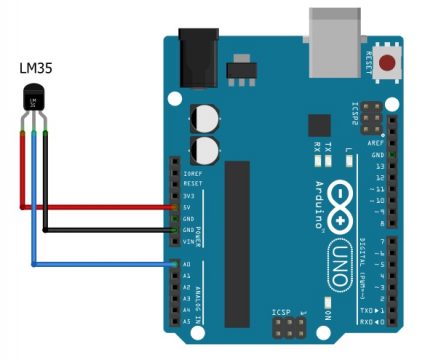
LM35 which is analog temperature sensor to interface it with Arduino Uno and get temperature data on your serial monitor of Arduino Uno. So basically if you look at the lm35 image.
So the LM35 looks like a transistor it has a three legs. So the way you connect this lm35 sensor to Arduino Uno is this way that if you take the flat surface of this lm35 sensor. The extreme left pin of this lm35 and that will be the VCC and that’s why the left extreme left pin will be connect to the 5V of the Arduino Uno. The middle pin is the output from of the sensor and we will be connected to the A0 pin of your Arduino Uno. The extreme right pin by keeping the flat surface towards you will be your ground. So that will be represented as a black line and it should be connected to the ground pin of the Arduino Uno. Once you are ready with these connections you can move on and write the programme for getting data from this lm35 sensor. So let me start writing a code this is the body of the code that you can get every time when you create a new scan. So I can first define a variable float variable called temp this variable will be a place holder for the data that we will be reading from the lm35 sensor. The temperature is always in some decimal places. So we should give this into the float variable then we need a serial monitor. The baud rate for serial communication is 9600. Now in the loop function I should have to write the temperature that is the variable which holds the data from the sensor and as you know this output from the sensor the center pin is going to A0 pin that is the analog pin A0 because this is the analog sensor that’s why we have to connect to a0 and that’s why we will write analog read this is the built-in function from Arduino. It will read the data from a0 pin where our sensor is physically connected. Now we know that this temperature data that we will be reading is not in a degree centigrade. So we will multiply this data from the sensor by multiplying factor 0.4882. Now you might be wondering where this comes from basically this value is obtain from the equation:
5/1024=0.004882
So basically our input voltage is 5 volts so we will going to divide this 5 by 1024 because the ADC is 10 bit so that is why we do divide it with 1024 that’s how you get 0.004882. Now this value is in millivolt. So you have to convert it into the Volt so if you multiplied by thousand then you will have:
0.004882 × 1000 = 4.882
But according to datasheet a 10 mV represents 1 degree centigrade. so we will going to divide it by 10 and we will obtain:
4.882/ 10 = 0.4882
The data that is coming from the sensor will be multiplied with 0.4882 and that will give me the exact temperature. Now I want this output to be looks a little bit better so I would write serial.print in order to print this on a serial monitor.
Programming2:
|
1 2 3 4 5 6 7 8 9 10 11 |
float temp; void setup() { Serial.begin(9600); } void loop() { temp=analogRead(A0); temp=temp*0.4882; Serial.print("Temperature: "); } |
| DHT11 | Specifications | LM35 |
| Humidity and temperature | Measurement | Temperature |
| 0 – 50° C / ± 2° C | Temperature Range | -55 – 150° C / ± 0.5° C |
| 20 – 80 / ± 5 % | Humidity Range | Nil |
| 1 wire | Communication Protocol | Analog |
| 1 Hz one reading every second | Sampling Rate | |
| 3 – 5 V | Operating Voltage | 4 – 30 V |
| 2.5 mA | Minimum current | 60 micro Ampere |
DHT11 VS DS18B20:
Interfacing DS18B20 sensor with Arduino:
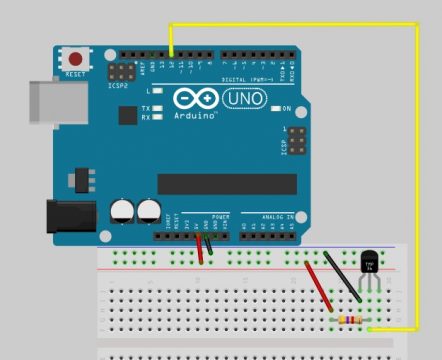
Now we will interface DS18B20 sensor with the Arduino to measure temperature. It communicates over one wire interface and can measure temperatures from -55 degrees Celsius to +125 degrees Celsius with an accuracy of ±0.5 degrees Celsius. Let’s get started wiring is very simple red wire is VCC and will be connected to the 5V of the Arduino, black is ground and is to be connected with the ground of the Arduino, yellows the data wire which will be connected to any digital pin on the Arduino. I am going to connect it with digital pin 12 and we do need a 4.7 a resistor between rivals and the data pin and that’s it for the wiring.
Now we need to down two libraries for it to work the bus library is the one wire library and the second is the Dallas temperature library make sure to add these two libraries in your IDE link is in the description.
https://github.com/milesburton/Arduino-Temperature-Control-Library
https://github.com/PaulStoffregen/OneWire
Let’s open a simple sketch inside Dallas temperature and change one wire bus from two to 12 because we have connected our sensor on that pin now hit upload and open up the serial monitor and we can see the temperature reading.
Programming3:
|
1 2 3 4 5 6 7 8 9 10 11 12 13 14 15 16 17 18 19 20 21 22 23 24 25 26 27 28 29 30 31 32 33 34 35 36 37 38 39 40 41 42 43 44 45 46 47 48 49 50 51 |
// Include the libraries we need #include <OneWire.h> #include <DallasTemperature.h> // Data wire is plugged into port 2 on the Arduino #define ONE_WIRE_BUS 12 // Setup a oneWire instance to communicate with any OneWire devices (not just Maxim/Dallas temperature ICs) OneWire oneWire(ONE_WIRE_BUS); // Pass our oneWire reference to Dallas Temperature. DallasTemperature sensors(&oneWire); /* * The setup function. We only start the sensors here */ void setup(void) { // start serial port Serial.begin(9600); Serial.println("Dallas Temperature IC Control Library Demo"); // Start up the library sensors.begin(); } /* * Main function, get and show the temperature */ void loop(void) { // call sensors.requestTemperatures() to issue a global temperature // request to all devices on the bus Serial.print("Requesting temperatures..."); sensors.requestTemperatures(); // Send the command to get temperatures Serial.println("DONE"); // After we got the temperatures, we can print them here. // We use the function ByIndex, and as an example get the temperature from the first sensor only. float tempC = sensors.getTempCByIndex(0); // Check if reading was successful if(tempC != DEVICE_DISCONNECTED_C) { Serial.print("Temperature for the device 1 (index 0) is: "); Serial.println(tempC); } else { Serial.println("Error: Could not read temperature data"); } } |
| DHT11 | Specifications | DS18B20 |
| Humidity and temperature | Measurement | Temperature |
| 0 – 50° C / ± 2° C | Temperature Range | -55 – 125° C / ± 0.5° C |
| 20 – 80 / ± 5 % | Humidity Range | Nil |
| 1 wire | Communication Protocol | 1 wire |
| 1 Hz one reading every second | Sampling Rate | |
| 3 – 5 V | Operating Voltage | 3 – 5 V |
| 2.5 mA | Minimum current | 10 mA |
