DHT21 AM2301 Temperature & Humidity Sensor with Arduino
Last Updated on September 21, 2024 by Engr. Shahzada Fahad
Table of Contents
DHT21 AM2301 Sensor with Arduino:
DHT21 AM2301 Temperature & Humidity Sensor with Arduino- Whenever we talk about Temperature and Humidity Monitoring, the very first sensor that pops up in everyone’s mind is the DHT11 Temperature and Humidity Sensor. Despite of the fact that it’s extremely slow and it has a low temperature and humidity detection range.it’s still one of the most commonly used sensors throughout the world. The main reason behind its popularity is that; because everyone including me is only using the DHT11 Temperature and Humidity sensor for testing IoT platforms, displays, and HMI screens, etc.
Why only DHT11 Sensor? We can also try other sensors in the same series like for example DHT21 and DHT22which can also be used for measuring the temperature and Humidity. DHT11, DHT21, and DHT22 all these three sensors have got different specs and features while their use is exactly the same.
So, in today’s article, you will learn how to make a simple temperature and humidity monitoring system using DHT21 or AM2301 Sensor, Arduino Nano, SSD1306 Oled Display Module, and a 5v Buzzer. Since this is a getting started tutorial, I will try my level best to explain its technical specs, features, it’s interfacing with Arduino, and programming. So, without any further delay let’s get started!!!
Amazon Links:
Arduino Nano USB-C Type (Recommended)
*Disclosure: These are affiliate links. As an Amazon Associate I earn from qualifying purchases.
DHT21or AM2301:
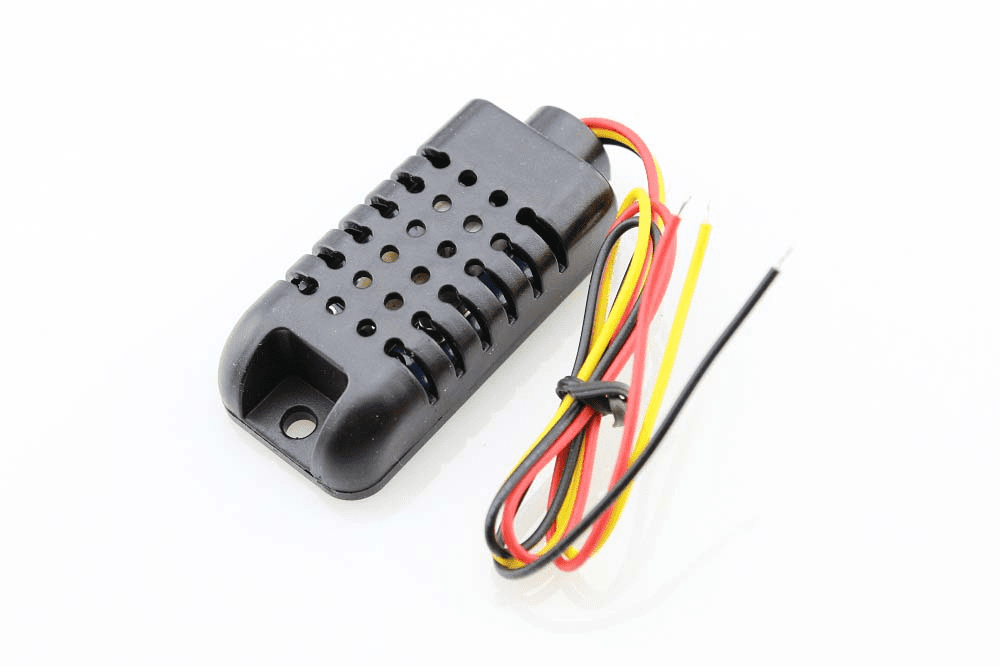
DHT21 Temperature and Humidity sensor is also known as AM2301. DHT21 is a digital temperature and humidity sensor module made using a capacitive humidity sensor, a high precision temperature sensor, and an 8-bit microcontroller. This module provides extremely accurate outputs as it is digitally calibrated using the coefficients stored in the microcontroller. It is able to measure temperature between -40 and 80 degrees Celsius with ±1 degree of error margin. Likewise, it is able to measure humidity between 0% RH to 100% RH with ±5% RH of error margin. DHT21 has a built-in pull-up resistor while in the DHT11 and DHT22 we have to externally connect pull-up resistors.
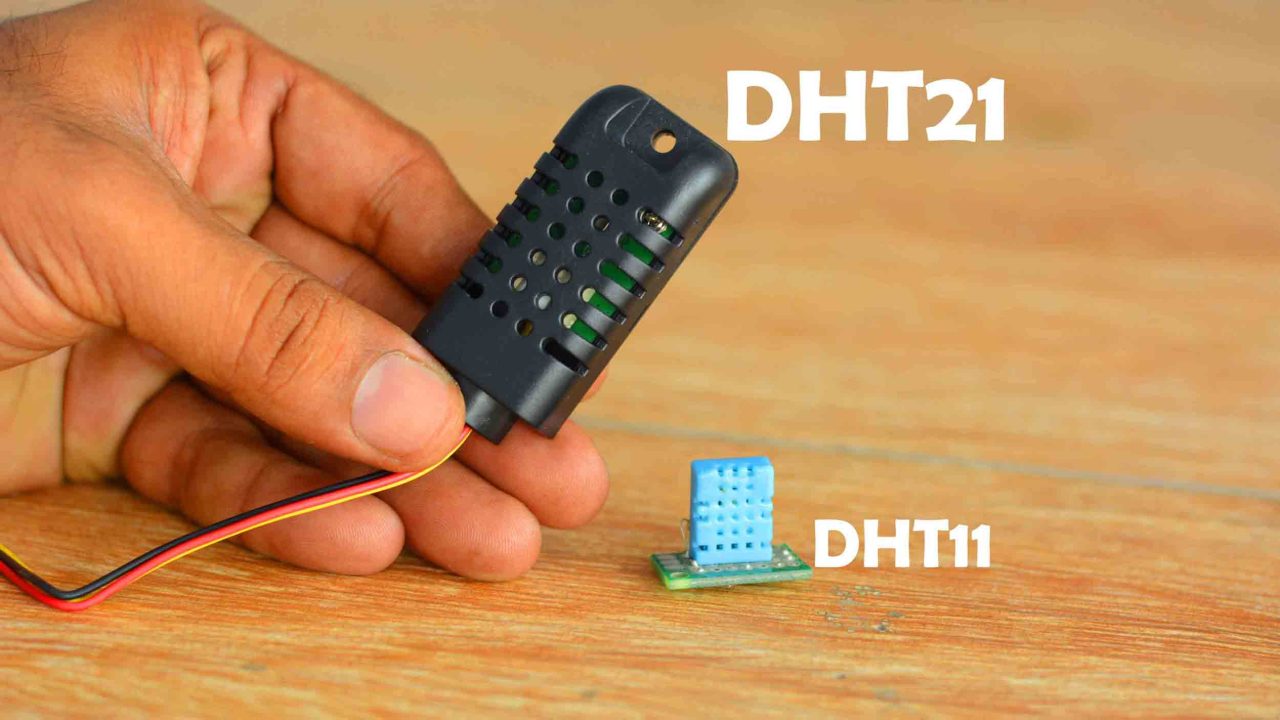
DHT21 is quite larger than the DHT11 and its also slightly expensive than the DHT11 sensor. The slightly higher price is not the downside as you are paying for the better specs. DHT21 outshines the DHT11 in every aspect from temperature range, temperature accuracy, humidity range, and humidity accuracy.
DHT11 Vs DHT21 Vs DHT22:
DHT11:
- 3 to 5V power and I/O
- 5mA max current use during conversion (while requesting data)
- Good for 20-80% humidity readings with 5% accuracy
- Good for 0-50°C temperature readings ±2°C accuracy
- No more than 1 Hz sampling rate (once every second)
- Body size 15.5mm x 12mm x 5.5mm
- 4 pins with 0.1″ spacing
- from $0.70 USD without PCB/pull-up
- from $0.80 USD with PCB/pull-up resistor
DHT22 (AM3202):
- 3 to 5V power and I/O
- 5mA max current use during conversion (while requesting data)
- Good for 0-100% humidity readings with 2-5% accuracy
- Good for -40 to 80°C temperature readings ±0.5°C accuracy
- No more than 0.5 Hz sampling rate (once every 2 seconds)
- Body size 15.1mm x 25mm x 7.7mm
- 4 pins with 0.1″ spacing
- from $2.35 USD without PCB/pull-up
- from $2.55 USD with PCB/pull-up resistor
DHT21 (AM2301):
- Humidity sensing range: 0 to 99.9% RH.
- Humidity measurement accuracy: ±3% RH.
- Temperature measurement range: -40 to 80 °C.
- Temperature measurement accuracy: ±0.5 °C.
- Supply voltage: 3.3 to 5.2 V.
- from $2.40 USD with PCB/pull-up resistor
DHT21 accepts a wide range of input voltages from 3.3V to 5.2V. Due to such a wide range of input voltages, it can be used with 3.3V and 5V compatible controller boards like ESP32, ESP8266, Arduino boards, Raspberry Pi, STM32, and so on.
- The Red wire is the VCC and it should be connected with 3.3V or 5V.
- The Yellow wire is the output wire, which is the Data wire. It outputs a digital signal via Single-bus.
- The Black wire is the GND wire.
Features:
- Ultra low power
- Fast response
- Relative humidity and temperature measurement
- Full range temperature compensation
- Excellent long term stability
- Long transmission distance
- High accuracy
- No need of extra components
- Excellent long term stability
- Calibrated digital output
Pin Out
- Red VDD Power (3.3V ~ 5.2V)
- Yellow SDA Serial Data, Dual Port
- Black GND Ground
Applications:
- HVAC (Heating, Ventilating and Air Conditioning)
- Dehumidifier
- Testing and inspection equipment
- Home appliances
- Data loggers
- Humidity regulator
- Weather stations
DHT21/AM2301 Interfacing with Arduino:
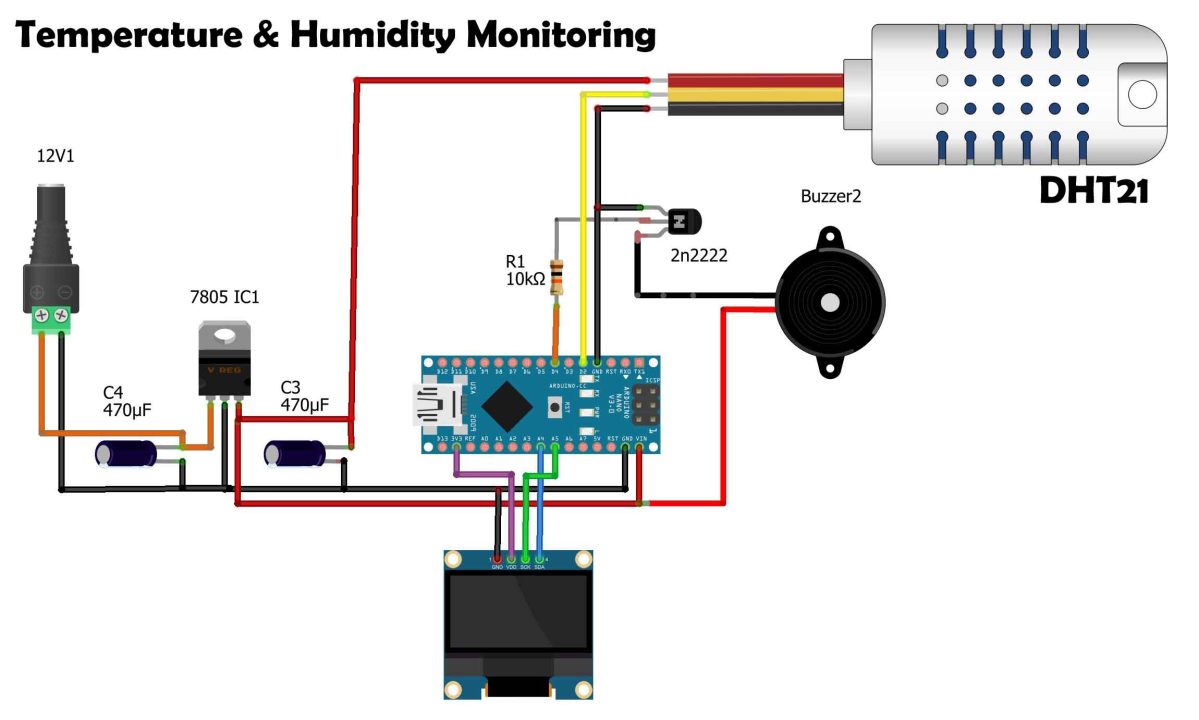
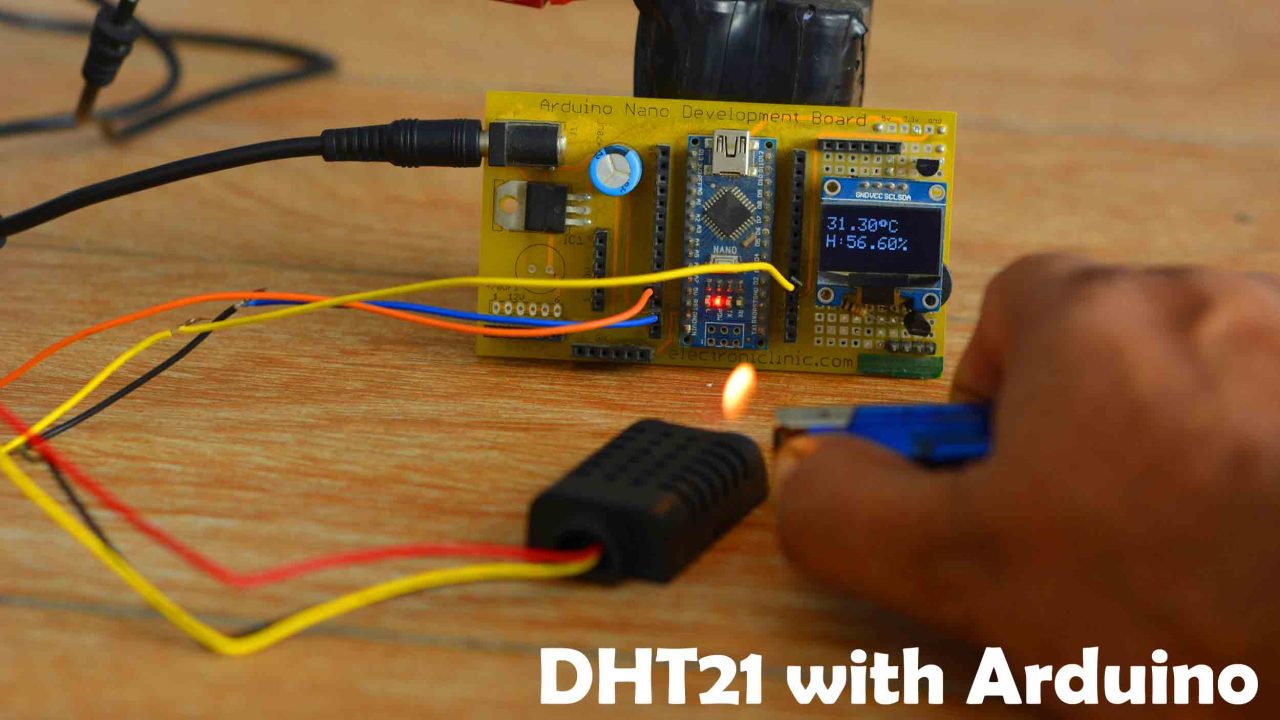
The VCC and GND wires of the DH21 or AM2301 Temperature and Humidity sensor are connected with the 5V and GND. While the Data wire is connected with the Arduino pin D2.
The RED wire of the buzzer is connected with the 5v. The ground wire of the 5V buzzer is connected with the Collector of the 2n2222 NPN transistor. The Emitter of the transistor is connected with the ground. While the base of the transistor is connected with the Arduino D4 pin through a 10km resistor.
The SSD1306 Oled display module SDA and SCL/SCK pins are connected with the A4 and A5 pins while the VDD/VCC and GND pins are connected with the Arduino’s 3.3V and GND pins.
On the left side is the 5v regulated power supply based on the LM7805 Linear voltage regulator.
Required Libraries:
As usual before you start the programming, first of all, make sure you download all the necessaries libraries.
Download:
To install the DHT library, simply click on the Sketch menu, go to include library, and then click on the manage libraries. In the search box type DHT.

Select the desired DHT library and install it. As you can see I have already installed this library.
DHT21/AM2301 Arduino Programming:
|
1 2 3 4 5 6 7 8 9 10 11 12 13 14 15 16 17 18 19 20 21 22 23 24 25 26 27 28 29 30 31 32 33 34 35 36 37 38 39 40 41 42 43 44 45 46 47 48 49 50 51 52 53 54 55 56 57 58 59 60 61 62 63 64 65 66 67 |
#include <DHT.h>; #include <Adafruit_GFX.h> #include <Adafruit_SSD1306.h> //Constants #define DHTPIN 2 //what pin we're connected to #define DHTTYPE DHT21 //DHT 21 (AM2301) DHT dht(DHTPIN, DHTTYPE); //Initialize DHT sensor for normal 16mhz Arduino int buzzer=4; //Variables float hum; //Stores humidity value float temp; //Stores temperature value #define SCREEN_WIDTH 128 // OLED display width, in pixels #define SCREEN_HEIGHT 64 // OLED display height, in pixels // Declaration for an SSD1306 display connected to I2C (SDA, SCL pins) #define OLED_RESET -1 // Reset pin # (or -1 if sharing Arduino reset pin) Adafruit_SSD1306 display(SCREEN_WIDTH, SCREEN_HEIGHT, &Wire, OLED_RESET); void setup() { Serial.begin(9600); pinMode(buzzer,OUTPUT); dht.begin(); display.begin(SSD1306_SWITCHCAPVCC, 0x3C); delay(2000); display.clearDisplay(); display.setTextColor(WHITE); delay(10); } void loop() { //Read data and store it to variables hum and temp hum = dht.readHumidity(); temp= dht.readTemperature(); //Print temp and humidity values to serial monitor Serial.print("Humidity: "); Serial.print(hum); Serial.print("%, Temperature: "); Serial.print(temp); Serial.println(" Celsius"); display.clearDisplay(); display.setTextSize(2); display.setCursor(0, 10); display.print(temp); display.print((char)247); display.print("C"); display.setTextSize(2); display.setCursor(0, 30); display.print("H:"+String(hum)+"%"); display.display(); if(temp>40) { digitalWrite(buzzer,HIGH); } else { digitalWrite(buzzer,LOW); } delay(1000); //Delay 2 sec. } |
This is the same exact program that I wrote for the DHT11 sensor. The only change which I made is; I replaced the DHT11 with DHT21. So, any program which is written for the DHT11 will also work with the DHT21 Temperature and Humidity Sensor.
Inside the loop() function, we simply read the Humidity and Temperature. And then display these values on the Oled display Module. Besides this, I have also added if condition which checks if the temperature has increased above the predefined value. If the temperature has increased then the buzzer will turn ON else the buzzer will remain OFF. So, that’s all about the programming. I have already uploaded this program and now let’s watch the DHT21 or AM2301 Temperature and Humidity Sensor in Action.
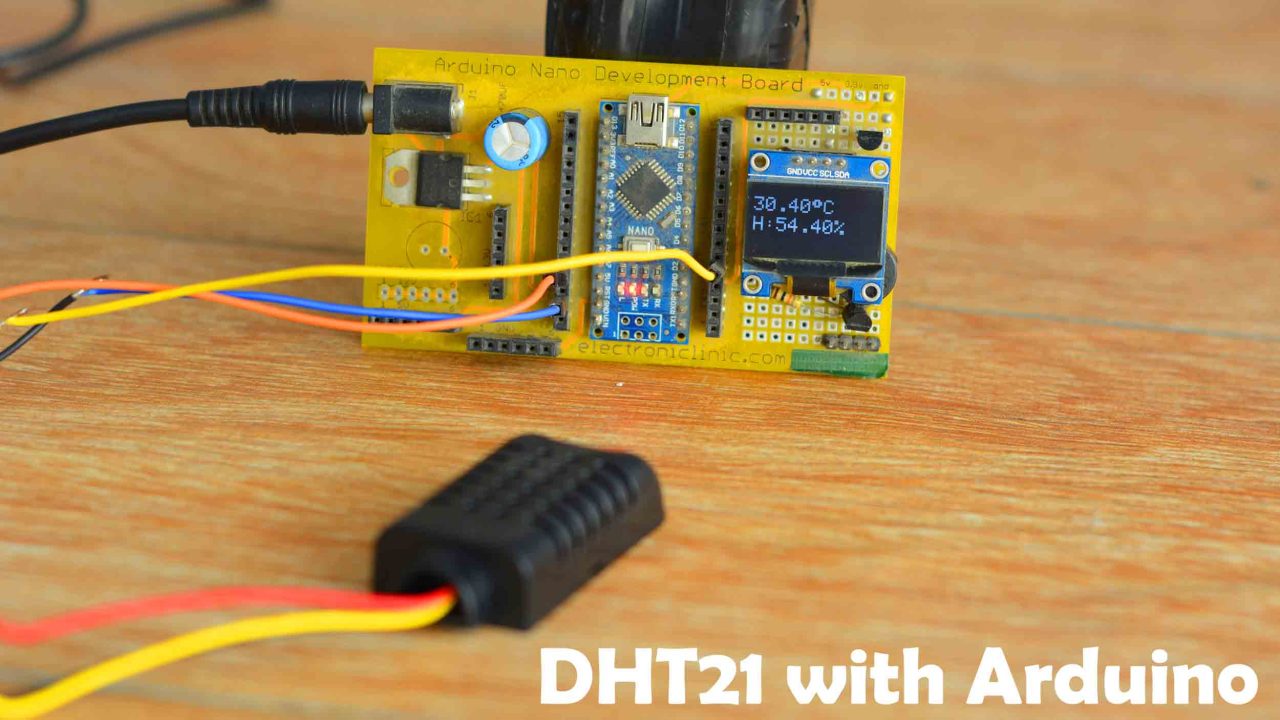
Initially, the temperature was 30.40 Degrees Celsius. After I applied some heat, the temperature and humidity started to change as you can see in the image below.
Watch Video Tutorial:

Discover more from Electronic Clinic
Subscribe to get the latest posts sent to your email.


