Flame Sensor Arduino, Fire Sensor Arduino, Circuit diagram & programming
Table of Contents
Description:
Flame Sensor Arduino– in this tutorial, you will learn how to use the Flame Sensor or Fire sensor with the Arduino Board to control a buzzer. So, whenever the Fire or flame is detected a buzzer will be activated. I this tutorial I will cover the maximum things so that you can use this sensor in some advanced level projects like
- Fire fighting robots.
- IoT fire Alarm projects.
- GSM based fire alert system and so on.
In this tutorial, we will cover
- Flame Sensor Pinout
- Flame Sensor technical specification
- Flame Sensor circuit diagram without using the Arduino
- Flame Sensor Arduino circuit diagram and
- Flame Sensor Arduino Programming
Without any further delay let’s get started!!!
Amazon Links:
Arduino Nano USB-C Type (Recommended)
Flame IR Sensor/fire detector sensor:
Other Tools and Components:
ESP32 WiFi + Bluetooth Module (Recommended)
Super Starter kit for Beginners
PCB small portable drill machines
*Please Note: These are affiliate links. I may make a commission if you buy the components through these links. I would appreciate your support in this way!
About the Flame Sensor:
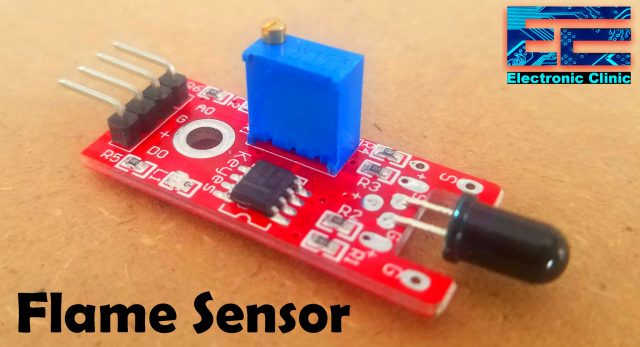
This is the Flame Sensor Module which is also known as the Infrared IR Fire Sensor Detector. This Flame Sensor is extremely sensitive to IR wavelengths between 760-1100nm light. This flame sensor is ideal for short-range fire detection and can be used to monitor projects or as a safety precaution to cut devices OFF / ON or to turn ON buzzers or Send SMS. It can be used in hundreds of projects. I have found that this Flame Sensor is mostly accurate up to about 3 feet. I think this much range is enough.
Flame Sensor Specifications and Pinout:
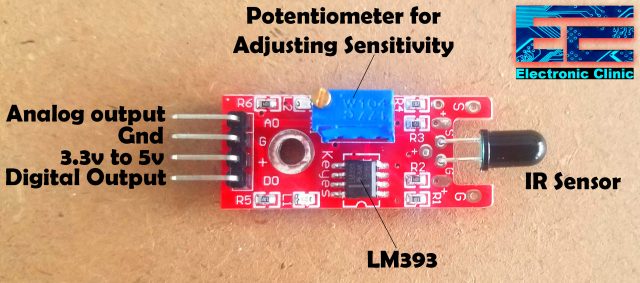
On the right we have a black IR LED sensor. The Flame Sensor Module has a total of 4 male headers on the left side which are clearly labeled as
- A0 which is the Analog output pin of the Flame Sensor
- G this is the ground pin and it should be connected with the ground pin of the power supply or the Arduino board.
- + pin the input supply pin and this is where we connect 3.3v or 5v from the Arduino Board.
- D0 is the digital output signal pin which can be connected with any i/o pin of the Arduino board or it can be directly connected with TTL supported circuits for directly controlling the buzzers and relays etc.
This Flame sensor module is also provided with a Potentiometer which can be used for adjusting the Fire Flame detection sensitivity.
The Flame sensor module is also provided with two LEDs L1 and L2. One LED is turned ON when you power up the Flame Sensor module while the other LED only lights up when it detects the flame.
This IR Flame Sensor module is based on the LM393 low offset voltage dual comparator. If you want to read more about the LM393 comparator, you can download the datasheet given below.
Download LM393 Datasheet: lm393 datasheet
- Detection Angle Range: About 60 degrees
- Power Supply: 0-15 V DC
- Hole Inner Diameter: Approx. 3mm
- Size (L x W): Approx. 36 x 16mm
Flame Sensor Working with and without Arduino:
The coolest thing about this flame sensor is it has two types of outputs Analog and digital which I already explained. You can use this sensor with and without Arduino. You can turn ON a buzzer only using the Flame Sensor. So I will explain both the techniques.
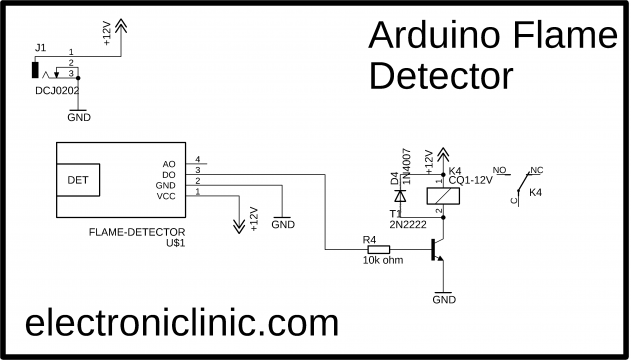
Let’s say if you only decide to turn ON the buzzer, and you don’t want to generate messages or send control signals to other electronic devices then there is no need to use the Arduino you can simply follow the connection given in the circuit diagram below.
Flame Sensor with Relay:
This is the simplest and cheapest flame detector system. A relay module is directly controlled using the Flame sensor. So, when the Flame Sensor detects the Fire it turns ON the relay. Using relay you can control any AC/DC Buzzer. You can also use a 5v buzzer, but as you know the sound level of the 5 volts buzzer is very low, the best choice can be a 12v buzzer. The Buzzer will remain ON so far the Sensor detects the fire, when there is no fire/flame the relay immediately turns OFF.
Now if you want to perform multiple tasks like turning ON the buzzer, sending a text message, or activating a Servo Motor, etc. then you can follow the circuit diagram given below. In the below example the Buzzer will be controlled using the Arduino Board. You can use Arduino UNO, Arduino Nano, Arduino Mega, etc.
Flame Sensor Arduino Circuit Diagram:
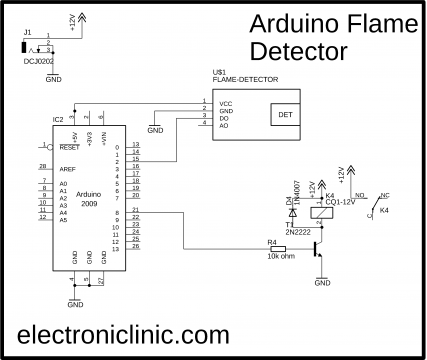
This time I added the Arduino Uno. The 12 volt DC power supply will be used to power up the Arduino and Relay module which is of the type SPDT “Single Pole and Double Throw”, it’s a 12v relay. The Flame Sensor connection with the Arduino Board is very easy. Connect the D0 pin of the IR Flame Sensor with the Arduino’s digital pin 2. Connect the VCC and GND pins of the Flame sensor module with the Arduino’s 5 volts and ground pins. While the one channel relay module is connected with the Arduino’s pin number 8.
When the Fire/Flame is detected the flame sensor gives a signal to the Arduino board and the Arduino board then controls the relay which can turn ON and turn OFF any electrical load connected with the relay module.
As we are using the Arduino, so now we have more control over the Relay module. Now, we can program the Arduino to turn ON the buzzer forever even if the flame is disappeared, or we can ON OFF the buzzer again and again whenever the flame is detected.
We can also connect a GSM module with the Arduino to send an alert message, which I will explain in one of my future tutorials. For now we stick with the basics.
Now let’s have a look at the Arduino programming.
Flame Sensor Arduino Programming:
|
1 2 3 4 5 6 7 8 9 10 11 12 13 14 15 16 17 18 19 20 21 22 23 24 25 26 27 28 29 30 31 32 |
#define F_Sensor 2 // connect DO pin of the flame sensor with the Arduino's digital pin 2 #define Relay_Buzzer 8 // A relay module is connected with the Arduino's pin number 8 void setup() { Serial.begin(9600); // Baud Rate Serial.println("Flame Sensor Project by Electronic Clinic"); pinMode(F_Sensor, INPUT);//define F_Sensor input pin pinMode(Relay_Buzzer, OUTPUT);//define Relay_Buzzer output pin } void loop() { int fire = digitalRead(F_Sensor);// read F_Sensor sensor if( fire == HIGH) { digitalWrite(Relay_Buzzer,HIGH);// set the buzzer ON Serial.println("Fire Detected"); } else { digitalWrite(Relay_Buzzer,LOW); // Set the buzzer OFF Serial.println("Peace"); } delay(1000); } |
Flame Sensor Arduino Code explanation:
No libraries are used in this project. The code is very simple and maximum of the programming instructions are commented.
Whenever you are using sensors and output devices with the Arduino it’s a good programming practice to first define the pins and assign them some meaningful names. I did the same thing I started off by defining pins for the IR Flame Sensor Module and the Buzzer.
#define F_Sensor 2 // connect DO pin of the flame sensor with the Arduino’s digital pin 2
#define Relay_Buzzer 8 // A relay module is connected with the Arduino’s pin number 8
As you know every Arduino program has at least two functions, which are the void setup() and void loop() functions. The void setup() function is just like the introduction. In the void setup() function we tell the controller about the baud rate, which are the input pins and which are the output pins etc.
void setup() {
The serial.begin() function is used for activating the serial communication. This is usually used for the debugging purposes. You can print messages on the computer screen using the Serial monitor. so for this project I selected 9600, you can select other standard baud rates.
Serial.begin(9600); // Baud Rate
The below line simply sends a message to the computer screen. in fact this message has nothing to do with the flame sensor but it is just for your understanding.
Serial.println(“Flame Sensor Project by Electronic Clinic”);
The Flame sensor is set as the input using the pinMode() function.
pinMode(F_Sensor, INPUT);//define F_Sensor input pin
pinMode(Relay_Buzzer, OUTPUT);//define Relay_Buzzer output pin
}
Then the void loop() function starts, which runs forever until you turn OFF the Arduino board or something goes wrong. The function runs again and again.
void loop() {
So, first we read the Flame sensor using the digitalRead() function.
int fire = digitalRead(F_Sensor);// read F_Sensor sensor
the following condition means if the fire is detected, then simply turn ON the Buzzer and send a message to the computer screen that the fire is detected. Else turn off the buzzer and send another message to the computer screen. finally there is a delay of 1000 milli seconds “1 second”.
if( fire == HIGH)
{
digitalWrite(Relay_Buzzer,HIGH);// set the buzzer ON
Serial.println(“Fire Detected”);
}
else
{
digitalWrite(Relay_Buzzer,LOW); // Set the buzzer OFF
Serial.println(“Peace”);
}
delay(1000);
}
Final words:
This is totally up to you if you plan to use a Buzzer at the relay output or a light bulb. If you are using AC load at the output “never touch the relay module” As AC voltage can be really dangerous, use protective gloves”.
For more amazing projects visit my YouTube channel “Electronic Clinic”. Subscribe to Electronic Clinic.


