K Type Thermocouple, MAX6675, and Arduino based Temperature Monitoring
Last Updated on August 18, 2024 by Engr. Shahzada Fahad
Table of Contents
Description:
K Type Thermocouple, MAX6675, and Arduino based Temperature Monitoring- This is a very basic getting started tutorial based on the K type thermocouple and MAX6675 module. In this tutorial, you will learn how to interface the k type thermocouple, MAX6675, and a 16×2 LCD with the Arduino Uno. I will start with the extreme basics so that you can easily understand the Interfacing and Programming. First I will write a very basic program in which I will print the temperature on the Serial Monitoring, and then in the 2nd program, I will print the temperature on the LCD.
If you only need the circuit diagram and programming then you can skip this entire article and jump to the portion of this article where you can find the circuit diagram and programming. But if you want to learn the extreme basics then read this article completely.
Amazon Links:
Arduino Nano USB-C Type (Recommended)
MAX6675 k type thermocouple and driver:
*Disclosure: These are affiliate links. As an Amazon Associate I earn from qualifying purchases.
What is a thermocouple TC?
A thermocouple “TC” is an electronic component or more specifically a Sensor which is used to measure the temperature.
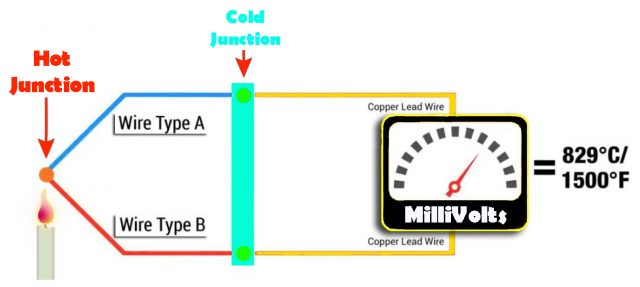
A thermocouple has two wires made up of two different types of materials “metals”. The two metal wires are welded together at one end which creates a junction point. The temperature is measured at this junction point. A change in the temperature at this junction point results in the voltage. This voltage is then used to calculate the temperature using some tables or a module like max6675 which I will be using in this tutorial.
Types of Thermocouple:
Thermocouples are divided into different types due to their unique characteristics, as every thermocouple has its own
- Temperature range
- Vibration Resistance
- Durability
- Chemical resistance and
- Compatibility
Depending on the above characteristics some common types of the thermocouples are K, J, T, R, E, S, N, and B. The R, S, and B type thermocouples are actually the “Noble Metal” thermocouples, which are used in areas where high temperatures are, need to be monitored. While the most commonly used thermocouples include J, T, and K type thermocouples. So as J, T, and K type thermocouples are most commonly used, that’s why I selected the K type thermocouple.
Before I am going to explain why I selected the K type thermocouple, let’s have a look at some of the specifications of all the above thermocouples. These specifications are as per the datasheet which you can easily find by search on Google.
K type thermocouple temperature range:
Nickel-Chromium / Nickel-Alumel
Temperature Range:
- -270 to 1260C
- Extension wire, 32 to 392F (0 to 200C)
K type thermocouple application:
The K type thermocouple is the most commonly used thermocouple. This is quite famous among all the professionals due to its cost, its accuracy, its reliability and on the top of all this it has a wide temperature range. This temperature sensor can be used in plastic injection molding machines, heaters, etc. This is the reason that I have selected this type of the thermocouple and decided to make a detailed tutorial on the k type thermocouple. Later I will use this sensor in a plastic injection molding machine. This tutorial will soon be available on my YouTube channel “Electronic Clinic” and on this website. You can subscribe to my website and YouTube channel for notifications.
J type thermocouple temperature range:
Iron / Constantan
Temperature Range:
- -210 to 760C
- Extension wire, 32 to 392F (0 to 200C)
J type thermocouple application:
The J type thermocouple is also quite famous, unlike the K type thermocouple. As compared to the K type thermocouple the J type thermocouple has a smaller temperature range. The J type thermocouple has a shorter lifespan when used at higher temperatures than the K type thermocouple. In terms of reliability and cost the J type thermocouple is equivalent to the K type thermocouple.
T type thermocouple temperature range:
Copper / Constantan
Temperature Range:
- -270 to 370C
- Extension wire, 32 to 392F (0 to 200C)
T type thermocouple application:
The T type thermocouple is very famous for its stability and is most commonly used in extremely low-temperature applications such as low freezers or Cryogenics.
E type thermocouple temperature range:
Nickel-Chromium / Constantan
Temperature Range:
- -270 to 870C
- Extension wire, 32 to 392F (0 to 200C)
E type thermocouple application:
E type thermocouple has a stronger signal and very high accuracy than the previous types of the thermocouples K type or J type thermocouples.
N-type thermocouple temperature range:
Nicrosil / Nisil
Temperature Range:
- -270 to 392C
- Extension wire, 32 to 392F (0 to 200C)
N type thermocouple application:
The N type thermocouple basically has the same accuracy and temperature range as the K type thermocouple. But the N type thermocouple is slightly more expensive.
S type thermocouple temperature range:
Platinum Rhodium – 10% / Platinum
Temperature Range:
- -50 to 1480C
- Extension wire, 32 to 392F (0 to 200C)
S type thermocouple application:
The S type of thermocouple is used in areas where very high temperature is needed to be monitored. The S type of thermocouple is most commonly used in the BioTech and Pharmaceutical industries. Because of its higher accuracy and stability, it is also used in lower temperature applications.
R type thermocouple temperature range:
Platinum Rhodium – 13% / Platinum
Temperature Range:
- -50 to 1480C
- Extension wire, 32 to 392F (0 to 200C)
R type thermocouple application:
The R type thermocouple has a higher percentage of Rhodium than the S type thermocouple, and this is the reason it’s more expensive. The R type thermocouple is also used in high-Temperature applications. In terms of the performance, the R type thermocouple is similar to the type S. Due to its high stability and accuracy this thermocouple is also sometimes used in lower temperature applications.
B type thermocouple temperature range:
Platinum Rhodium – 30% / Platinum Rhodium-6%
Temperature Range:
- 0 to 1700C
- Extension wire, 32 to 392F (0 to 100C)
B type thermocouple application:
The type B thermocouple has the highest temperature limit as compared to all the above thermocouples and is used in extremely high-temperature applications. This B type thermocouple can maintain high stability and high accuracy at high-temperature level.
Now from the above discussion, I am sure now you have the complete understanding of why I have selected the K type thermocouple for this tutorial. As in this tutorial, the MAX6675 module is also used so let’s have a look at the MAX6675 module before I explain the circuit diagram and Arduino Programming.
MAX6675 Module:
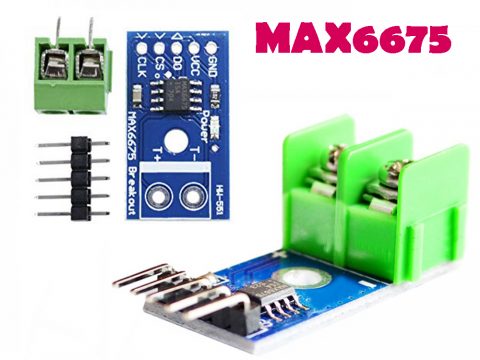
This is how the MAX6675 breakout module looks. The max6675 is a thermocouple temperature sensor amplifier. The temperature resolution capability of the max6675 breakout module is 0.25 degree.
MAX6675 Datasheet specifications:
- Operating voltage:0 to 5.5 volts
- Current: 50 Milliamps
As you can see in the picture above, all the pins are clearly labeled as GND, VCC, D0, CS, CLK, +, and – .
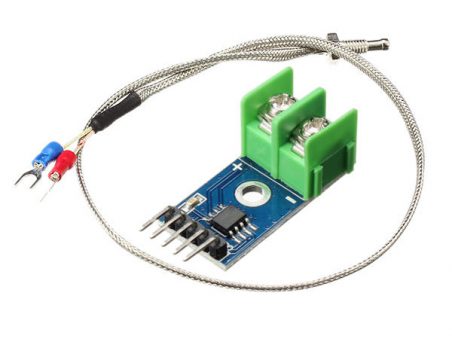
The two wires of the thermocouple come with the Red and Blue sleeves. Red is connected with the + terminal of the max6675 module while the Blue wire is connected with the – terminal of the max6675 breakout module.
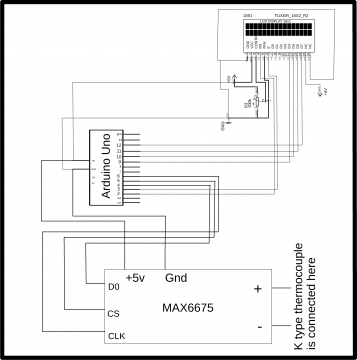
Circuit Diagram:
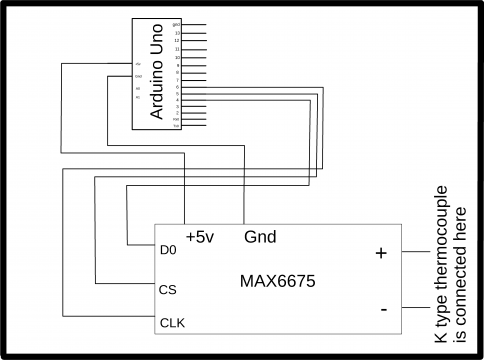
This is a very simple circuit diagram without using the LCD. This circuit diagram is only for the beginners explaining how the k type thermocouple is connected with the max6675 and how the max6675 breakout module is interfaced with the Arduino. This circuit will be later modified by connecting an LCD 16×2 to display the temperature. Now let’s write a very basic program to display the temperature on the Serial Monitor.
Max6675 Arduino Code:
Before you start the programming you will need to download the max6675 library. The download link is given below.
Download Max6675 Library: max6675
After you download the max6675 library, then simply extract the folder and copy and paste it into the Documents > Arduino > libraries folder.
|
1 2 3 4 5 6 7 8 9 10 11 12 13 14 15 16 17 18 19 20 21 22 23 24 25 26 27 28 29 30 31 32 33 34 35 36 37 |
#include "max6675.h" int thermoDO = 4; // so int thermoCS = 5; // int thermoCLK = 6; // sck float temp1 = 0; MAX6675 thermocouple(thermoCLK, thermoCS, thermoDO); void setup() { Serial.begin(9600); // wait for MAX chip to stabilize, 500 milli seconds equal to a half second delay(500); } void loop() { // Serial.println(thermocouple.readFahrenheit()); temp1 = thermocouple.readCelsius(); Serial.println(temp1); // adjust the following conditions according to the temperature we want to set . if(temp1 < 40 ) { Serial.println("normal"); delay(1000); } if(temp1 > 40) { Serial.println("High"); delay(1000); } else delay(500); } |
After you upload the program into the Arduino Uno. Open the serial monitor, apply some temperature and you will see values like these.

Now let’s modify the circuit by adding a 16×2 LCD. If you have never used the 16×2 LCD then you can watch my getting started tutorial on the 16×2 LCD which explains everything from soldering to the basic Arduino Uno programming.
Max6675 + K type thermocouple and LCD:
The LCD connections with the Arduino can be easily understood. Now let’s write a program to display the temperature on the LCD.
K Type thermocouple + MAX6675 Arduino programming:
|
1 2 3 4 5 6 7 8 9 10 11 12 13 14 15 16 17 18 19 20 21 22 23 24 25 26 27 28 29 30 31 32 33 34 35 36 37 38 39 40 |
// lcd pins int rs = 2; int en = 3; int d4 = 9; int d5 = 10; int d6 = 11; int d7 = 12; // include the library code: #include <LiquidCrystal.h> #include "max6675.h" LiquidCrystal lcd(rs, en, d4, d5, d6, d7); int thermoDO = 4; // so int thermoCS = 5; // int thermoCLK = 6; // sck float temp1 = 0; MAX6675 thermocouple(thermoCLK, thermoCS, thermoDO); int tempflag = 0; void setup() { lcd.begin(16, 2); // intialise the LCD Serial.begin(9600); Serial.println("MAX6675 test"); // wait for MAX chip to stabilize delay(500); lcd.clear(); lcd.print("Temperature"); // Voltage status , Temperature status, Load status } void loop() { temp1 = thermocouple.readCelsius(); lcd.setCursor(0,1); // second row lcd.print(temp1); // voltage high old instruction was lcd. print("VH"); delay(500); } |
After compiling and uploading the code. I was able to monitor the temperature on a 16×2 LCD.
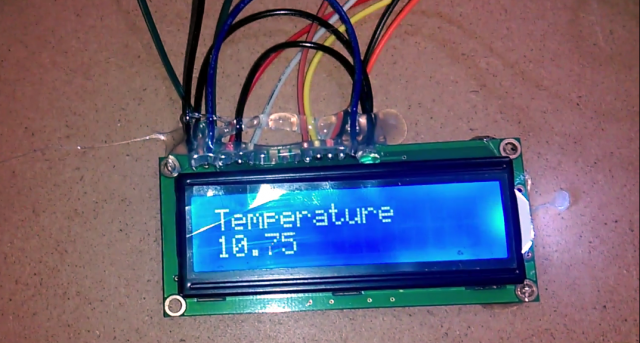
This project was a great success. With a little modification in the programming and adding some relays, I will use this project in my Plastic injection molding machine for monitoring the temperature of the heat bands.
If you have any questions regarding this project, feel free to comment.
Discover more from Electronic Clinic
Subscribe to get the latest posts sent to your email.


good day. how to connect 4 max6675 k type thermocouples on arduino mega
I already did for 3 sensors. did you check?
how to maser negative temperature
The K-type is often has the 2 terminals. one colored yellow is the positive, and second is red negative terminal