Rain Drop Sensor with Arduino, Rain Detector Arduino code & Circuit
Table of Contents
Rain Drop sensor Or Rain Detector Sensor:
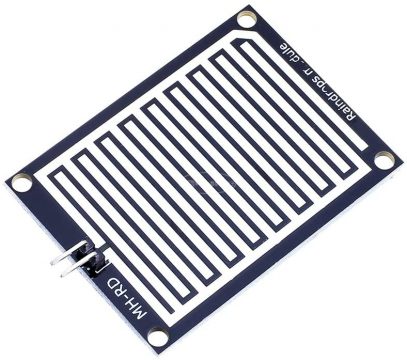
In this article, we will be discussing the rain drop sensor which is also known as the rain detector sensor. Basically rain drop sensor is a tool used for sensing rain, which consists of two modules a rain board that detects the rain and control module which compare the analog value and converts it in to digital value. Basically rain drop sensor can be used in automobile to control the wipers automatically. It can also be used for rain detection and alert notification system.The first part of the rain drop sensor is the pcb board which consists of soldered wires and it gives signal directly whenever the rain drop fall on it.The rain drop sensor consists of metal strips which are left exposed. This metal has certain resistivity when this metal exposed to water the resistance will be changed the more exposed to water the conductivity of this metal will be more or the resistance will be decreased
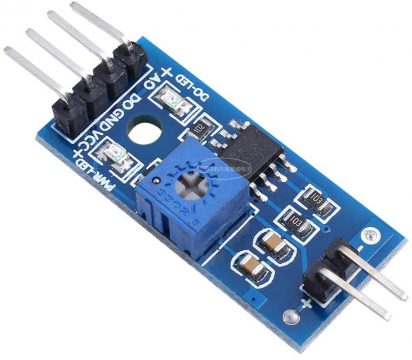
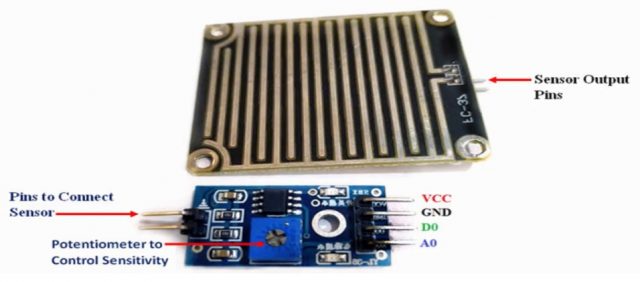
When a raindrop gets on it completes the path between the two grids and thus allows current to flow. It consists of two wires which is connected with the pcb wires and with this we are using an analog-to-digital converter. The rain detector sensor comes with a board this board is a signal conditioning it will convert the resistance to voltage and it has two outputs which are analog and digital. The analog output will give us voltage according to the quantity of the water that is exposes to the rain drop sensor. The more water exposed the sensor the less voltage it will give us. On the board module we have lm393 comparator IC. This IC is used to make digital output when water or voltage reaches certain level it will give a LOW output we can change the threshold by turning this potentiometer which is blue in color.
The ADC will be used in case of the microcontroller where we do not have analog pins while in case of the Arduino we have analog pins so we can also use it directly with the Arduino. The two pins at one end of the ADC will be connected with the rain drop sensor while at the other end of the comparator we have 4 pins.
- VCC
- GND
- D0
- A0
A0 which is analog value gives us voltage if the rain drop is maximum it will gives us maximum value and if the rain drop value is minimum the voltage will be minimum. D0 is the digital pin which is adjusted with the variable resistor and gives us value in 0 and 1 form. The potentiometer of the module is used to control the sensitivity of the module.
Features:
• Operating voltage: 5V
• Provide both digital and analog output
• Adjustable sensitivity
• Output LED indicator
• Compatible with Arduino
• TTL Compatible
• Bolt holes for easy installation
• Jumper wires included
Pins:
LM393 is used as a comparator
D0 – Digital Output (TTL Compatible)
A0 – Analog Output
VCC – Reference Voltage of the comparator
Size:
2.2″ x 1.6″ (the sensor)
1.6″ x 0.6″ x 0.25″ (the module)
Amazon link:
Arduino Nano USB-C Type (Recommended)
*Please Note: These are affiliate links. I may make a commission if you buy the components through these links. I would appreciate your support in this way!
Interfacing the Rain drop sensor with arduino using Analog pin:
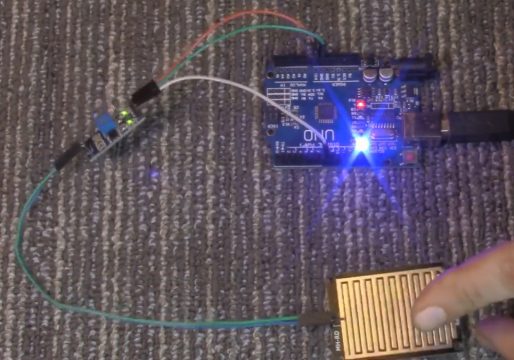
Let’s start the experiment with the analog output using Arduino. First i will connect the rain detector sensor pad to the board module by connecting the two wires of the rain detector pad sensor with the rain drop sensor with the board module and then connect the sensor module with Arduino.
Such that:
- Connect the VCC of the board module with 5V
- Connect the ground of the board module with the ground of the arduino
- Analog output to analog A0 of arduino.
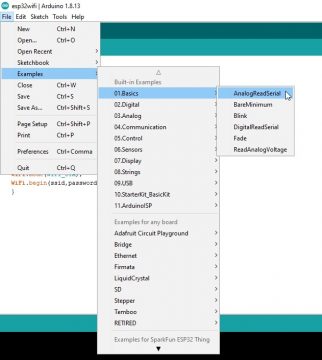
I will left the digital output not connected and as usual we can use a very simple easy to read the analog voltage. Let just open the analog read serial example file upload the sketch.
Rain detector Arduino Code:
|
1 2 3 4 5 6 7 8 9 10 11 12 13 14 |
// the setup routine runs once when you press reset: void setup() { // initialize serial communication at 9600 bits per second: Serial.begin(9600); } // the loop routine runs over and over again forever: void loop() { // read the input on analog pin 0: intsensorValue = analogRead(A0); // print out the value you read: Serial.println(sensorValue); delay(1); // delay in between reads for stability } |
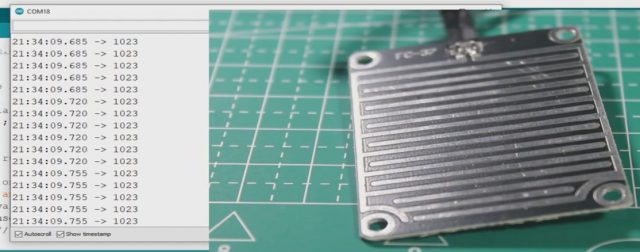
Now open the serial monitor. We can see that at first the ADC is 1023 or its 5 volt it’s at maximum output voltage.
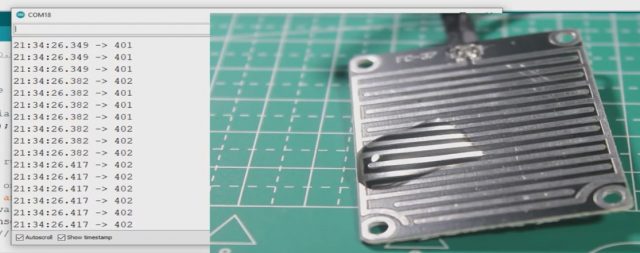
Then i will try to drop water on the sensor pad when the water drop the ADC is dropped too and we can see that when the water is slipped from the pad the ADC rise again and when i add more water it will decrease the voltage or the ADC again.
So as i said at the beginning the more water on the sensor means less voltage output. So the water and the voltage are inversely proportional and when i dry the sensor pad it back to 1023.
Now we can determine threshold so every certain value of ADC we will know that it is raining so i will take 900 as a threshold. So whenever the ADC is less than 900 it is rain and i will make a simple alarm so whenever it is raining a buzzer will sound. Simply connect the buzzer to pin 13 of arduino.
Arduino Rain Drop Detecor Code:
|
1 2 3 4 5 6 7 8 9 10 11 12 13 14 15 16 17 18 19 20 21 22 23 24 25 26 |
// the setup routine runs once when you press reset: const int buzzer = 13; void setup() { // initialize serial communication at 9600 bits per second: Serial.begin(9600); pinMode(buzzer,OUTPUT); } // the loop routine runs over and over again forever: void loop() { // read the input on analog pin 0: int sensorValue = analogRead(A0); // print out the value you read: Serial.println(sensorValue); if (sensorValue<900) { Serial.println("it is raining"); digitalWrite(buzzer,HIGH); } else { digitalWrite(buzzer,LOW); } delay(1); // delay in between reads for stability } |
I will drop the water on the sensor it start to sound the buzzer and when i dry the sensor the buzzer turned off. Now we have successfully made a rain alarm using the analog pin of the Arduino.
Interfacing the Rain drop sensor with arduino using digital pin:
Now let’s try the digital output of the sensor so i will connect the digital output of the sensor to pin 2 of arduino.
- Connect the VCC of the arduino with the VCC of the ADC
- Connect the ground of the sensor with the ground of the arduino
- Connect the digital pin of comparator with the with the arduino pin number 2.
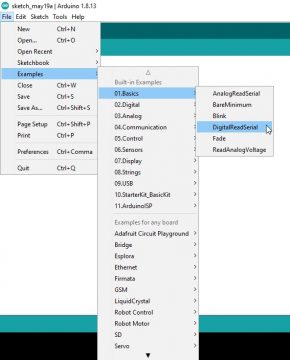
Then use the sample sketch named digital read serial upload and open the serial monitor.
Rain Alarm or Rain Detector Arduino Code:
|
1 2 3 4 5 6 7 8 9 10 11 12 13 14 15 16 17 18 19 20 21 22 23 24 25 26 27 28 29 30 |
// digital pin 2 has a pushbutton attached to it. Give it a name: int pushButton = 2; // instead push button connect the rain sensor and change its name int led = 13; // the setup routine runs once when you press reset: void setup() { // initialize serial communication at 9600 bits per second: Serial.begin(9600); // make the pushbutton's pin an input: pinMode(pushButton, INPUT); pinMode(led, OUTPUT); } // the loop routine runs over and over again forever: void loop() { // read the input pin: int buttonState = digitalRead(pushButton); // print out the state of the button: Serial.println(buttonState); if (buttonState == HIGH) { Serial.println("it is raining"); digitalWrite(led,HIGH); } else { digitalWrite(led,LOW); } delay(1); // delay in between reads for stability } |
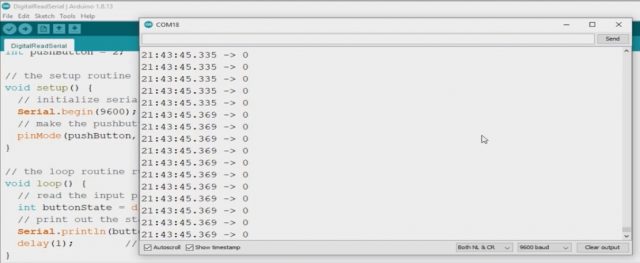
So at first when there is no water it will print one and when there is water on the pad it will print zero.
when use the digital output we can change the threshold by adjusting potentiometer. Now I licked my fingers so it is wet and I touched it.
It makes the path connects it and it turns LED on and I have a short delay on there so it’s not reading continuously every second.
Rain drop sensor based Rain detector or Rain Alarm System:
The rain detector sensor can also be used without the Arduino. Now we will design a project in which when rain start it will give us indication by turning on the led.
Components required:
- Rain drop sensor
- Led or buzzer
- BC 547 transistor
- 1KΩ Resistor
- 470Ω Resistor
Now as show in the above circuit diagram:
- We will connect the rain sensor with the two pins of the ADC as shown above the ADC consists of 4 pins.
- The ground pin of the ADC will be connected with the negative terminal of the battery.
- Connect VCC of the ADC with the 9V
- Now connect D0 of the ADC at one end of the 1KΩ resistor and connect the other terminal of the resistor with the base of the BC547 transistor
- Connect the emitter of BC547 transistor with the ground
- Connect the collect of the BC547 with the cathode of the led
Working of the Rain Detector circuit:
When the rain sensor will detect the rain we will get 5V at D0 of the ADC as 1KΩ resistor is used for biasing of the transistor will make the transistor in active state. The transistor will start working like a switch. The collector and emitter will be shorted and as the led has already gaining positive voltage and will obtain ground through this transistor and the led will start glowing. We can also use buzzer in place of the led.
Applications of the Rain drop sensor:
- Rain sensing wipers are great convenience feature in a luxury car
- Useful in marine application
- It can be used in aircrafts




Mujy ya project. Purchase karna ha. Ager. Ap. Sale. Karty to. Rain alrm
Whatsapp num 03186114158
Mei sell tu nahi kerta, per agar aap ko designing aur making mei help chahiye tu aap mujhe contact ker sakti hain.