SCR Applications, Power Control, Current Control, Emergency Lighting, Over-voltage
Table of Contents
SCR Applications:
Some basic applications of an SCR are as follows.
1). Relay controls
2). Full-wave bridge rectifier Control
3). Static switches
4). Motor controllers
5). Inverters
6). Battery charger
7). Heater controller
8). Phase controller
9). Fire controller
10). Full wave alternating current controller
11). Emergency lighting system
12). Overvoltage protection
13). Controlling speed of electric motors
14). Ultrasonic cleaning
15). Induction heating controls
16). Inverters (which are used in uninterrupted power supplies or UPS)
17). High-powered industrial control systems
18). Mechanical switches. I am going to explain some of these.
Power Controls or Phase Controls by SCR
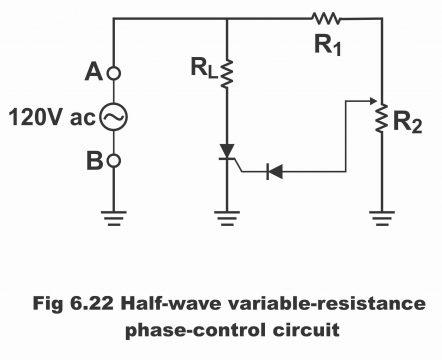
We know that an SCR is most commonly used as a phase control or power control device. In other words, SCR is normally used for controlling AC power supplied to lamp dimmers, electric heaters, electric motors, etc. In figure 6.22, a half-wave variable resistance phase control circuit has been illustrated. AC power is supplied parallel to its A and B terminals. In this figure, R1 means load resistance (e.g. heater element or lamp filament). R1 is a current limiting resistor while R2 is a potentiometer or a variable resistance, changing the value of which the trigger level of an SCR can be revised or set. Remember that SCR can be triggered at any point between zero and 90ᵅ in positive half cycle of AC waveform. The process of phase control via R2 is as follows.
Figure 6.22 Half-wave variable resistance phase-control circuit
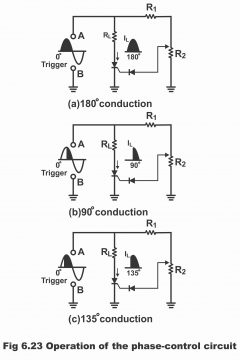
- When the value of R2 is set in such a manner that it is on its lowest value, as is clear from figure 6.23 (a), SCR starts conducting as soon as the positive half cycle starts (at about zero degrees). This process of conduction starts at zero degrees and continues till 180ᵅ. In this way, load gets maximum power.
- When R2 is set at about half of its value, as shown in figure b, SCR fires or conducts at about peak value of positive half cycle i.e. 90ᵅ. This process of conduction starts at about 90ᵅ (i.e. SCR starts working from about 90ᵅ of the positive half cycle and works up to 180ᵅ or up to the next 90ᵅ from its beginning. Remember that half-cycle equals 180ᵅ). In such a situation, the load receives little power.
- Triggering can be started by adjusting / setting R2 anywhere between these two extreme conditions. Thus, a variable quantity of power can be supplied to load. For example, if triggering is started at 45ᵅ by adjusting the value of R2 between above mentioned two conditions, as can be seen in the figure ©, then SCR conducts till 135ᵅ of the positive half-cycle (i.e. SCR starts conducting at 45ᵅ of the positive half cycle and then turns off conducting till 180ᵅ. Thus, conduction is possible till 135ᵅ)
It is worth remembering here that when AC input supplied on the circuit becomes negative (i.e. when the negative half cycle starts), SCR turns off and does not conduct again until the trigger point of the next half-cycle is reached. In other words, turns off on the negative half cycle of the input supply and does not function again till the trigger point or trigger angle of the next positive half-cycle arrives. The diode fitted on the gate’s circuit stops negative AC voltages from reaching the SCR gate so that extreme gate voltage between gate and cathode could stay within its permissible limits during input supplies’ negative half cycle.
Figure 6.23 Operation of the phase-control circuit
ON-OFF Control of Current
In figure 6.24, an ON-Off control circuit of an SCR has been demonstrated. In which load is supplied current via turning SW1 switch on momentarily. And at times of need, the flow of current to load can be suspended through closing switch SW2.
Figure 6.24 On-off SCR control circuit
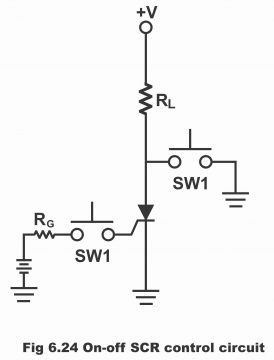
Suppose that SCR is off in beginning. Now if the SW1 switch is pressed and closed momentarily, a current pulse is received on the SCR gate due to which SCR turns on. Thus, the flow of current through load R1 also starts (i.e. SCR conduction starts by providing a pulse on its gate and the load starts receiving current). Remember that now if the gate pulse of SCR is abolished by turning off SW1, SCR will still remain in its conduction mode (i.e. still pass current or remain on). Whenever low current to the load is desired to be stopped, the SW2 switch mounted on the circuit is momentarily closed, due to which current shunts around SCR (i.e. divided between two parallel paths as is evident from the figure). Thus, SCR anode current value gets less as compared to its holding value (IH). As a result, SCR turns off. The value of load current also becomes zero when SCR turns off (i.e. flow of current towards the load stops)
Emergency Lighting System
Another example of SCR application is the restoration of light through a lighting system as a result of power failure. In this system, SCR is used in circuits in which a backup battery is used in order to restore light continuously.
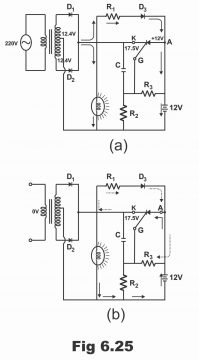
In figure 6.25, a center-tapped full-wave rectifier circuit has been demonstrated which is used to provide AC power to a low voltage lamp. So long as power is available on the circuit (i.e. as long as external AC power remains restored), till that point battery fitted in the circuit keeps on charging through diode D3 and resistor R1. In case of AC power is on, capacitor C charges till full-wave rectified AC voltages’ peak value (i.e. 12.4×1.414=17.5 volts). The same cathode voltages are found on cathode K. As battery voltages (i.e. 12 volts) are present on SCR‘s anode A, which are less compared to SCR’s cathode voltages. Therefore, an anode is less positive as compared to a cathode. Thus, SCR does not conduct. Voltages are received on the SCR gate through a voltage divider consisting of R2 and R3. Under this situation, the lamp gets illuminated via AC supply and SCR remains off, as demonstrated in figure (a).
Whenever AC power fails (or AC power is obstructed) capacitor C gets discharged via closed paths R1, D3, and R3 (as denoted via the dotted arrow sign in figure b). Thus, cathode voltages diminish as a result of the discharge of the capacitor and the cathode becomes less positive compared to the anode. As a result of this action, triggering starts on SCR and SCR starts to conduct. Resultantly, current flows through the battery via SCR and lamp and thus, the lamp illuminates, as is evident from figure b. Remember that the capacitor restarts charging as soon as AC power is restored and SCR turns off. As SCR turns off, the battery starts charging again.
An over-voltage protection circuit
Some loads (particularly loads comprising digital ICs) cannot withstand even a momentary high supply voltage. Thus, special care has to be exercised in order to protect such delicate and expensive loads from fluctuations in power supply. For overvoltage protection circuits are mounted with these loads which safeguard them completely against excessive voltages above their allowed rated ratings.
In figure 6.26, simple and overvoltage protection circuits have been displayed, which are also known as SCR crowbar circuits occasionally. (Remember, crowbar means a heavy iron rod through which a large weight can be lifted)
Figure 6.26 A basic SCR over-voltage protection circuit.
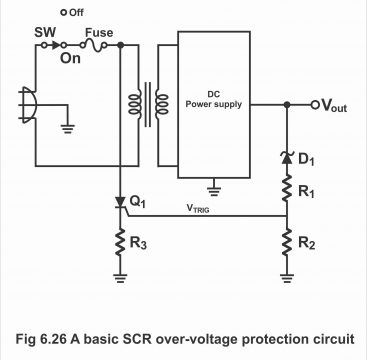
Under normal circumstances, when regulators’ output voltages are lower than Zener diodes’ breakdown voltages, SCR does not conduct (Remember Zener diode D1 and resistive voltage divider (R1 and R2) monitors DC output voltages accrued through DC power supply or regulator. Further, the extreme limit of the output voltage is set by means of Zener voltage). Thus, regulators’ complete output voltages are received on load. When supply voltages increase due to any reason, the Zener diode starts working (i.e. Zener diode tends to break down). As the Zener diode begins to conduct, the voltage divider causes a trigger voltage or trigger pulse on the SCR gate, due to which SCR (which is mounted parallel to line voltage) gets fired (i.e. SCR starts conduction). Fuse melts as a result of SCR current flow as soon as SCR fires. Thus, the load fitted on the DC power supply’s output immediately gets protected as a result of detachment from line voltage.
For further elaboration, a simple SCR curve has been shown in figure 6.27. According to this circuit, output voltages VCC are provided from the power supply to the protected load (i.e. load which requires protection). Under normal circumstances, the VCC value is less as compared to the breakdown voltage of a Zener diode. In such a situation, no voltages are found parallel to R. Thus, SCR remains opened (i.e. it does not conduct) and the load keeps on receiving VCC voltages.
Figure 6.27 SCR crowbar
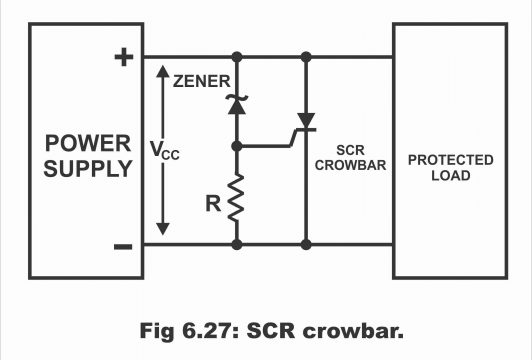
Now suppose that supply voltages increase due to some reason. When the value of VCC increases, the Zener diode tends to break down. Thus, voltages parallel to “R” are being received. If the value of voltages parallel to R exceeds SCR’s gate trigger voltage, SCR gets fired and starts behaving like a closed latch. Thus, maximum current transmits through SCR when it gets fired. As a result, the fuse fitted in the power supply melts. Consequently, load detaches from the power supply and thus gets protected from the unpleasant impacts of overvoltage.
Theft Alarm
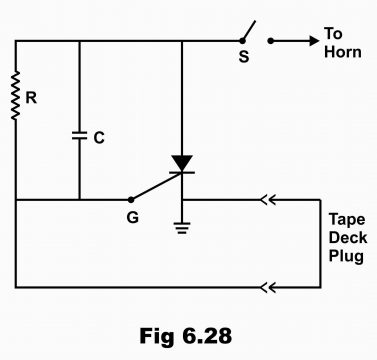
Using the circuit shown in figure 6.28, car tape, deck, or radio receiver can be protected from being stolen. For this end, switch S is closed and hidden in some secret place in a car. As SCR‘s gate is grounded via tape deck (as is clear from the circuit shown in the figure), SCR remains off and the horn also remains silent. However, as soon as the tape or deck is detached, the grounded position on the SCR gate eliminates (i.e. SCR gate separates from the ground) and it connects with the car battery through R. Thus, the gate current sets up (i.e. pulse is received on SCR gate) due to which SCR fires (i.e. it starts conduction) and the horn starts to honk. Remember the horn keeps on honking so long as the hidden switch “S” in the car is not opened.
A Simple Light Dimmer Circuit
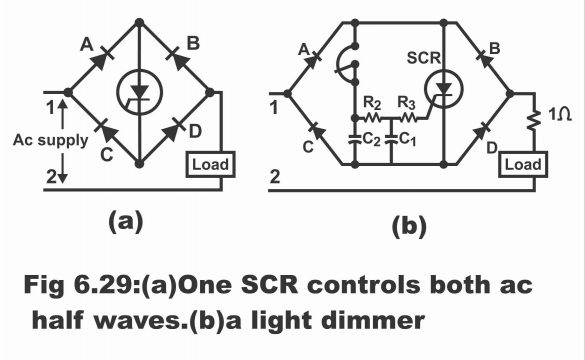
The purpose of this circuit is to control the AC voltages of load which consists of an electric bulb. Thus, the intensity of light can be controlled through fluctuating voltages received on the bulb (i.e. bulb light can be dimmed or increased). In figure 6.29, a simple bridge circuit has been displayed, which comprises four diodes, an SCR, a bulb, and a few passive components. Through this circuit, an electric bulb gets controlled voltages (i.e. voltages that can be increased or decreased or voltages that can be controlled, which are called controlled voltages). The value of AC voltages can be changed by controlling SCR’s gate voltages through a potentiometer R1 and RC network (i.e. lamp light can gradually be dimmed by changing values of R1).
Figure 6.29 (a) One SCR controls both AC half-waves (b) a light dimmer
Mechanism of circuits’ operation:
Four diodes (A, B, C, D) mounted on a circuit construct a bridge circuit. As a result, positive and negative half-cycles are met on the electric bulb. Diode A and D due to being forward biased, conduct during the positive half cycle while diode B and C conduct during the negative half. Carefully analyzing the circuit shown in the figure, it becomes clear that point 1 is more positive as compared to point 2 during a positive half cycle. And during negative half cycles, point 2 is positive with respect to point 1. Thus, during the negative half cycle, current flows towards diode B, SCR, diode C and back to point 1 via point 2 to bulb and resistor 1Ω. On the contrary, during a positive half cycle, current flows via point 1 to diode A, SCR, diode D, and 1Ω resistor, thus reaching the bulb and then returning back to point 2.
It must be remembered that the resistance of a cold bulb is always less compared to a hot bulb. Its resistance increases as it gets warmer and reaches its actual value very quickly. That’s why 1-ohm resistance is placed in the circuit prior to the lamp so that when power is turned on for the first time, the current flowing through the cold bulb remains limited.
Suppose a suitable voltage and a reasonable current are always available on an SCR gate, as a result, SCR remains on. Thus, depending on the setting of a potentiometer, we control the lamplight by changing the SCR firing angle. However, it must be inculcated into mind that such a value of R1 should be set on the circuit which ensures the availability of positive voltages on the gate all the time. Thus, once the value of R1 is set, gate firing voltages become almost the same for both negative and positive half cycles.
Rising AC voltages in every half cycle, (found via diode A or B) charge C1 via R1. When voltages parallel to C1 raise, (i.e. it is charged to its rated value) it also starts charging C2 slowly. If the value of R1 is set at zero ohms by rotating it, C1 and C2 start charging very rapidly by means of their short timing constants. Thus, SCR fires at the start of every half cycle (i.e. it conducts). Therefore, the lamp starts to receive nearly full AC line voltages. Due to which lamp gets brightened to its fullest capacity.
If the value of R1 is set at the midpoint, the C2 capacitor charges through R3, and thus, suitable voltages can be found on SCR’s gate during the middle of every half cycle. Consequently, SCR starts to fire. Thus, the lamp receives adequate voltages for the final portion of every half cycle. When the value of R1 is set at a very high resistance via rotation, C1 charges very slowly due to its long time constant. Thus, SCR tends to fire in the half cycles quite late or it does not fire at all. As a result, the bulb does not illuminate. (In other words, if R1 is set on its high value during the positive half cycle, capacitor C1, due to its long time constant, will charge quite slowly till its desired positive voltages? This action will also occur on capacitor C2. As a result, the gate will receive positive voltages quite late and SCR will also turn on sluggishly) Thus, by changing the setting of R1, we can control SCR firing angle from zero to 180ᵅ.
Remember that in the case of a zero-firing angle (α) electric bulb receives full voltages whereas when the value of (α) is 180ᵅ, SCR does not turn on and the bulb will also remain off. Thus, by setting R1 according to need, full light from an electric bulb can be obtained. Apart from dimming, the bulb can also be turned fully off, if required.
Automatic Battery Charging Circuit
In figure 6.30, a charging circuit of a 12-volt battery has been shown in which two SCRs have been used. Both SCRs charge the battery automatically and when the battery gets fully charged, the current charging the battery stops automatically. In the figure, a center-tapped step-down transformer has also been displayed, which steps down the 240-volt RMS main AC voltage to a reasonable level. Two diodes D1 and D2 working as a full rectifier provide output voltages parallel to SCR1 and a 12-volt battery (which is desired to be charged). When SCR2 is in its off mode, DC triggering voltages on the SCR1 gate are received via resistor R1. SCR2 remains in off condition only so long as its gate does not receive appropriate triggering voltages. Remember that for turning the SCR2 gate on, positive voltages are received vide the voltage divider network (which consists of R3, R1, and 11-volt Zener diode).
Figure 6.30 a battery charger using two SCRs
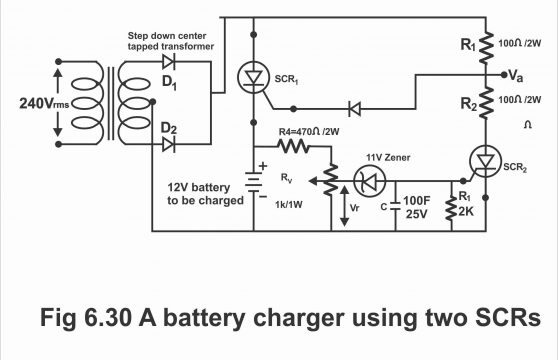
When the battery is discharged (i.e. its volts are less than 12 volts) Vy voltages also drop, so that the Zener diode (11 volts) does not turn on. Thus, SCR’s gate supply suspends and SCR2 ultimately turns off. In such a situation, the SCR1 gate receives voltages Va through R1. The value of Va voltage (between R1 and R2) is just enough to turn SCR1 on and the battery starts charging.
When a battery has been fully charged, Vy voltage also increases with an increase in the battery’s voltage. The Rv value of the potentiometer has been set in such a way that when the battery gets fully charged, SCR2 turns on automatically (normally between 12.8 to 13.2 volts). Once SCR2 turns on, Va voltage drops. As a result gate current of SCR1 gets disconnected. Thus, SCR1 turns off, and the charging current leads to the battery drop down to zero. A resistor R4 has also been included in the circuit so that if the value of Rv is set at zero, in such a situation there must always be some kind of limiting resistance in the path of the Zener diode. Capacitor C1 has been fixed in the circuit so that SCR2 could be protected against wrong triggering as a result of a sudden change in voltage or transient voltage. Therefore, almost constant voltages can be found parallel to C1. Further, C1 bypass such transient voltages towards the ground. Thus SCR2 gate gets protected from these transients. This battery charging circuit is thoroughly automatic because whenever a battery is completely charged, this circuit suspends the charging current immediately. When the battery discharges and its voltages get diminished from a definite level, the charger turns on automatically. Through such types of circuits, the risk of battery overcharging is eliminated. As overcharging reduce a battery’s life, therefore overcharging should be avoided at all costs.
Previous Topic: Silicon Controlled Rectifier SCR, Construction
Next Topic: DIAC
For electronics and programming-related projects visit my YouTube channel.
