Temperature sensor ds18S20 and AM2302 DHT22 with raspberry pi
Last Updated on August 3, 2022 by Engr. Shahzada Fahad
Table of Contents
Temperature Sensor with Raspberry Pi:
The temperature sensor DS18S20 and AM2302 DHT11 with Raspberry Pi– The aim of this project is to measure the ambient temperature with a Temperature sensor DS18S20. The Raspberry Pi has no analog inputs on which the voltage can be measured with an analog / digital converter. All GPIO inputs are digital inputs that can only differentiate between 0 and 1. It is therefore advisable to use a component for simple temperature measurement an integrated A / D converter. The DS18S20 temperature sensor component, which is often available as a 1-wire Thermometer. This name results from the fact that this component only has three connections: two are used for power supply, the third is used for signal transmission in the form of a binary data stream. The DS18S20 temperature sensor can even be operated without an explicit supply voltage and then draws power from the signal line. Background information on the 1-Wire bus and the correct one We already have the configuration of /boot/config.txt.
Amazon Purchase Links:
DS18B20 one-wire digital temperature sensor:
Wireless Keyboard and Mouse for raspberry pi:
Night vision Camera for Raspberry Pi:
Oled HDMI touch display for raspberry pi:
Other Tools and Components:
Super Starter kit for Beginners
PCB small portable drill machines
*Please Note: These are affiliate links. I may make a commission if you buy the components through these links. I would appreciate your support in this way!
The DS18S20 temperature sensor measures temperatures in a measuring range between –55 °C and +125 °C. The temperature is transmitted as a 9 or 12 bit number. Since each DS18S20 temperature sensor has a unique Serial number, several elements can be connected in parallel and evaluated separately (via a single GPIO pin). When reading out the thermometer helps with its own Linux kernel module. There are different versions of the original DS18S20 TEMPERATURE SENSOR: Easiest available is mostly the component DS18S20 temperature sensor, which is almost completely compatible with the original and served as the basis for this section. The DS18B20 temperature sensor variant, in which the required measurement accuracy is programmed via a register, is also popular. A lower accuracy enables faster measurements and reduces power consumption. Some DS1820 TEMPERATURE SENSOR variants are also offered in a waterproof Version, having the same electrical properties.
Similar to mechanical switches, the DS18S20 TEMPERATURE SENSOR must also have a pull-up resistor can be used (see Figure 1).
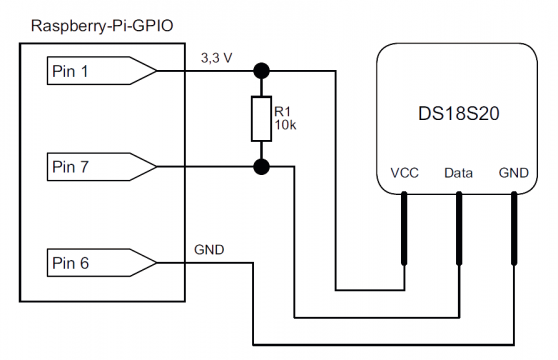
Note: Which pin of the DS18S20 is pin 1?
The assignment of the pins of the DS18S20 can be found in the data sheet. You have to Note that the component is shown from below (bottom view)!
Before you can read out the temperature, you have to enter the file /boot/config.txt insert a device-tree-overlay. To do this, open the file and add the following line:
dtoverlay = w1-gpio, gpiopin = 4
You can also use any other free GPIO pin for 1-Wire. After a restart you can use the file / sys / devices / w1_bus_master1 / w1_master_slaves the IDs remove all connected DS18S20 temperature sensors. In this example there is only a sensor:
cat/sys/devices/w1_bus_master1/w1_master_slaves
10 -000802 ae1551
The measurement data of each sensor are available in a text file. The second is interesting Line: It indicates the temperature in thousandths of a degree, even if the measurement accuracy is less. At the time of measurement, the ambient temperature was therefore approx. 20.6 °C.
cat/sys/devices/w1_bus_master1/10 -000802 ae1551/w1_slave
29 00 4b 46 ff ff 02 10 0c: crc = 0c YES
29 00 4b 46 ff ff 02 10 0c t = 20625
You can also read out the 1-Wire sensors in Python. We used the simple Python3 library w1thermsensor. Clone the necessary files from the GitHub repository and install the Extension:
git clone https://github.com/timofurrer/w1thermsensor cd w1thermsensor python3
setup.py install
The library offers the possibility to read out individual sensors as well as each connected one Sensor. For our temperature sensor, the Python program looks like:
|
1 2 3 4 5 6 7 8 9 10 11 12 13 14 15 16 17 18 |
#! / usr / bin / python3 # Ds18b20.py file from w1thermsensor import W1ThermSensor # Read out individual sensors: # Sensor number previously with # Read out "cat /sys /devices / w1_bus_master1/w1_master_slaves". # Enter only the name after the hyphen. sensor = W1ThermSensor (W1ThermSensor.THERM_SENSOR_DS18B20,"000802 ae1551") temperature_in_celsius = sensor. get_temperature () print ("single sensor:", temperature_in_celsius) # Read out all available sensors: for sensor in W1ThermSensor. get_available_sensors (): print ("Sensor list: \ nSensor% s has the temperature% .2f"% (sensor.id, sensor. get_temperature ())) Calling the program leads to this result: Single sensor: 21,812 Sensor list: Sensor 000802 ae1551 has the temperature 21.81 Sensor 03146 badb5ff has the temperature 21.81 |
The list will of course continue as long as additional sensors are connected. The library also offers the option of displaying temperatures in Fahrenheit and Kelvin display.
Waterproof design
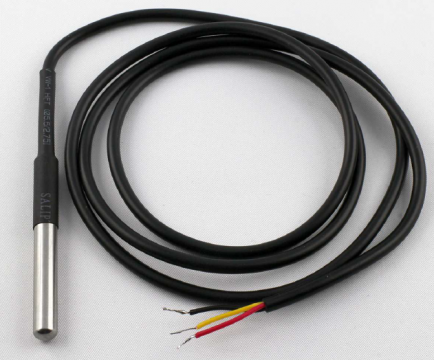
Under the search term »DS18B20« you will find waterproof versions of the sensor. These usually consist of a metal sensor and a three-wire connection line (see Figure 2). The handling is the same as that of the three-legged component. The connection colors of the cable are mostly:
Red: VCC
Black: GND
Yellow or white: signal
Temperature and humidity sensor DHT22 / AM2302:
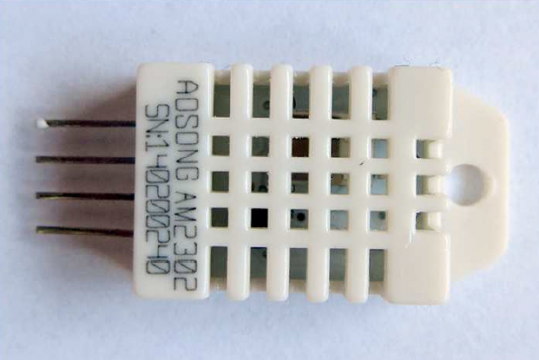
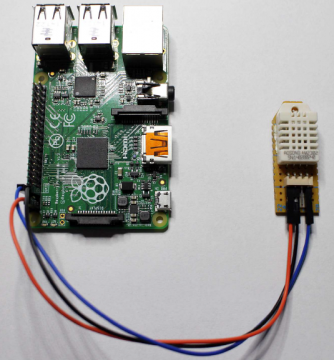
The DHT22 / AM2302 humidity and temperature sensor is a sensor that measures temperature and humidity values and also outputs this via the 1-Wire protocol. The sensor has a larger, easy-to-install housing (see Figure 3). So he doesn’t have to be forcibly soldered on a circuit board. The DHT22 / AM2302 humidity and temperature has a measuring range of –40 ° C to +80 °C with a tolerance less than ±0.5 °C. The humidity can range from 0% to 100% with a tolerance value of ±2% can be measured. Now connect the sensor to the Raspberry Pi (see Figure 4).
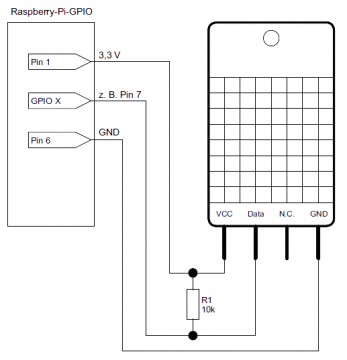
Before proceeding with the software, take a look at the 1-Wire setup Bus in the bus system in my pervious article 1-Wire. Note that the data pin in our example can be connected to any free GPIO pin. Therefore it is referred to as GPIO X in the circuit diagram. Fit In the later Python program, however, you have to select the appropriate pin. The data line should – as can be seen in our circuit diagram – by a pull-up resistor be connected to the VCC line. Otherwise, the Sensors come. We use a Python library from Adafruit for programming. Unfortunately this was not yet adapted for Python 3. Therefore we use in this Example code still Python 2. You install the library via git. If not already is present, also install git:
sudo apt – get install git
cd/home/pi /
git clone https: // github.com/adafruit/Adafruit_Python_DHT
cd Adafruit_Python_DHT
sudo python setup.py install
If you get the error message Python.h: File or Verification when installing the driver directory not found, you are missing the python-dev package. Install do this via sudo apt-get install python-dev, and repeat step sudo python setup.py install. This completes the installation. How simple it is Adafruit library shows the following Python code:
|
1 2 3 4 5 6 7 8 9 10 11 12 13 14 15 |
#! / usr / bin / python # coding = utf -8 import Adafruit_DHT # Sensor type # Possible entries: # Adafruit_DHT .DHT11, Adafruit_DHT .DHT22, Adafruit_DHT .AM2302 sensor = Adafruit_DHT.DHT22 # 1 - Wire - Pin. Use BCM designation! pin = 4 humidity, temperature = Adafruit_DHT.read (sensor, pin) if humidity is not None and temperature is not None: print "Temperatur:% .2f"% temperature "Humidity:% .2f"% humidity else: print "Read error. Try again!" |
The types DTH11 and DHT22 / AM2302 humidity and temperature are supported in the sensor variable. The variable pin contains the pin to which your sensor is connected. Respect, think highly of Make sure that the BCM designation must be used in the variable pin. In other words: GPIO pin 7 = BCM4. The output of the values is by adding % .2f to two Limited decimal places. It can happen that the sensor does not provide any values. This is sometimes due the signal query generated by software. If you use the Use Adafruit_DHT.read_retry, the sensor will be up to fifteen times with two Second waiting time requested. With this method, there is a risk of program crashes much lower due to missing measured values. The datasheet for more details on using the Temperature and Humidity sensor:
Discover more from Electronic Clinic
Subscribe to get the latest posts sent to your email.