Arduino LCD AutoScroll, 16×2 LCD Text Scrolling, Running Text LCD
Last Updated on August 18, 2024 by Engr. Shahzada Fahad
Table of Contents
Description:
Arduino LCD AutoScroll or 16×2 LCD Text Scrolling Project is about the text Scrolling on a 16×2 LCD. This is a small tutorial on how to scroll text on a 16×2 LCD. In this tutorial, you will learn how to make your own custom text scrolling loop and how to use built-in text scrolling functions. In my previous tutorial, I covered the 16×2 LCD introduction… it features …it’s Pinout ….Soldering and basic programming. If you want to learn in details about the 16×2 LCD then you should watch the video.
Amazon Links:
Arduino Nano USB-C Type (Recommended)
*Disclosure: These are affiliate links. As an Amazon Associate I earn from qualifying purchases.
Arduino LCD AutoScroll Circuit Diagram:

This is the complete circuit diagram explaining how 16×2 LCD is connected with the Arduino. This schematic is designed in cadsoft eagle 9.1.0 version. If you want to learn how to make schematics and PCB’s, then watch the video tutorial.
As you can see in the circuit diagram above, the ground is connected with pin number 1, 5, and pin number 16…5v from Arduino is connected with pin number 2 and pin number 15…the middle pin of the variable resistor or potentiometer is connected with pin number 3 of the LCD…while the other two pins are connected with the ground and 5v. Pins 4 to 7 of the Arduino are connected with pins D7 to D4 of the LCD. Pin number 8 of the Arduino is connected with the enable pin of the LCD….pin number 9 of the Arduino is connected with the RS pin of LCD…Now let’s discuss the programming.
Arduino LCD AutoScroll Simulation:
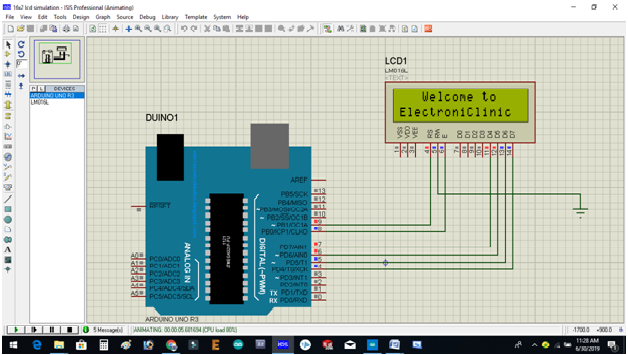
Download:16×2 lcd simulation
It’s a good Designing practice to test your connections. To verify my connections I used Proteus software. If you don’t know how to make a simulation in Proteus then you should watch my video tutorials on Proteus in which I have practically created some advanced level projects. Visit my YouTube Channel “Electronic Clinic”. The Arduino LCD AutoScroll code and circuit diagram was first tested in the Proteus Simulation. After I was satisfied with the results then I Practically start building this Project and completed all the soldering and Interfacing. For the Step, by Step explanation, you can watch Video Tutorial given at the end of this Article.
Arduino LCD AutoScroll Programming:
The 16×2 LCD Programming is really easy. The difficult part has already been done by the Programmers. To control a 16×2 LCD they designed a library for this, which can be used to Print Text on the LCD, any of the two rows can be selected and also any of the 16 columns can be selected. For scrolling text on the 16×2 LCD we can also make a custom user-defined function, instead of using the Built-in function.
|
1 2 3 4 5 6 7 8 9 10 11 12 13 14 15 16 17 18 19 20 21 22 23 24 25 26 27 28 29 30 31 32 33 34 35 36 37 38 39 40 41 42 43 44 45 46 47 48 49 50 51 52 53 54 55 56 57 |
#include <LiquidCrystal.h> #define rs 9 #define en 8 #define d4 7 #define d5 6 #define d6 5 #define d7 4 // initialize the library with the numbers of the interface pins LiquidCrystal lcd(rs, en, d4, d5, d6, d7); void setup() { // set up the LCD's number of columns and rows: lcd.begin(16, 2); // Print a message to the LCD. for(int i= 0; i<= 3; i++) { lcd.clear(); lcd.setCursor(i,0); lcd.print("Welcome to"); delay(300); } lcd.setCursor(0,1); lcd.print("ElectroniClinic"); delay(5000); lcd.clear(); lcd.print(" Seconds "); } void loop() { lcd.setCursor(4,1); lcd.print(millis()/ 1000); // scroll 29 positions (string length + display length) to the right // to move it offscreen right: for (int positionCounter = 0; positionCounter < 7; positionCounter++) { // scroll one position right: lcd.scrollDisplayRight(); // wait a bit: delay(500); } // scroll 16 positions (display length + string length) to the left // to move it back to center: for (int positionCounter = 7; positionCounter > 0; positionCounter--) { // scroll one position left: lcd.scrollDisplayLeft(); // wait a bit: delay(500); } } |
Arduino LCD Autoscroll code explanation:
As usual, i started off by adding the library LiquidCrystal. You need to add this library otherwise the code won’t compile.
#include <LiquidCrystal.h>
Next, i defined pins as per the circuit diagram already explained above.
#define rs 9
#define en 8
#define d4 7
#define d5 6
#define d6 5
#define d7 4
// initialize the library with the numbers of the interface pins
LiquidCrystal lcd(rs, en, d4, d5, d6, d7);
Inside the void setup() function, i activated the LCD using the lcd.begin() functino. 16×2 means, the type of LCD i am using has 16 columns and 2 rows.
void setup() {
// set up the LCD’s number of columns and rows:
lcd.begin(16, 2);
// Print a message to the LCD.
The following for loop is used to scroll the text “Welcome to” then print “ElectroniClinic”, then a delay of 5 seconds, cleared the LCD, and then finally, I printed the text “Seconds”.
for(int i= 0; i<= 3; i++)
{
lcd.clear();
lcd.setCursor(i,0);
lcd.print(“Welcome to”);
delay(300);
}
lcd.setCursor(0,1);
lcd.print(“ElectroniClinic”);
delay(5000);
lcd.clear();
lcd.print(” Seconds “);
}
void loop() {
lcd.setCursor(4,1);
lcd.print(millis()/ 1000);
// scroll 29 positions (string length + display length) to the right
// to move it offscreen right:
for (int positionCounter = 0; positionCounter < 7; positionCounter++) {
// scroll one position right:
lcd.scrollDisplayRight();
// wait a bit:
delay(500);
}
// scroll 16 positions (display length + string length) to the left
// to move it back to center:
for (int positionCounter = 7; positionCounter > 0; positionCounter–) {
// scroll one position left:
lcd.scrollDisplayLeft();
// wait a bit:
delay(500);
}
}
Watch Video Tutorial:
Discover more from Electronic Clinic
Subscribe to get the latest posts sent to your email.


