Fingerprint Based Biometric Attendance System using Arduino & VB.net
Last Updated on August 16, 2024 by Engr. Shahzada Fahad
Table of Contents
Description:
Fingerprint Based Biometric Attendance System– This Tutorial is about the Arduino-based Fingerprint attendance which is also called a Biometric attendance system. The students are marked Present, Late, and absent depending on the time, The attendance application will be designed in Microsoft visual basic 2010 express edition and the Arduino programming will be done in the Arduino IDE “C Language”.
Another more advanced version of the student’s attendance system is based on Firebase Database, RFID, GSM, and Nodemcu ESP8266.
A few days backs I posted a tutorial on the fingerprint module in which I covered all the basics, including its interfacing with Arduino, and how to enroll fingers. In that tutorial, I already enrolled three fingers, so I will be using the same fingers to represent student1, student 2, and student3. I highly recommend first you should watch this tutorial.
This is a very basic student’s attendance system without a database, while in the upcoming tutorial I will modify this project and include a database, then each student record can be edited, checked, deleted, or updated.
For the complete step-by-step explanation, you can watch the Video Tutorial given at the end of this article.
Amazon Links:
Arduino Nano USB-C Type (Recommended)
*Disclosure: These are affiliate links. As an Amazon Associate I earn from qualifying purchases
Fingerprint Module that we will be using with the Arduino:
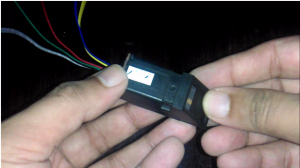
fingerprint attendance
This is the fingerprint module that we will be using today with the Arduino. It has a total of six wires. While some fingerprint modules have 4 wires, but their use is exactly the same. As you can this module has six wires, but we will be using only 4 wires, Red, green, white and black.

We don’t need the yellow and blue wires.
connect the red wire with the Arduino’s 5v.
Connect the black wire of the fingerprint module with the Arduino’s ground.
Connect the green wire with pin 4 of the Arduino and connect the white wire with pin5 of the Arduino. so now our interfacing is completed.

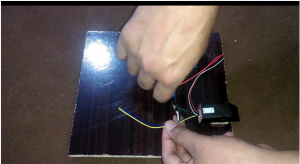
Now it’s time to enroll fingers. For Fingers enrolling watch my Previous Tutorial “Click Here”
Circuit Diagram:
Circuit Diagram of the Arduino FingerPrint Attendance system.
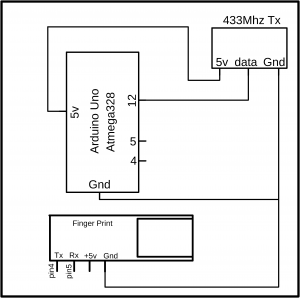
As you can see in the circuit Diagram a 433Mhz RF transmitter is also used which will be used in the future project. In this tutorial, you can neglect this RF Transmitter. The Finger Print module is connected with the Arduino’s pin number 4 and Pin number 5. The 5v pin of the Finger Print Module will be connected with the Arduino 5v pin and ground of the Finger Print module will be connected with the ground of Arduino.
fingerprint attendance Programming:
This project is based on two programs, Arduino programming, and Vb.net Programming. Before, you start the programming, first of all, make sure that you download the necessary libraries.
fingerprint attendance Arduino Programming:
|
1 2 3 4 5 6 7 8 9 10 11 12 13 14 15 16 17 18 19 20 21 22 23 24 25 26 27 28 29 30 31 32 33 34 35 36 37 38 39 40 41 42 43 44 45 46 47 48 49 50 51 52 53 54 55 56 57 58 59 60 61 62 63 64 65 66 67 68 69 70 71 72 73 74 75 76 77 78 79 80 81 82 83 84 85 86 87 88 89 90 91 92 93 94 95 96 97 98 99 100 101 102 103 104 105 106 107 108 109 110 111 112 113 114 115 116 117 118 119 120 121 122 123 124 125 126 127 128 129 130 131 132 133 134 135 136 137 138 139 140 141 142 143 144 145 146 147 148 |
#include <Adafruit_Fingerprint.h> #include <SoftwareSerial.h> int getFingerprintIDez(); char data ; // pin #4 is IN from sensor (GREEN wire) // pin #5 is OUT from arduino (WHITE wire) SoftwareSerial mySerial(4, 5); Adafruit_Fingerprint finger = Adafruit_Fingerprint(&mySerial); void setup() { Serial.begin(9600); // Bits per sec Serial.println("fingertest"); // set the data rate for the sensor serial port finger.begin(57600); if (finger.verifyPassword()) { Serial.println("Found fingerprint sensor!"); } else { Serial.println("Did not find fingerprint sensor :("); while (1); } Serial.println("Waiting for valid finger..."); } void loop() // run over and over again { getFingerprintIDez(); } uint8_t getFingerprintID() { uint8_t p = finger.getImage(); switch (p) { case FINGERPRINT_OK: Serial.println("Image taken"); break; case FINGERPRINT_NOFINGER: Serial.println("No finger detected"); return p; case FINGERPRINT_PACKETRECIEVEERR: Serial.println("Communication error"); return p; case FINGERPRINT_IMAGEFAIL: Serial.println("Imaging error"); return p; default: Serial.println("Unknown error"); return p; } // OK success! p = finger.image2Tz(); switch (p) { case FINGERPRINT_OK: Serial.println("Image converted"); break; case FINGERPRINT_IMAGEMESS: Serial.println("Image too messy"); return p; case FINGERPRINT_PACKETRECIEVEERR: Serial.println("Communication error"); return p; case FINGERPRINT_FEATUREFAIL: Serial.println("Could not find fingerprint features"); return p; case FINGERPRINT_INVALIDIMAGE: Serial.println("Could not find fingerprint features"); return p; default: Serial.println("Unknown error"); return p; } // OK converted! p = finger.fingerFastSearch(); if (p == FINGERPRINT_OK) { Serial.println("Found a print match!"); } else if (p == FINGERPRINT_PACKETRECIEVEERR) { Serial.println("Communication error"); return p; } else if (p == FINGERPRINT_NOTFOUND) { Serial.println("Did not find a match"); return p; } else { Serial.println("Unknown error"); return p; } // found a match! Serial.print("Found ID #"); Serial.print(finger.fingerID); Serial.print(" with confidence of "); Serial.println(finger.confidence); } // returns -1 if failed, otherwise returns ID # int getFingerprintIDez() { uint8_t p = finger.getImage(); if (p != FINGERPRINT_OK) return -1; p = finger.image2Tz(); if (p != FINGERPRINT_OK) return -1; p = finger.fingerFastSearch(); if (p != FINGERPRINT_OK) return -1; // found a match! // Serial.print("Found ID #"); Serial.print(finger.fingerID); // Serial.print(" with confidence of "); Serial.println(finger.confidence); if(finger.fingerID == 11) { Serial.println("stu1"); delay(1000); } if(finger.fingerID == 2) { Serial.println("stu2"); delay(1000); } if(finger.fingerID == 3) { Serial.println("stu3"); delay(1000); } else return finger.fingerID; // Serial.println("Invalid User\n"); } |
fingerprint attendance VB.net Application Programming:
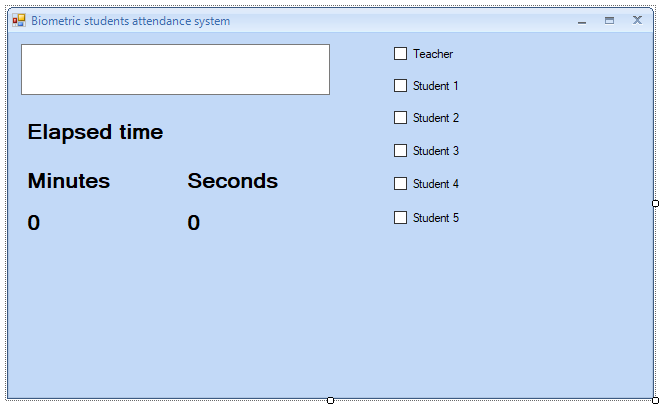
This is how the final application looks like. For the Detailed step by step explanation watch Video tutorial available at the end of this article.
|
1 2 3 4 5 6 7 8 9 10 11 12 13 14 15 16 17 18 19 20 21 22 23 24 25 26 27 28 29 30 31 32 33 34 35 36 37 38 39 40 41 42 43 44 45 46 47 48 49 50 51 52 53 54 55 56 57 58 59 60 61 62 63 64 65 66 67 68 69 70 71 72 73 74 75 76 77 78 79 80 81 82 83 84 85 86 87 88 89 90 91 92 93 94 95 96 97 98 99 100 101 102 103 104 105 106 107 108 109 110 111 112 113 114 115 116 117 118 119 120 121 122 123 124 125 126 127 128 129 130 131 132 133 134 135 136 137 138 139 140 141 142 143 144 145 146 147 148 149 150 151 152 153 154 155 156 157 158 159 160 161 162 163 164 165 166 167 168 169 170 171 172 173 174 175 176 177 178 179 180 181 182 183 184 |
Imports System.IO Imports System.IO.Ports Public Class Form1 Dim secs As Integer Dim mins As Integer ' teacher flag Dim tflag As Integer 'flags for students Dim sflag1 As Integer ' student1 flag Dim sflag2 As Integer 'student2 flag Dim sflag3 As Integer Dim sflag4 As Integer Dim sflag5 As Integer Private Sub Form1_Load(ByVal sender As System.Object, ByVal e As System.EventArgs) Handles MyBase.Load tflag = 0 sflag1 = 0 sflag2 = 0 sflag3 = 0 sflag4 = 0 sflag5 = 0 SerialPort1.Close() SerialPort1.PortName = "com8" SerialPort1.BaudRate = "9600" ‘use same baud rate as used in Arduino SerialPort1.DataBits = 8 SerialPort1.Parity = Parity.None SerialPort1.StopBits = StopBits.One SerialPort1.Handshake = Handshake.None SerialPort1.Encoding = System.Text.Encoding.Default SerialPort1.Open() End Sub Private Sub Timer1_Tick(ByVal sender As System.Object, ByVal e As System.EventArgs) Handles Timer1.Tick ' if the students comes in time, within 2 mints then the students will be marked present. If InStr(TextBox1.Text, "stu1") And (sflag1 = 0) And tflag = 1 And mins <= 2 Then chkstu1.Checked = True sflag1 = 1 chkstu1.Text = chkstu1.Text + " Present" End If If InStr(TextBox1.Text, "stu2") And (sflag2 = 0) And tflag = 1 And mins <= 2 Then chkstu2.Checked = True sflag2 = 1 chkstu2.Text = chkstu2.Text + " Present" End If If InStr(TextBox1.Text, "stu3") And (sflag3 = 0) And tflag = 1 And mins <= 2 Then chkstu3.Checked = True sflag3 = 1 chkstu3.Text = chkstu3.Text + " Present" End If If InStr(TextBox1.Text, "stu4") And (sflag4 = 0) And tflag = 1 And mins <= 2 Then chkstu4.Checked = True sflag4 = 1 chkstu4.Text = chkstu4.Text + " Present" End If If InStr(TextBox1.Text, "stu5") And (sflag5 = 0) And tflag = 1 And mins <= 2 Then chkstu5.Checked = True sflag5 = 1 chkstu5.Text = chkstu5.Text + " Present" End If ' the following conditions will be used to check if the students are late. If InStr(TextBox1.Text, "stu1") And (sflag1 = 0) And tflag = 1 And mins > 2 And mins < 5 Then chkstu1.Checked = True sflag1 = 1 chkstu1.Text = chkstu1.Text + " is late" End If If InStr(TextBox1.Text, "stu2") And (sflag2 = 0) And tflag = 1 And mins > 2 And mins < 5 Then chkstu2.Checked = True sflag2 = 1 chkstu2.Text = chkstu2.Text + " is late" End If If InStr(TextBox1.Text, "stu3") And (sflag3 = 0) And tflag = 1 And mins > 2 And mins < 5 Then chkstu3.Checked = True sflag3 = 1 chkstu3.Text = chkstu3.Text + " is late" End If If InStr(TextBox1.Text, "stu4") And (sflag4 = 0) And tflag = 1 And mins > 2 And mins < 5 Then chkstu4.Checked = True sflag4 = 1 chkstu4.Text = chkstu4.Text + " is late" End If If InStr(TextBox1.Text, "stu5") And (sflag5 = 0) And tflag = 1 And mins > 2 And mins < 5 Then chkstu5.Checked = True sflag5 = 1 chkstu5.Text = chkstu5.Text + " is late" End If ' the following conditions will be used to check if the students are absent. If (sflag1 = 0) And tflag = 1 And mins >= 5 Then chkstu1.Checked = True sflag1 = 1 chkstu1.Text = chkstu1.Text + " is absent" End If If (sflag2 = 0) And tflag = 1 And mins >= 5 Then chkstu2.Checked = True sflag2 = 1 chkstu2.Text = chkstu2.Text + " is absent" End If If (sflag3 = 0) And tflag = 1 And mins >= 5 Then chkstu3.Checked = True sflag3 = 1 chkstu3.Text = chkstu3.Text + " is absent" End If If (sflag4 = 0) And tflag = 1 And mins >= 5 Then chkstu4.Checked = True sflag4 = 1 chkstu4.Text = chkstu4.Text + " is absent" End If If (sflag5 = 0) And tflag = 1 And mins >= 5 Then chkstu5.Checked = True sflag5 = 1 chkstu5.Text = chkstu5.Text + " is absent" End If End Sub Private Sub DataReceived(ByVal sender As Object, ByVal e As SerialDataReceivedEventArgs) Handles SerialPort1.DataReceived Try Dim mydata As String = "" mydata = SerialPort1.ReadExisting() If TextBox1.InvokeRequired Then TextBox1.Invoke(DirectCast(Sub() TextBox1.Text &= mydata, MethodInvoker)) Else TextBox1.Text &= mydata End If Catch ex As Exception MessageBox.Show(ex.Message) End Try End Sub Private Sub Timer2_Tick(sender As System.Object, e As System.EventArgs) Handles Timer2.Tick 'timer2 will be used to empty the textbox1 for the new data. the timer interval is set to 1 second. TextBox1.Text = "" End Sub Private Sub Timer3_Tick(sender As System.Object, e As System.EventArgs) Handles Timer3.Tick ' timer3 will be used for the elapsed time. and this timer will be activated only when the teacher will check the box. secs = secs + 1 lblsecs.Text = secs lblmins.Text = mins If secs = 60 Then secs = 0 mins = mins + 1 End If End Sub Private Sub chkteacher_CheckedChanged(sender As System.Object, e As System.EventArgs) Handles chkteacher.CheckedChanged If chkteacher.Enabled = True Then tflag = 1 Timer3.Enabled = True End If End Sub End Class |
Watch Video Tutorial:
Discover more from Electronic Clinic
Subscribe to get the latest posts sent to your email.


Excellent post. I was checking continuously this blog and I’m impressed! Very useful info particularly the last part gdakbbgedefc
Can you provide a full version of the tutorial? Thinks
How can I download the project
Hello…. I need help on how I can see the list of attendate students on my laptop.
This fingerprint-based biometric attendance system sounds like a fantastic project! I’m particularly impressed by how you’ve integrated Arduino with VB.NET for seamless data management. Can’t wait to try this out and see how it enhances attendance tracking in my workplace! Thanks for sharing the detailed steps!