Arduino Soil Moisture Sensor Getting Started Tutorial
Last Updated on August 18, 2024 by Engr. Shahzada Fahad
Table of Contents
Soil Moisture Sensor With Arduino Description:
In this tutorial, you will learn how to use a soil moisture sensor with Arduino. A soil moisture sensor has many applications, especially in agriculture. Before I use this sensor in some intermediate and advanced level projects, first I decided to make a very basic getting started tutorial to explain the basic connections and programming. This tutorial covers
- Basic introduction
- Interfacing the soil moisture sensor with Arduino
- Soil Moisture Sensor Arduino Programming and finally
- Testing
Recently, I added an advanced level project based on Irrigation. In this project I used the Capacitive Soil moisture with the Nodemcu ESP8266 along with the Lora Transceiver modules by the Reyax technologies. This is really an amazing project, which I designed for one of my customers.
Let’s get started….
Amazon Links:
Arduino Nano USB-C Type (Recommended)
*Disclosure: These are affiliate links. As an Amazon Associate I earn from qualifying purchases.
FC-28 Soil Moisture sensor:

A soil moisture sensor actually consists of two components, the board and the part having these legs.
This is component number1 provided with 2 male headers, with the help of these two male headers it can be interfaced with the blue board using the Female to Female type jumper wires, or if you want solid connections, you can solder these pins.
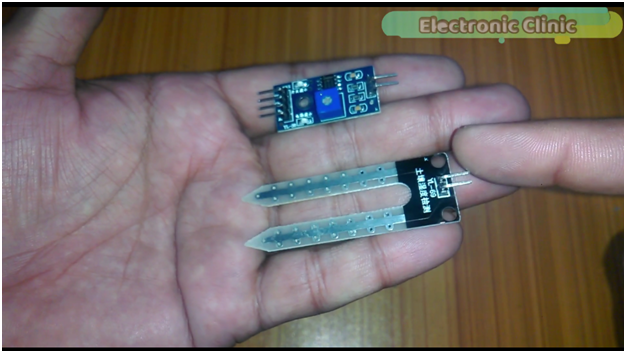
And this is component number 2.
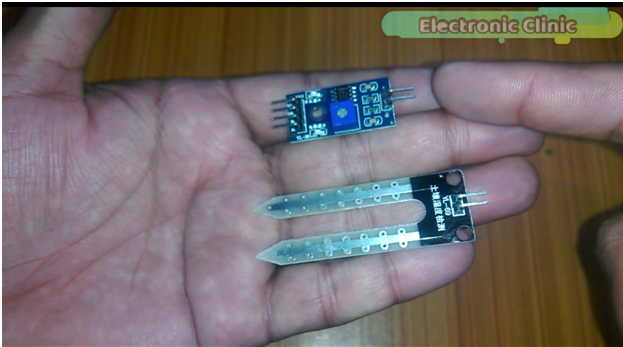
Component number 1 is basically a two-legged lead, that goes into the soil, as you can see this component has two male headers which connect to the component number 2 which is an amplifier/ Analog to digital converter circuit.
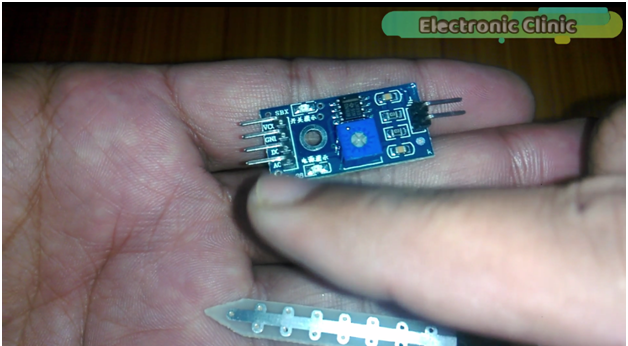
This circuit is connected with the Arduino using these 4 male headers. These 4 male headers are labeled with Vcc. Ground….D0 and A0. D is for the digital while A is for the analog. So it means we can get values in both Digital and Analog. The digital output is in the form of 0 or 1which can be controlled using this potentiometer.
This module has also two led’s, one led is the power ON led, while the other led works with the digital output pin. When the moisture is below a certain value which is set using the potentiometer then led remains off. When there is moisture, this led turns ON. While the analog output can be any number between 0 and 1024. This value will entirely depend on the water content present in the soil. So now we can say that the soil moisture sensor has two modes
- Analog Mode and
- Digital Mode.
First of all, let’s cover the analog Mode.

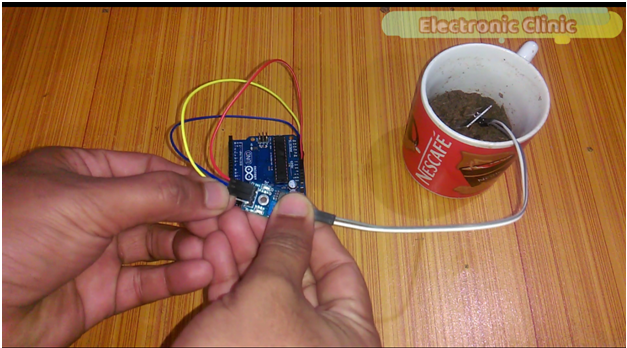
The component 1 which is a two-legged lead is connected with component 2 using two jumper wires, it doesn’t matter which pin you connect with which one, as it has no polarity. The VCC pin is connected with 5volts, The ground wire which is the blue wire is connected with the Arduino’s ground, while the analog output pin is connected with pin A1 of the Arduino.
Soil Moisture Sensor Analog Mode Programming:
|
1 2 3 4 |
int msensor = A1; // moisture sensor is connected with the analog pin A1 of the Arduino int msvalue = 0; // moisture sensor value int led = 13; boolean flag = false; |
As you know my friends every Arduino and the mega program has at least two functions, which are the void setup and void loop function. void means that this function is not returning any value, while the empty parenthesis means that this function is not taking any arguments as the input.
|
1 2 3 4 5 6 7 8 9 10 11 12 13 14 15 16 17 18 19 20 21 22 23 24 25 26 |
void setup() { Serial.begin(9600); pinMode(msensor, INPUT); pinMode(led, OUTPUT); } void loop() { msvalue = analogRead(msensor); Serial.println(msvalue); if ( (msvalue >= 500 ) && ( flag == false ) ) { digitalWrite(led, HIGH); flag = true; delay(1000); } if ( (msvalue <= 300 ) && ( flag == true ) ) { digitalWrite(led, LOW); flag = false; delay(1000); } delay(1000); } |
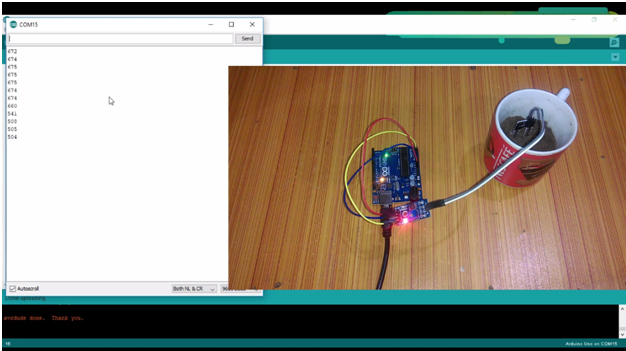
reads the moisture sensor and store the value in msvalue variable. And then using the serial.println function, we send the value to the serial monitor, where we can check the value of the moisture sensor.
Then using two if the conditions we can turn on and turn off the led. When the sensor value is greater than 500 and the flag is false then turn on the led, which means that it needs water. And then change the flag status to true and use a delay of 1 second as 1000 milliseconds are equal to 1 second.
If the value is less then 300 then simply turn off the led. And change the flag status back to false.
I have already uploaded this program let’s watch this in action…
Soil Moisture Sensor Digital Mode:
Now simply remove the yellow wire and connect it with the digital output pin and connect the other end with digital pin 4 of the Arduino.
Soil Moisture Sensor Digital Mode Programming:
|
1 2 3 4 5 6 7 8 9 10 11 12 13 14 15 16 17 18 19 20 21 22 23 24 25 26 27 28 29 30 |
int msensor = 4; // moisture sensor is connected with digital pin4 of the Arduino int led = 13; boolean flag = false; void setup() { Serial.begin(9600); pinMode(msensor, INPUT); pinMode(led, OUTPUT); } void loop() { if ( (digitalRead(msensor) == HIGH ) && ( flag == false ) ) { digitalWrite(led, HIGH); flag = true; delay(1000); } if ( (digitalRead(msensor) == LOW ) && ( flag == true ) ) { digitalWrite(led, LOW); flag = false; delay(1000); } delay(1000); } |
Watch Video Tutorial:
Other Related Video
Discover more from Electronic Clinic
Subscribe to get the latest posts sent to your email.


hi, why my serial monitor not showing any reading?