Multiple Max6675 Arduino based Industrial Temperature Monitoring System
Table of Contents
Description:
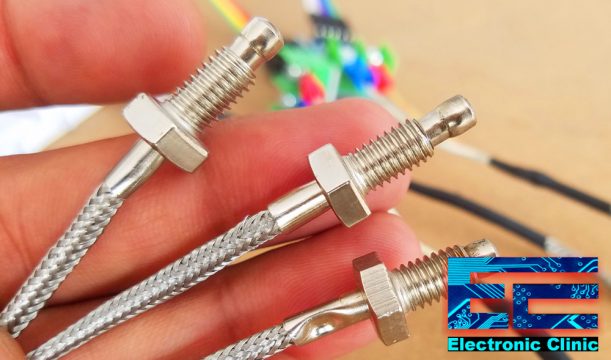
Multiple Max6675 Arduino based Industrial Temperature Monitoring System- In this tutorial, you will learn how to make an industrial temperature monitoring system using Arduino, i2c supported Oled display Module, and multiple Max6675 thermocouple temperature sensor amplifiers based on the K type thermocouples capable of measuring the temperature from 0 to 1024 centigrade.
This is an industrial level temperature monitoring system and can be used in Plastic Injection Molding machines, Food industries, and so on, where you need to monitor multiple temperature sensors.
In this tutorial, we will only cover the monitoring while in version 2 we will make a completely automatic system so that the heaters can be turned ON and turned OFF depending on the pre-defined values.
In this tutorial, we will cover,
- Max6675 Technical specifications
- Oled Display Module Pinout
- Complete circuit diagram Explanation
- Arduino Programming and finally
- Testing
Without any further delay let’s get started!!!
Amazon Links:
Arduino Nano USB-C Type (Recommended)
MAX6675 k type thermocouple and driver:
SSD1306 128×64 Oled i2c display Module
Other Tools and Components:
ESP32 WiFi + Bluetooth Module (Recommended)
Super Starter kit for Beginners
PCB small portable drill machines
What is a thermocouple TC?
A thermocouple “TC” is an electronic component or more specifically a Sensor which is used to measure the temperature.
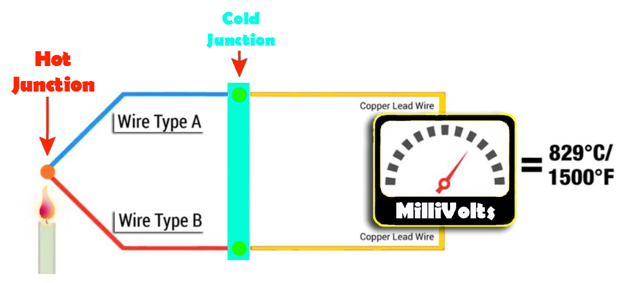
A thermocouple has two wires made up of two different types of materials “metals”. The two metal wires are welded together at one end which creates a junction point. The temperature is measured at this junction point. A change in the temperature at this junction point results in the voltage. This voltage is then used to calculate the temperature using some tables or a module like max6675 which I will be using in this tutorial.
Types of Thermocouple:
Thermocouples are divided into different types due to their unique characteristics, as every thermocouple has its own
- Temperature range
- Vibration Resistance
- Durability
- Chemical resistance and
- Compatibility
Depending on the above characteristics some common types of the thermocouples are K, J, T, R, E, S, N, and B. The R, S, and B type thermocouples are actually the “Noble Metal” thermocouples, which are used in areas where high temperatures are, need to be monitored. While the most commonly used thermocouples include J, T, and K type thermocouples. So as J, T, and K type thermocouples are most commonly used, that’s why I selected the K type thermocouple.
Before I am going to explain why I selected the K type thermocouple, let’s have a look at some of the specifications of all the above thermocouples. These specifications are as per the datasheet which you can easily find by search on Google.
K type thermocouple temperature range:
Nickel-Chromium / Nickel-Alumel
Temperature Range:
- -270 to 1260C
- Extension wire, 32 to 392F (0 to 200C)
K type thermocouple application:
The K type thermocouple is the most commonly used thermocouple. This is quite famous among all the professionals due to its cost, its accuracy, its reliability and on top of all this it has a wide temperature range. This temperature sensor can be used in plastic injection molding machines, heaters, etc. This is the reason that I have selected this type of thermocouple and decided to make a detailed tutorial on the k type thermocouple. Later I will use this sensor in a plastic injection molding machine. This tutorial will soon be available on my YouTube channel “Electronic Clinic” and on this website. You can subscribe to my website and YouTube channel for notifications.
J type thermocouple temperature range:
Iron / Constantan
Temperature Range:
- -210 to 760C
- Extension wire, 32 to 392F (0 to 200C)
J type thermocouple application:
The J type thermocouple is also quite famous, unlike the K type thermocouple. As compared to the K type thermocouple the J type thermocouple has a smaller temperature range. The J type thermocouple has a shorter lifespan when used at higher temperatures than the K type thermocouple. In terms of reliability and cost the J type thermocouple is equivalent to the K type thermocouple.
T type thermocouple temperature range:
Copper / Constantan
Temperature Range:
- -270 to 370C
- Extension wire, 32 to 392F (0 to 200C)
T type thermocouple application:
The T type thermocouple is very famous for its stability and is most commonly used in extremely low-temperature applications such as low freezers or Cryogenics.
E type thermocouple temperature range:
Nickel-Chromium / Constantan
Temperature Range:
- -270 to 870C
- Extension wire, 32 to 392F (0 to 200C)
E type thermocouple application:
E type thermocouple has a stronger signal and very high accuracy than the previous types of the thermocouples K type or J type thermocouples.
N-type thermocouple temperature range:
Nicrosil / Nisil
Temperature Range:
- -270 to 392C
- Extension wire, 32 to 392F (0 to 200C)
N-type thermocouple application:
The N-type thermocouple basically has the same accuracy and temperature range as the K type thermocouple. But the N-type thermocouple is slightly more expensive.
S type thermocouple temperature range:
Platinum Rhodium – 10% / Platinum
Temperature Range:
- -50 to 1480C
- Extension wire, 32 to 392F (0 to 200C)
S type thermocouple application:
The S type of thermocouple is used in areas where very high temperature is need to be monitored. The S type of thermocouple is most commonly used in the BioTech and Pharmaceutical industries. Because of its higher accuracy and stability, it is also used in lower temperature applications.
R type thermocouple temperature range:
Platinum Rhodium – 13% / Platinum
Temperature Range:
- -50 to 1480C
- Extension wire, 32 to 392F (0 to 200C)
R type thermocouple application:
The R type thermocouple has a higher percentage of Rhodium than the S type thermocouple, and this is the reason it’s more expensive. The R type thermocouple is also used in high-Temperature applications. In terms of the performance, the R type thermocouple is similar to the type S. Due to its high stability and accuracy this thermocouple is also sometimes used in lower temperature applications.
B type thermocouple temperature range:
Platinum Rhodium – 30% / Platinum Rhodium-6%
Temperature Range:
- 0 to 1700C
- Extension wire, 32 to 392F (0 to 100C)
B type thermocouple application:
The type B thermocouple has the highest temperature limit as compared to all the above thermocouples and is used in extremely high-temperature applications. This B type thermocouple can maintain high stability and high accuracy at the high-temperature level.
Now from the above discussion, I am sure now you have a complete understanding of why I have selected the K type thermocouple for this tutorial. As in this tutorial, the MAX6675 module is also used so let’s have a look at the MAX6675 module before I explain the circuit diagram and Arduino Programming.
MAX6675 Module:
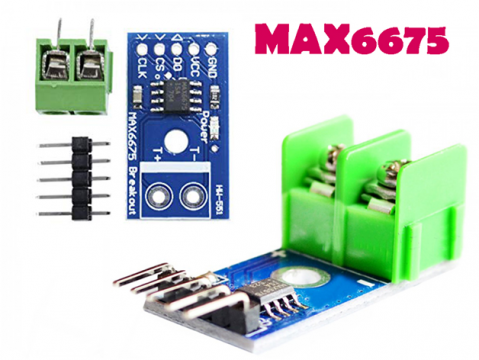
This is how the MAX6675 breakout module looks. The max6675 is a thermocouple temperature sensor amplifier. The temperature resolution capability of the max6675 breakout module is 0.25 degrees.
MAX6675 Datasheet specifications:
- Operating voltage:0 to 5.5 volts due to which it can also be used with 3.3V compatible controller boards like Nodemcu ESP8266 Wifi module, ESP32, and so on.
- Current: 50 Milliamps
As you can see in the picture above, all the pins are clearly labeled as GND, VCC, SCK, CS, and S0.
The two wires of the thermocouple come with the Red and Blue sleeves. Red is connected with the + terminal of the max6675 module while the Blue wire is connected with the – terminal of the max6675 breakout module.
Oled Technology:
Organic light-emitting diodes or OLEDs. These were developed during the 20th century the very first commercial device to use old LEDs was a Kodak camera in 2003 in 2013 Samsung became the first company to release OLED televisions and they’re now the biggest manufacturer in the world of OLED television screens now, the Oled we’re going to be using is not as big as a TV
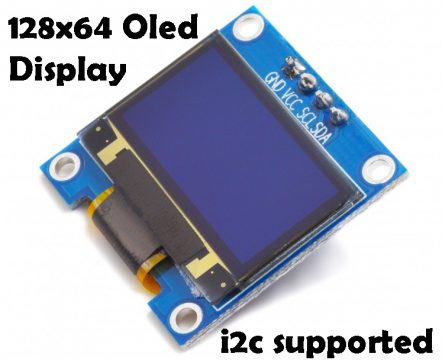
screen, but very small one as you can see in the picture below.
The Oled displays are the kinds of devices you’ll see on items like mp3 radios and smartwatches and they’re very nice These things have a lot of excellent properties to use with an Arduino as a display, they are very easy to read, they take very small current and you can read them from different angles.
About the Oled i2c Display:
This is a mono-color, 0.96-inch with 128×64 pixels Oled i2c display module. OLED stands for Organic light-emitting diode. There are two different models of the same Oled display module which are SSD1306 and SH1106. Only by looking at the Oled display it’s really hard to tell whether this is SSD1306 or SH1106 model.
Unlike the 16×2 liquid crystal display module, the Oled display does not require a backlight, which results in a very nice contrast and moreover the Oled display consumes less power when
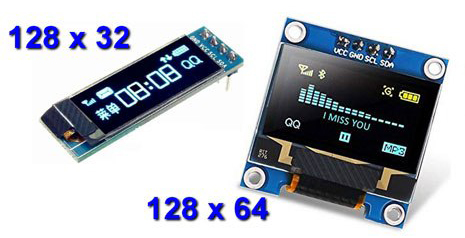
There are other types of the Oled display modules, which are available in different shapes and sizes, some are using i2c communication protocol, there are also other Oled displays that support the SPI communication. But in this tutorial, I will only focus on the Oled display modules that support i2c communication.
This Oled display module can be powered up using 3.3 to 5 volts due to which it can be easily used with 3.3 volts supported controller boards like Nodemcu ESP8266, ESP32, etc and 5 volts supported controller boards like Arduino Uno, Arduino Mega, Arduino Nano and so on.
Oled Display Module Pinout:
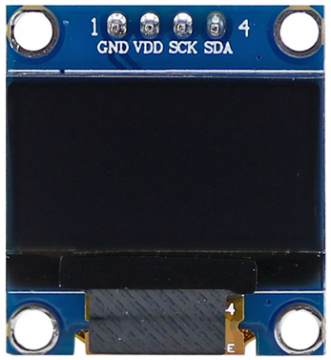
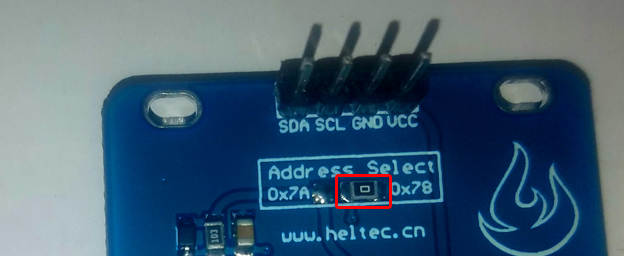
This display module has a total of 4 male headers which are clearly labeled as VCC, GND, SCL, and SDA.
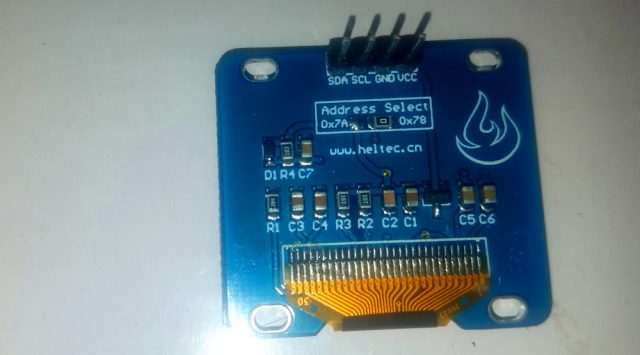
This small resistor is the i2c address selector. Currently, the i2c address is 0x78. But if you remove this resistor and solder it on the other side then the i2c address will become 0x7A. But there are situations when both the i2c addresses are not working, so when you end up in a situation like this, then you will need to use the i2c scanner, So, now let’s have a look at the circuit diagram.
Interfacing Multiple Max6675 with Arduino Circuit Diagram:
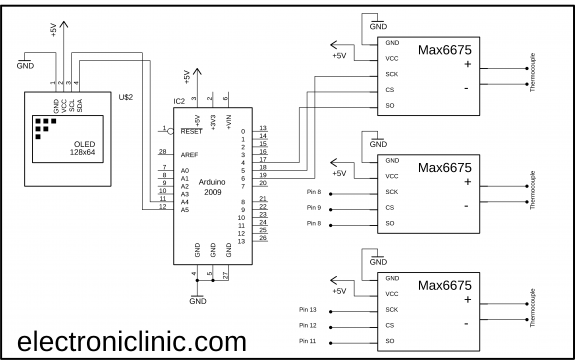
As you can see the circuit diagram is very simple. Let’s start with the Oled display module. The ground and VCC pins of the Oled display module are connected with the Arduino’s ground and 5 volts. The SCL pin of the Oled display module is connected with the analog pin A5 and the SDA pin is connected with the analog pin A4 of the Arduino.
The ground and VCC pins of all the Max6675 boards are connected with the Arduino’s ground and 5 volts. The SCK, CS, and SO pins of the first temperature sensor module are connected with the Arduino’s pins 6, 5, and 4. The SCK, CS, and SO pins of the second temperature sensor module are connected with the Arduino’s pins 8, 9, and 10. While, The SCK, CS, and SO pins of the third MAX6675 temperature sensor module are connected with the Arduino’s pins 13, 12, and 11.
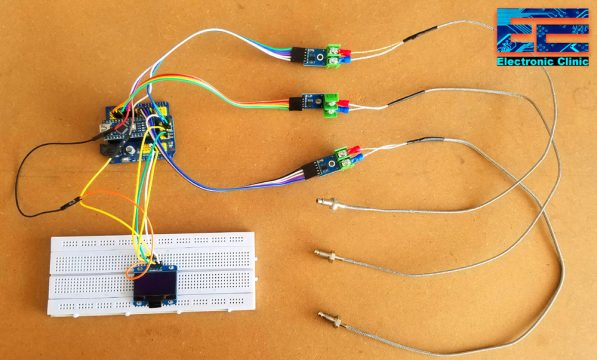
Multiple Max6675 and Oled display Module interfacing with Arduino:
I connected everything as per the circuit diagram. Now let’s have a look at the Arduino programming.
Multiple Max6675 Arduino programming:
|
1 2 3 4 5 6 7 8 9 10 11 12 13 14 15 16 17 18 19 20 21 22 23 24 25 26 27 28 29 30 31 32 33 34 35 36 37 38 39 40 41 42 43 44 45 46 47 48 49 50 51 52 53 54 55 56 57 58 59 60 61 62 63 64 65 66 67 68 69 70 71 72 73 74 75 76 77 78 79 80 81 82 83 84 85 86 87 88 89 90 91 92 93 94 95 96 97 98 99 100 101 102 103 104 |
#include "max6675.h" #include <Adafruit_GFX.h> #include <Adafruit_SH1106.h> #include <Adafruit_Sensor.h> #define SCREEN_WIDTH 128 // OLED display width, in pixels #define SCREEN_HEIGHT 64 // OLED display height, in pixels #define OLED_RESET -1 Adafruit_SH1106 display(OLED_RESET); // Temperature Sensor1 int thermo1D0 = 4; // so int thermo1CS = 5; int thermo1CLK = 6; // sck float temp1 = 0; MAX6675 thermocouple1(thermo1CLK, thermo1CS, thermo1D0); // Temperature Sensor2 int thermo2D0 = 8; // so int thermo2CS = 9; int thermo2CLK = 10; // sck float temp2 = 0; MAX6675 thermocouple2(thermo2CLK, thermo2CS, thermo2D0); // Temperature Sensor3 int thermo3D0 = 11; // so int thermo3CS = 12; int thermo3CLK = 13; // sck float temp3 = 0; MAX6675 thermocouple3(thermo3CLK, thermo3CS, thermo3D0); void setup() { Serial.begin(9600); display.begin(SH1106_SWITCHCAPVCC, 0x3C); delay(2000); display.clearDisplay(); display.setTextColor(WHITE); } void loop() { temp1 = thermocouple1.readCelsius(); delay(100); temp2 = thermocouple2.readCelsius(); delay(100); temp3 = thermocouple3.readCelsius(); delay(100); //clear display display.clearDisplay(); display.setTextSize(1); display.setCursor(0,0); display.print("Temp1: "); display.setTextSize(2); display.setCursor(38,0); display.print(temp1); display.print(" "); display.setTextSize(1); display.cp437(true); display.write(167); display.setTextSize(2); display.print("C"); // temperature sensor 2 display.setTextSize(1); display.setCursor(0,20); display.print("Temp2: "); display.setTextSize(2); display.setCursor(38,20); display.print(temp2); display.print(" "); display.setTextSize(1); display.cp437(true); display.write(167); display.setTextSize(2); display.print("C"); // temperature sensor 3 display.setTextSize(1); display.setCursor(0,40); display.print("Temp3: "); display.setTextSize(2); display.setCursor(38,40); display.print(temp3); display.print(" "); display.setTextSize(1); display.cp437(true); display.write(167); display.setTextSize(2); display.print("C"); display.setTextSize(1); display.setCursor(0,57); display.print(" www.electroniclinic.com "); display.display(); } |
Multiple Max6675 Arduino Code Explanation:
Before you start the programming you will need to download the max6675, Adafruit_GFX.h, Adafruit_SH1106.h, and Adafruit_Sensor.h libraries. The download links are given below.
Download: max6675
Download: Adafruit_GFX Library, Adafruit_SH1106 Library, Adafruit_Sensor Library
After you download all the libraries, then simple extract the folders, copy and paste the into the Documents > Arduino > libraries folder.
#include “max6675.h”
#include <Adafruit_GFX.h>
#include <Adafruit_SH1106.h>
#include <Adafruit_Sensor.h>
Then I defined the screen width and screen height
#define SCREEN_WIDTH 128 // OLED display width, in pixels
#define SCREEN_HEIGHT 64 // OLED display height, in pixels
As the type of the Oled display module I am using has no reset pin so that’s why I assigned a value of -1.
#define OLED_RESET -1
Adafruit_SH1106 display(OLED_RESET);
Then I defined pins for the SCK, CS, and SO. Make sure you don’t use the same pins.
// Temperature Sensor1
int thermo1D0 = 4; // so
int thermo1CS = 5;
int thermo1CLK = 6; // sck
float temp1 = 0;
MAX6675 thermocouple1(thermo1CLK, thermo1CS, thermo1D0);
// Temperature Sensor2
int thermo2D0 = 8; // so
int thermo2CS = 9;
int thermo2CLK = 10; // sck
float temp2 = 0;
MAX6675 thermocouple2(thermo2CLK, thermo2CS, thermo2D0);
// Temperature Sensor3
int thermo3D0 = 11; // so
int thermo3CS = 12;
int thermo3CLK = 13; // sck
float temp3 = 0;
MAX6675 thermocouple3(thermo3CLK, thermo3CS, thermo3D0);
Inside the void setup() function. I activated the serial communication, which I used for the debugging purposes. 9600 is the Baud rate.
void setup()
{
Serial.begin(9600);
display.begin(SH1106_SWITCHCAPVCC, 0x3C); // 0x3C is the i2c address which I have already explained in my previous tutorial explaining how an Oled display module is used with the Arduino board.
delay(2000);
display.clearDisplay();
display.setTextColor(WHITE);
}
Inside the void loop() function, we simply, read the temperature sensors, store the values in variables temp1, temp2, and temp3.
void loop()
{
temp1 = thermocouple1.readCelsius();
delay(100);
temp2 = thermocouple2.readCelsius();
delay(100);
temp3 = thermocouple3.readCelsius();
delay(100);
//clear display
display.clearDisplay();
After reading the sensors and clearing the display, the final step is to display the values on the Oled display module. These are the basic functions which I have already explained, you can watch the complete video available in the related projects section given at the end of this article.
display.setTextSize(1);
display.setCursor(0,0);
display.print(“Temp1: “);
display.setTextSize(2);
display.setCursor(38,0);
display.print(temp1);
display.print(” “);
display.setTextSize(1);
display.cp437(true);
display.write(167);
display.setTextSize(2);
display.print(“C”);
// temperature sensor 2
display.setTextSize(1);
display.setCursor(0,20);
display.print(“Temp2: “);
display.setTextSize(2);
display.setCursor(38,20);
display.print(temp2);
display.print(” “);
display.setTextSize(1);
display.cp437(true);
display.write(167);
display.setTextSize(2);
display.print(“C”);
// temperature sensor 3
display.setTextSize(1);
display.setCursor(0,40);
display.print(“Temp3: “);
display.setTextSize(2);
display.setCursor(38,40);
display.print(temp3);
display.print(” “);
display.setTextSize(1);
display.cp437(true);
display.write(167);
display.setTextSize(2);
display.print(“C”);
display.setTextSize(1);
display.setCursor(0,57);
display.print(” www.electroniclinic.com “);
display.display();
}
In the end, I uploaded the program, connected the power supply and started testing my project.
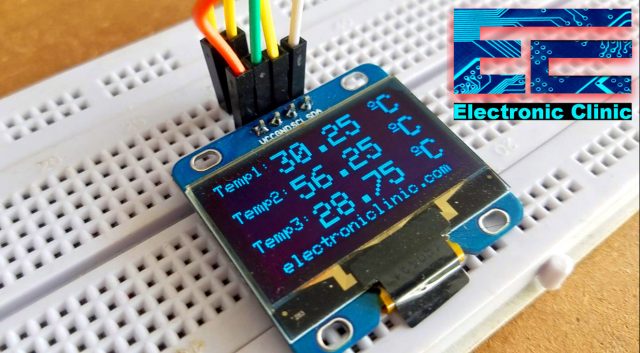
I successfully displayed the temperature values of all three sensors. For the step by step explanation and practical demonstration, watch the video tutorial given below.
Watch Video Tutorial:



Great tutorial. In this you mention that the T-couple wire with the red sleeve is connected to positive terminal on the T-couple amplifier. On your particular thermocouple this may very well be true. But, you might want to mention, that if the thermocouple does not have the sleeve. The wire with the red insulation will need to be connected to the negative terminal on the amplifier.