Nodemcu ESP8266 DS18b20 Waterproof Temperature Sensor Monitoring
Table of Contents
Nodemcu ESP8266 and DS18b20:
Nodemcu ESP8266 DS18b20 Waterproof Temperature Sensor Monitoring- In this Project “Nodemcu ESP8266 DS18b20 Waterproof Temperature Sensor Monitoring using Blynk”, you will learn how to use the ds18b20 waterproof temperature sensor with the Nodemcu esp8266 wifi module and display the temperature on Gauges using the Blynk Application. This is an IOT “Internet of things” based project. With the help of Nodemcu esp8266 wifi module and Blynk application, the temperature can be monitored in Real-Time from anywhere around the world.
This is version2 of the DS18b20 waterproof temperature sensor monitoring system while in version1; I used the same temperature sensor with the Arduino and displayed the temperature value on a 16×2 LCD. Following is the video explaining how the DS18B20 waterproof Temperature Sensor is interfaced with the Arduino and the temperature is displayed on the 16×2 LCD. Maximum of the instructions used in Version1 will be used in this Tutorial.
In this tutorial, we will cover.
- DS18B20 introduction
- Complete Circuit diagram
- Interfacing
- Blynk application designing and finally number
Testing
Amazon Links:
DS18B20 one-wire digital temperature sensor:
Other Tools and Components:
Super Starter kit for Beginners
Two Channel / 200 MHz Digital Oscilloscope
PCB small portable drill machine:
DISCLAIMER:
Please Note: these are affiliate links. I may make a commission if you buy the components through these links. I would appreciate your support in this way!
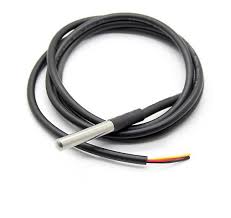
About the DS18B20 Waterproof Temperature Sensor:
One-wire temperature sensors like the DS18B20 are devices that can measure temperature with a minimal amount of hardware and wiring. These sensors use a digital protocol to send accurate temperature readings directly to your development board without the need of an analog to digital converter or other extra hardware. You can get one-wire sensors in different form factors like waterproof and high-temperature probes–these are perfect for sensing temperature in many different projects and applications. And since these sensors use the one-wire protocol you can even have multiple of them connected to the same pin and read all their temperature values independently.
The DS18B20 Waterproof Temperature Sensor has three wires
- The red wire is the VCC wire: the operating voltage is 3 to 5 volts. In my case, I will use 3.3 volts.
- Yellow Wire is the Data wire: we usually connect a resistor between the data wire and VCC wire, I will explain this in the circuit diagram.
- The black wire is the Ground wire. This wire is connected with the Nodemcu Esp8266 wifi module ground.
This temperature sensor is capable of measuring the temperature ranging from -55°C to 125°C
Circuit Diagram of the Nodemcu Esp8266 DS18B20:
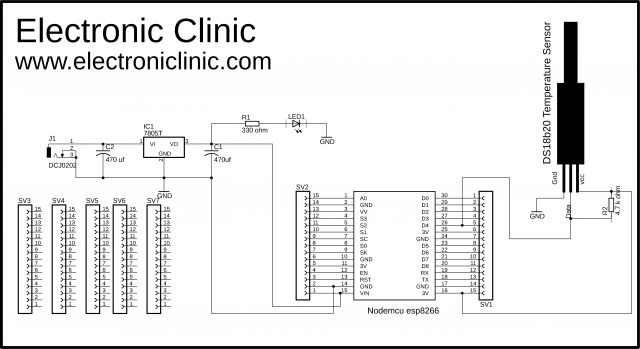
This is the complete circuit diagram of the Nodemcu esp8266 DS18B20 Waterproof temperature sensor monitoring system. This Schematic is designed in cadsoft Eagle 9.1.0 version. If you want to learn how to make a schematic and PCB then you can watch the following video.
Let’s first of all, start with the 5v regulated Power supply which is used to power up the Nodemcu esp8266 wifi module. This Power Supply is based on the famous LM7805 voltage regulator. J1 is the female power jack and this is where we connect a 12v adaptor, battery or a solar panel. Two 470uf capacitors are connected at the input and output sides of the voltage regulator. A 330-ohm resistor is connected in series with a 2.5v led. This is a current limiting resistor. The output of the voltage regulator is connected with the Vin pin of the Nodemcu esp8266 wifi module and the ground is connected with the ground. SV1 and SV2 are the female headers.
As you can see a 4.7 Kilo ohm resistor is connected between the VCC and data wire. You can also use a 10k resistor. The VCC is connected with 3.3 volts. The ground is connected with the Nodemcu esp8266 module ground. While the Data wire is connected with digital Pin D4 of the Nodemcu ESP8266 wifi module.
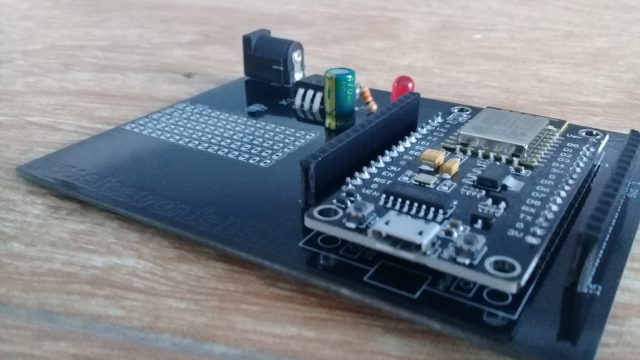
This is the Final Power Supply Circuit Board of the Nodemcu Esp8266 wifi Module. The Schematic and PCB designing is already explained in the video above.
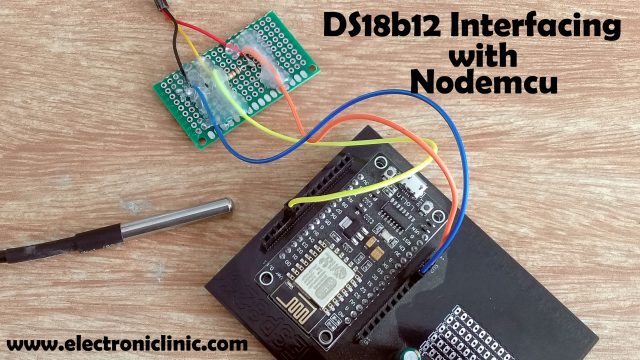
DS18B12 interfacing with Nodemcu ESP8266 Interfacing:
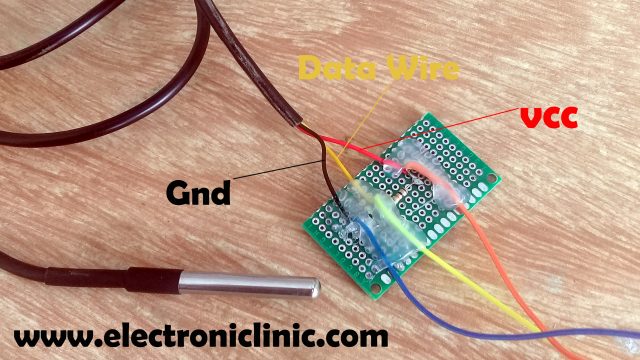
As you can see the red wire which is the VCC wire is connected with the 3.3v, the ground wire of the DS18b20 temperature sensor is connected with the Nodemcu module ground pin, while the yellow wire which is the data wire is connected with the digital Pin D4 of the Nodemcu module. You can also see in the Picture above, a 10 kilo Ohm resistor is connected between the VCC and data wire. Usually, this resistor is 4.7 kilo Ohm but you can also use a 10k Resistor.
Note: this old version of the Blynk app is no more functional. For the blynk mobile App setup and Blynk.cloud dashboard setup ready my article on the New Blynk V2.0. In this article I have explained how to migrate your projects from Blynk 1.0 to the new Blynk V2.0. You can also watch the video.
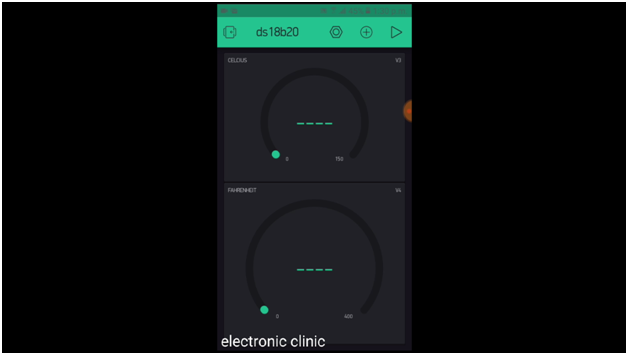
Blynk Application designing for the Nodemcu ESP8266 DS18b20:
- First of all, open the blynk application.
- set the project name as ds18b20.
- Click on the choose device and select Nodemcu.
- make sure you set the connection type to wifi and then click on the create button, an authentication token will be sent on your email id, which will be then used in the programming, simply copy and paste it in programming. This step is already explained in the video given at the end of this Article.
- Now click anywhere on the screen and search for the Gauge and add it. Resize the Gauge as per your requirement. Click on the Gauge and set the name as Celcius. Then click on the PIN and select Virtual Pin V3, change the Font size and make sure you click on the push button and you select 1 second.
- Now again click on the screen and add another gauge and follow the same exact steps.
Our application is ready and now let’s discuss the programming.
Nodemcu esp8266 ds18b20 Programming:
Before you start the programming for the Nodemcu esp8266 DS18B20 project, first of all, make sure that you download all the necessary libraries, and also make sure you update the Nodemcu board. These are the same libraries I have been using in all of my IoT based projects. The OneWire library and DallasTemperature are already used in Version1. The video link is already given above in the description section. For the complete program explanation watch video Tutorial given at the End of this Article.
|
1 2 3 4 5 6 7 8 9 10 11 12 13 14 15 16 17 18 19 20 21 22 23 24 25 26 27 28 29 30 31 32 33 34 35 36 37 38 39 40 41 42 43 44 45 46 47 48 |
#include <ESP8266WiFi.h> #include <BlynkSimpleEsp8266.h> #include <SimpleTimer.h> #include <OneWire.h> #include <DallasTemperature.h> #define BLYNK_PRINT Serial // Comment this out to disable prints and save space char auth[] = "f24df138e4fe4d74967a74b95d475cf7"; /* WiFi credentials */ char ssid[] = "ZONG MBB-E8231-6E63"; char pass[] = "romeo1234"; SimpleTimer timer; #define ONE_WIRE_BUS 2 // DS18B20 on arduino pin2 corresponds to D4 on physical board "D4 pin on the ndoemcu Module" OneWire oneWire(ONE_WIRE_BUS); DallasTemperature DS18B20(&oneWire); float temp; float Fahrenheit=0; void setup() { Serial.begin(115200); Blynk.begin(auth, ssid, pass); DS18B20.begin(); timer.setInterval(1000L, getSendData); } void loop() { timer.run(); // Initiates SimpleTimer Blynk.run(); } /*************************************************** * Send Sensor data to Blynk **************************************************/ void getSendData() { DS18B20.requestTemperatures(); temp = DS18B20.getTempCByIndex(0); // Celcius Fahrenheit = DS18B20.toFahrenheit(temp); // Fahrenheit Serial.println(temp); Serial.println(Fahrenheit); Blynk.virtualWrite(V3, temp); //virtual pin V3 Blynk.virtualWrite(V4, Fahrenheit); //virtual pin V4 } |


Hello
Please how can I use a relay with esp8266?
C:\Program Files (x86)\Arduino\libraries\OneWire/OneWire.h:108:2: error: #error “Please define I/O register types here”
#error “Please define I/O register types here”
HELP!
what exact libraries do I need, I have tried and not working
Search for libraries on my site. I have added all the working libraries. I have personally tested all these libraries and i have also shared the projects in which these libraries are used.
Hi, great post for NodeMcu, I follow your article and build in no time the thermometer and integrate with Blynk!! Many thanks from Canada.
I just want to mention for Nodemcu you don’t need the 4.7K pullup res if you are using the D4 pin, there is already a pullup of 12K on the board. Also D3 pin has same 12K pullup. It is from the schematic of Nodemcu, not very obvious to know but it is worthwhile to read the schematic 😎
I would also add the same for A0 pin for ADC, the nodemcu also has built-in voltage divider with 220K-100K res.
Again thank you for your nice article, I have lots of fun rediscovering ESP8266.
Useful information.
Hallo,
beim Compilieren erhalte ich immer die Meldung, dass der SimpleTimer nicht declariert ist. Was bedeutet das?
@Peter here is my #include, for me I uncomment #include <SimpleTimer.h> because Blynk has its own. Hope this can help you.
#include <BlynkSimpleEsp8266.h>
// using Blink Timer instead so disable this line — #include <SimpleTimer.h>
#include <OneWire.h>
#include <DallasTemperature.h>
Hi. i’m currently trying to write this for the arduino mrk 1010 , but I don’t get it to work. Any tips?
How can i rewrite this code to work with an Arduino mrk 1010? I have tried, but I can’t get the pin out right. Sorry for the dumb question i am a noob at this