Seeeduino XIAO and I2C Oled Display based Light meter, Seeeduino XIAO I2C
Table of Contents
Seeeduino XIAO and I2C Oled Display:
Seeeduino XIAO and I2C Oled Display based Light meter– Seeeduino XIAO due to its very small size is becoming very popular. Using the smallest Arduino Seeeduino XIAO amazing wearable projects can be designed. In this tutorial, you will learn how to make a light meter using Seeeduino XIAO, 128×64 I2C supported Oled display Module, and LDR “Light Dependent Resistor”.
About the Sponsor, ALLPCB:
ALLPCB is the World’s Fastest PCB Manufacturing Company. Feel free to visit their website Allpcb.com to not only find out what awesome PCB and assembly services they offer but also to easily upload your Gerber files and thus order affordable and High-quality PCBs quickly. Besides this, you will also get a 30 Dollars Coupon balance, which you can use to get your first prototype order for free.
The main purpose of this tutorial is to explain how to use Seeeduino XIAO with I2C supported devices. Just like the Arduino boards Seeeduino XIAO also has the I2C pins. Once you learn the very basics of how to use the I2C communication using Seeeduino XIAO, then you can design your own cool projects using multiple I2C supported devices. You can make a patient monitoring system, a digital clock, a range finder, and thousands of other projects.
In my previous tutorial, I have already covered the extreme basics including the
Seeeduino XIAO Pinout and Technical specification.
Seeeduino XIAO board installation using the Arduino IDE.
And I also explained how to write your very first program to control an LED.
So, I highly recommend reading my previous getting started tutorial on the Seeeduino XIAO, because in this tutorial I will not explain the things which I have already covered in my previous tutorial.
In this tutorial, we will cover
- LDR and the Oled Display interfacing with Seeeduino
- Light meter program explanation, and finally
- Testing
Without any further delay, let’s get started!!!
Amazon Purchase Links:
Seeeduino XIAO from Seeedstudio:
SSD1306 128×64 Oled i2c display Module
Other Tools and Components:
Arduino Nano USB-C Type (Recommended)
ESP32 WiFi + Bluetooth Module (Recommended)
Super Starter kit for Beginners
PCB small portable drill machines
*Please Note: These are affiliate links. I may make a commission if you buy the components through these links. I would appreciate your support in this way!
Seeeduino XIAO I2C:
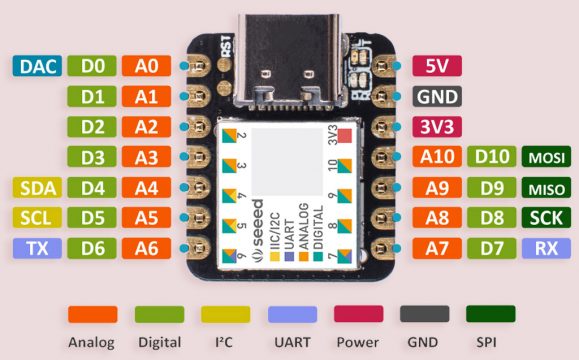
Just like the Arduino boards, Seeeduino XIAO also has the I2C pins. A4 is the SDA and A5 is the SCL. Using these two pins of the Seeeduino XIAO multiple I2C supported devices can be connected without any problem. Every I2C supported device has a unique I2C address which is usually printed on the device. If the I2C address printed on the device doesn’t work for you, then you can use the following I2C scanner code to find the I2C address of the connected device.
I2C Scanner Code:
|
1 2 3 4 5 6 7 8 9 10 11 12 13 14 15 16 17 18 19 20 21 22 23 24 25 26 27 28 29 30 31 32 33 34 35 36 37 38 39 40 41 42 43 44 |
#include <Wire.h> void setup() { Wire.begin(); Serial.begin(115200); Serial.println("\nI2C Scanner"); } void loop() { byte error, address; int nDevices; Serial.println("Scanning..."); nDevices = 0; for(address = 0; address <= 127; address++ ) { Wire.beginTransmission(address); error = Wire.endTransmission(); if (error == 0) { Serial.print("I2C device found at address 0x"); if (address<16) Serial.print("0"); Serial.print(address, HEX); Serial.println(" !"); nDevices++; } else if (error==4) { Serial.print("Unknow error at address 0x"); if (address<16) Serial.print("0"); Serial.println(address,HEX); } } if (nDevices == 0) Serial.println("No I2C devices found\n"); else Serial.println("done\n"); delay(30000); } |
While the I2C supported Oled display module is connected with the Seeeduino XIAO, simply upload the above code. Open the Serial monitor and then you will be able to see the I2C address of the Oled display module.
I2C Oled display and LDR interfacing with Seeeduino XIAO:
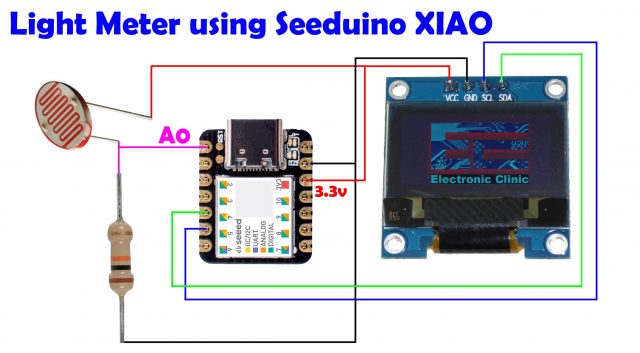
A light-dependent resistor “LDR” and a 10K ohm resistor are connected in series; this makes the voltage divider circuit. A wire from the middle is connected with the Analog pin A0 of the Seeeduino XIAO.
The I2C supported 128×64 Oled Display Module SCL and SDA pins are connected with the Seeeduino analog pins A5 and A4. A5 is the SCL and A4 is the SDA. The Oled display module VCC and GND pins are connected with the Seeeduino 3.3V and GND pins.
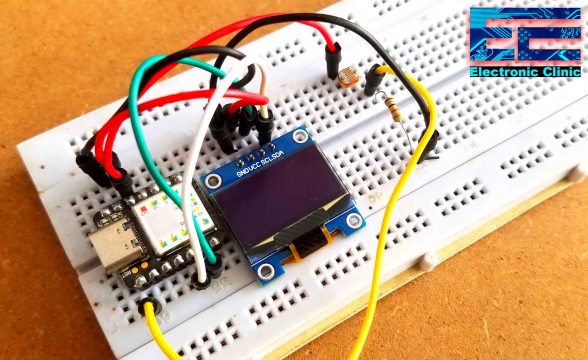
Connections on the Breadboard:
I completed the connections as per the circuit diagram; now let’s take a look at the program.
Before, you start the programming; first, you will need to install the Seeeduino XIAO board.
Seeeduino XIAO Light Meter Programming:
|
1 2 3 4 5 6 7 8 9 10 11 12 13 14 15 16 17 18 19 20 21 22 23 24 25 26 27 28 29 30 31 32 33 34 35 36 37 38 39 40 41 42 43 44 45 46 47 48 49 50 51 52 53 54 55 56 57 58 59 60 61 62 63 64 65 66 67 |
/* Light meter Oled interfacing with Seeeduino XIAO Download Libraries: https://www.electroniclinic.com/arduino-libraries-download-and-projects-they-are-used-in-project-codes/ */ #include <Wire.h> #include <Adafruit_GFX.h> #include <Adafruit_SSD1306.h> #define SCREEN_WIDTH 128 // OLED display width, in pixels #define SCREEN_HEIGHT 64 // OLED display height, in pixels // Declaration for an SSD1306 display connected to I2C (SDA, SCL pins) #define OLED_RESET -1 // Reset pin # (or -1 if sharing Arduino reset pin) Adafruit_SSD1306 display(SCREEN_WIDTH, SCREEN_HEIGHT, &Wire, OLED_RESET); int LDR = A0; int LDR_DATA; int F_value; // LDR sensor final value void setup() { Serial.begin(57600); pinMode(LDR, INPUT); display.begin(SSD1306_SWITCHCAPVCC, 0x3C); delay(2000); display.clearDisplay(); display.setTextColor(WHITE); } void loop() { F_value = readSensor(); display.clearDisplay(); // display R G B Values display.setTextSize(2); display.setCursor(0,0); display.print("L Meter:"); display.setTextSize(3); display.setCursor(0, 28); display.print(F_value); display.setTextSize(1); display.setCursor(0, 56); display.print("www.electroniclinic.com"); display.display(); } int readSensor() { LDR_DATA = analogRead(LDR); LDR_DATA = map(LDR_DATA,0,1023,0,100); return(LDR_DATA); delay(1000); } |
Seeeduino XIAO based Light Meter Code Explanation:
As usual, before you start the programming, first of all, make sure you download all the necessary libraries.
You will need the Wire.h library for the I2C supported devices. The Adafruit_GFX and Adafruit_SSD1306 libraries are used with the Oled display module. The Oled display module I am using has the screen width 128 and screen height 64.
An LDR is connected with the Analog pin A0 of the Seeeduino XIAO. The LDR values are stored in the variable LDR_DATA, which is of the type integer. While the F_value variable is used to stored the final mapped value.
0x3c is the I2C address of the Oled display module. You can find this address by using the I2C scanner code, which you can find in the article.
The value returned by the readSensor() function is stored in the variable F_value and is then printed on the Oled display. If you have never used the Oled display module then you can watch my video on the Oled display module in which I covered all of these functions, and also fixed the most common issues that you might face while using the Oled display module. Anyhow, the readSensor() function is a user-defined function and its return type is integer. The purpose of this function is to read the analog pin A0 to which an LDR is connected. The LDR value is then mapped to limit the values between 0 and 100. Finally, we return this value.
Final Testing:
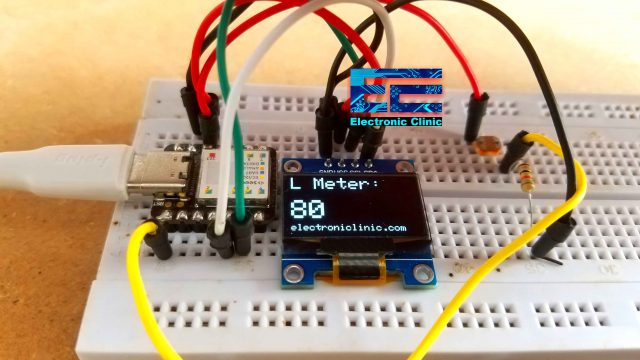
After uploading the program, I powered up the Seeeduino XIAO using a Power bank. You can also use your laptop for the testing. Anyhow, by changing the light intensity falling on the LDR, I was able to see a change in the value.
Watch Video Tutorial:


