Temperature controlled Fan or Room Cooler using Arduino
Table of Contents
Description:
Temperature controlled Fan or Room Cooler using Arduino- In this project, you will learn how to make your own Fan, room cooler, ceiling fan or exhaust fan automatic temperature controller using Arduino, DHT11 temperature and humidity sensor, and a relay module. The Room Cooler or Fan is controlled automatically depending on the room temperature. This way we can save electricity and reduce electric bills. As in this project, a relay module will be used for the switching so this temperature controller can be used to control the AC Fans or Room Coolers too.
The DC room coolers and Fans are quite famous in Pakistan and India due to the load shedding. More than 80% of the families in my area use the DC fans or DC room coolers. The DC Fans and room coolers so far I have seen in the market have no temperature controllers. This is the reason I am making this project.
In this tutorial we will be using the dht11 sensor, well we can also use lm35 or any other temperature sensor. But, if you look at the prices of both the sensors “LM35 & DHT11” then dht11 is the best choice as it also gives the humidity values and moreover dht11 programming is much easier than the LM35. In my previous tutorials, I have also used other temperature sensors like k-type thermocouple which is most commonly used in industries, used for monitoring temperatures up to 1000C. I have also used a bmp180 sensor, which gives temperature, pressure, and altitude. You can also find articles on this website based on the DS18B20 waterproof one-wire digital temperature sensor but for this project, I am going to use the dht11 Temperature and humidity Sensor.
We can make a temperature controller without using the Arduino; we can use a thermostat and LM741 IC which can be used as the voltage comparator. So, it’s totally up to you which sensor you want to use and whether you want to make a controller based temperature controller or purely electronics based temperature controller. If you want to use it commercially then my suggestion is don’t use the Arduino board or any other expensive controller. But, as this project is based on the Arduino so, I will do it using the Arduino Board.
In this tutorial, I will cover the following.
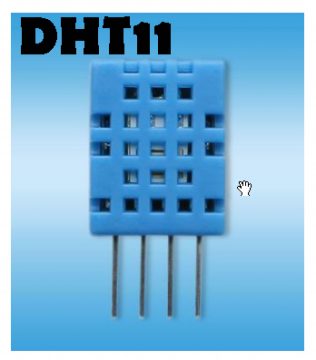
- DHT11 sensor datasheet, Pinout and soldering.
- Relay driver circuit designing and soldering.
- DHT11 Sensor Interfacing with Arduino
- DHT11 Arduino Programming
- Final Testing
Without any further delay, let’s get started!!!
Amazon Purchase Links:
Arduino Nano USB-C Type (Recommended)
DHT11 Temperature and Humidity Module:
Other Tools and Components:
ESP32 WiFi + Bluetooth Module (Recommended)
Super Starter kit for Beginners
PCB small portable drill machines
*Please Note: These are affiliate links. I may make a commission if you buy the components through these links. I would appreciate your support in this way!
DHT11 Temperature & Humidity Sensor Specification:
It’s a good designing practice to first study the datasheets of the electronic components that you are going to use in your project. In this project the main electronic component is the DHT11 temperature sensor. Let’s have a look at the DHT11 specs.
DHT11 Overview:
DHT11 digital temperature and humidity sensor is a composite Sensor contains a calibrated digital signal output of the temperature and humidity. Application of a dedicated digital modules
collection technology and the temperature and humidity sensing technology, to ensure that the
product has high reliability and excellent long-term stability. The sensor includes a resistive sense of wet components and NTC temperature measurement devices and connected with a
high-performance 8-bit microcontroller.
DHT11 Sensor Applications
HVAC, dehumidifier, testing, and inspection equipment, consumer goods, automotive, automatic control, data loggers, weather stations, home appliances, humidity regulator, medical and other humidity measurement and control.
DHT11 Sensor Features
Low cost, long-term stability, relative humidity, and temperature measurement, excellent quality, fast response, strong anti-interference ability, long-distance signal transmission, digital signal output, and precise calibration.
DHT11 parameters
Relative humidity
Resolution: 16Bit
Repeatability: ±1% RH
Accuracy: At 25℃ ±5% RH
Interchangeability: fully interchangeable
Response time: 1 / e (63%) of 25℃ 6s
1m / s air 6s
Hysteresis: <± 0.3% RH
Long-term stability: <± 0.5% RH / yr in
Temperature
Resolution: 16Bit
Repeatability: ±0.2℃
Range: At 25℃ ±2℃
Response time: 1 / e (63%) 10S
Electrical Characteristics
Power supply: DC 3.5~5.5V
Supply Current: measurement 0.3mA standby 60μA
Sampling period: more than 2 seconds
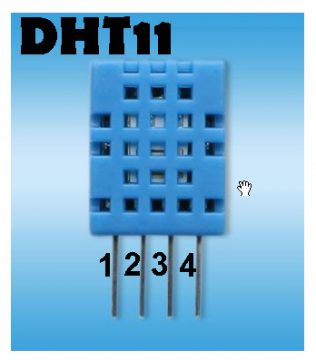
Pin Description
1, the VDD power supply 3.5~5.5V DC
2 DATA serial data, a single bus
3, NC, empty pin
4, GND ground, the negative power
For more details download the DHT11 datasheet given below.
Download DHT11 datasheet: DHT11 datasheet
Temperature controlled Fan Circuit Diagram:
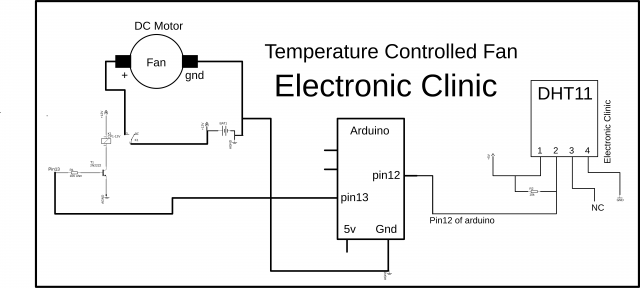
As you can see the circuit diagram is really simple. The DHT11 temperature and humidity sensor data pin “2” is connected with the Arduino’s pin number 12. Pin number 1 is connected with the Arduino’s 5 volts, pin number 3 is not connected while pin number 4 is connected with the ground.
A relay module is controlled using the Arduino’s pin number 13. You can use a readymade relay module or you can make the one by yourself by following the below designing steps.
Driving a Relay
Relays can be controlled through a low voltage signal and can be used to control a high power circuit with a lower power circuit. To make a relay Operate, first of all, we will have to energize the relay coil by simply passing the current through the relay coil. Most of the relays which are available in the market are 12v and 24v. I will be using a 12v relay. 12v relay cannot be directly controlled by the controller, that’s why electromechanical relay needs a driver circuit. A driver circuit simply consists of an NPN or PNP type transistor and a resistor. It depends on the designer whether he/she wants to use the PNP or NPN. I will be using an NPN transistor in this project for controlling the relay.
For the Driver circuit to design, first of all, we find the relay coil resistance using a digital multimeter. The relay voltage is already known which is 12v. then by using the Ohm’s law
V = IR
We can find the current, which will be needed to energize the relay coil to make enough magnet to attract the contact. After finding the relay coil current then select any general NPN type transistor whose collector current is greater than the relay coil current. In my case, I will use 2n2222 type transistor because it is cheap, easily available in the market and moreover it can handle much more current than the calculated value which was 32ma.
A 10k resistor is connected with the base of the 2n2222 NPN transistor as it’s a BJT bipolar junction transistor and it’s a current-controlled device so that’s why a 10k resistor must be added to limit the current. then we get the below circuit. Through this circuit, we can control an electromechanical relay through a microcontroller.
As you can see in the circuit diagram above, ground from a 12V battery is directly connected with the DC Motor, while the 12V wire from the battery is connected with the DC motor through a relay. Now, by turning ON and turning OFF this relay the DC motor can be controlled. Now we will write a program to control this Fan or room cooler automatically depending on the room temperature.
Temperature controlled Fan Arduino Programming:
|
1 2 3 4 5 6 7 8 9 10 11 12 13 14 15 16 17 18 19 20 21 22 23 24 25 26 27 28 29 30 31 32 33 34 35 36 37 38 39 40 41 42 43 44 45 46 47 48 49 50 51 52 53 54 55 56 57 58 59 60 61 62 63 64 65 66 67 68 69 70 71 72 73 74 75 76 77 78 79 80 |
#include "DHT.h" #define DHTPIN 12 // what pin we're connected to //Uncomment whatever the type of sensor we are using. #define DHTTYPE DHT11 // DHT 11 //#define DHTTYPE DHT22 // DHT 22 (AM2302) //#define DHTTYPE DHT21 // DHT 21 (AM2301) // Connect pin 1 (on the left) of the sensor to +5V // NOTE: If using a board with 3.3V logic like an Arduino Due connect pin 1 // to 3.3V instead of 5V! // Connect pin 2 of the sensor to whatever your DHTPIN is // pin3 of the sensor is not connected // Connect pin 4 (on the right) of the sensor to GROUND // Connect a 10K resistor from pin 2 (data) to pin 1 (power) of the sensor // Initialize DHT sensor for normal 16mhz Arduino DHT dht(DHTPIN, DHTTYPE); // NOTE: For working with a faster chip, like an Arduino Due or Teensy, you // might need to increase the threshold for cycle counts considered a 1 or 0. // You can do this by passing a 3rd parameter for this threshold. It's a bit // of fiddling to find the right value, but in general the faster the CPU the // higher the value. The default for a 16mhz AVR is a value of 6. For an // Arduino Due that runs at 84mhz a value of 30 works. // Example to initialize DHT sensor for Arduino Due: //DHT dht(DHTPIN, DHTTYPE, 30); boolean tflag = false; // temperature flag. // this flag will be used to stop unnecessary repetition of code. int relay = 13; void setup() { Serial.begin(9600); Serial.println("DHT11 test!"); dht.begin(); pinMode(relay, OUTPUT); digitalWrite(relay, LOW); } void loop() { // Wait a few seconds between measurements. delay(2000); // Reading temperature or humidity takes about 250 milliseconds! // Sensor readings may also be up to 2 seconds 'old' (its a very slow sensor) int h = dht.readHumidity(); // Read temperature as Celsius int t = dht.readTemperature(); // Read temperature as Fahrenheit int f = dht.readTemperature(true); // Check if any reads failed and exit early (to try again). if (isnan(h) || isnan(t) || isnan(f)) { Serial.println("Failed to read from DHT sensor!"); return; } // Compute heat index // Must send in temp in Fahrenheit! int hi = dht.computeHeatIndex(f, h); if ( (t > 32 ) && ( tflag == false ) ) { digitalWrite(relay, HIGH); Serial.println("Fan is On"); tflag = true; } if ( (t <= 32 ) && ( tflag == true ) ) { digitalWrite(relay, LOW); Serial.println("Fan is Off"); tflag = false; } Serial.print("Temperature: "); Serial.println(t); } |
For the practical demonstration watch video given below.


