Unlock my car with my phone, Start engine, Start A/C, Anti theft using Arduino
Last Updated on August 18, 2024 by Engr. Shahzada Fahad
Table of Contents
Unlock my Car with my Phone Project Description:
Unlock my car with my phone, Start the engine, Start A/C, and Anti-theft using Arduino- In this tutorial, I will show you how to control your car wirelessly using your android cell phone. In this tutorial, you will also learn how to protect your car from being stolen. This project is based on an atmega328 microcontroller, the same microcontroller which is used in Arduino and HC-05 or HC-06 Bluetooth module. I named this project a Bluematic car, a car that can be controlled using an android cell phone, and Bluetooth.
I also have an article on the Bike Anti-theft system in which I used the RFID technology and practically demonstrated everything.
You can also watch a video Tutorial given at the end of this Article. Without any further delay let’s get started!!!
Amazon Links:
Arduino Nano USB-C Type (Recommended)
*Disclosure: These are affiliate links. As an Amazon Associate I earn from qualifying purchases.
Bluematic Car:
I named this project as the Bluematic Car. Bluematic car is an app designed for the security of your Car. Bluematic car allows you to operate your car without even touching it. it has a number of features including, anti-theft, Ignition and doors unlocking, in case you forget your keys inside the car or you lose your keys while the car is locked, do not panic, take out your cell phone and using your cell phone you can unlock the doors.
By enabling the anti-theft function nobody can start your car even if he has a key to do so. if you suspect anyone near your car, you can horn to scare the people away. This project is designed in such a way that even if someone removes the battery terminals, the car won’t reset, that’s how efficiently the anti-theft function works.
I have practically installed the circuit and it works perfectly
- I can Unlock my car with my phone
- I can start my car engine remotely using my cell phone
- I can lock and unlock the doors.
- I can turn on the car A/C using my android cell phone
- I can enable my car anti-theft protection mode.
Now I can use my cell phone as the Car Key. This Car project really helped me to control and protect my car and I believe every car owner should make this project. If you follow this article completely you will be able to design your own car automation system using Arduino and a Bluetooth module. Or you can use my designed PCB to reduce the project cost. It’s just like the Arduino as I am using the same microcontroller “Atmega328”.
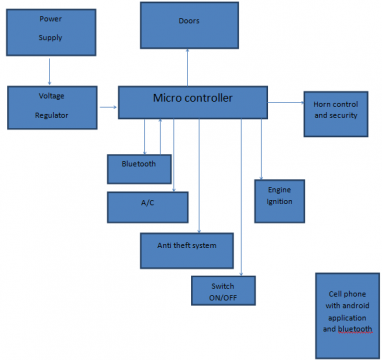
Block Diagram of the Arduino Bluetooth Controlled Car
SOFTWARES USED:
- SolidWorks for 3D designing
- Arduino Uno IDE for programming
- Proteus simulation for basic circuit checking to confirm connections
- Eclipse for android application designing.
- Cadsoft eagle for PCB designing.
We tried to design this project according to the market requirements, for this purpose before building the hardware, first, we designed our hardware in 3d software called SOLIDWORKS. This designing really helped us in understanding the dimension of the components and then using these components within the defined area. for the complete hardware design, we had to make each and every component. After the design was final. then we started performing some experiments on the Bluetooth interfacing and basic commands transferring. we defined the credentials like pin code and its baud rate. after we completed the circuit then we started the programming to check our hardware. for the programming, we used Arduino Uno IDE. The heart of our project is the Atmega328 microcontroller. The Android software is highly secured as it needs pairing code, and the login password. In the android application, we also defined different passwords for all the features. This android application can not be used for other cars unless new passwords are defined. each and every car will have its own codes, in order to make it highly secured.
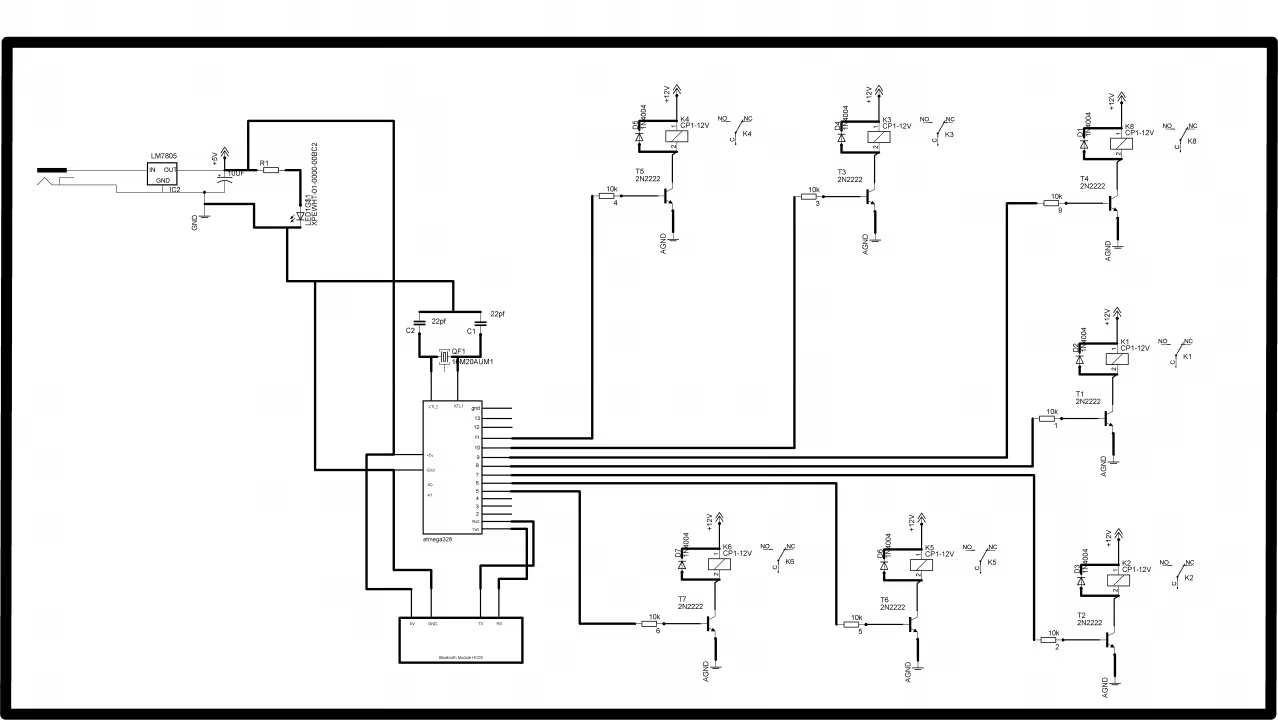
Bluetooth Car Control Circuit Diagram:

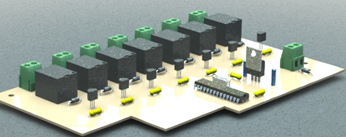
Bluetooth Car Control PCB DESIGN:

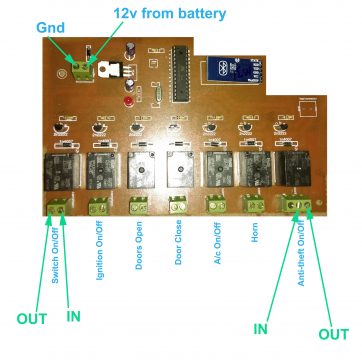
Hardware Picture:
Download the Original PCB board file: Bluetooth
SolidWorks design of the Bluetooth Car control system:
The SolidWorks designing really helped me in understanding the dimensions of all the components. It was due to the dimensions that I was able to place the components with precise accuracy. If you want to learn SolidWorks then you can visit my YouTube channel “Electronic Clinic”.
Download the APK file of the Car control App:
Download APK file: unlock my car apk
After you download and install the Bluematic car app in your cell phone. use the following credentials.
username: admin
password: fgrty
If you want to learn how to make your own Android cell phone application then read my article on “Unlock my car with my phone, Start the engine, Start A/C, Anti-theft using Arduino”
Note: You can use the above cell phone App for free. The app source code is available only at 100 Dollars.
Arduino “Atmega328” Bluetooth Car Project Programming:
|
1 2 3 4 5 6 7 8 9 10 11 12 13 14 15 16 17 18 19 20 21 22 23 24 25 26 27 28 29 30 31 32 33 34 35 36 37 38 39 40 41 42 43 44 45 46 47 48 49 50 51 52 53 54 55 56 57 58 59 60 61 62 63 64 65 66 67 68 69 70 71 72 73 74 75 76 77 78 79 80 81 82 83 84 85 86 87 88 89 90 91 92 93 94 95 96 97 98 99 100 101 102 103 104 105 106 107 108 109 110 111 112 113 114 115 116 117 118 119 120 121 122 123 124 125 126 127 128 129 130 131 132 133 134 135 136 137 138 139 140 141 142 143 144 145 146 147 148 149 150 151 152 153 154 155 156 157 158 159 160 161 162 163 164 165 166 167 168 169 170 171 172 173 174 175 176 177 178 179 180 181 182 183 184 185 186 187 188 |
#include <SoftwareSerial.h> SoftwareSerial Blue(0, 1); long int data; int relay1 = 5; // car switch ON long int password1 = 98421615;// to on switch long int password2 = 96951628;// to off switch int relay2 = 6; // engin ON " this will turn on the switch for few seconds to turn on the engine, after the engine starts the switch is released again. long int password3 = 74151525; // engine self on long int password31 = 45614787; // engine self 0ff int relay3 = 7; // doors open long int password4 = 84515822; int relay4 = 8; // doors close long int password5 = 81426337; // car A/C int relay5 = 9;// for A/c long int password6 = 86741749; // to turn on ac long int password7 = 22241729; // to turn off A/c // Horn int relay6 = 10; // for horn long int password8 = 34156469; // to turn the horn button // PARKING LIGHTS int relay7 = 11; // anti theft long int password9 = 24127161; // to turn on anti theft long int password10 = 48615369; // to turn off anti theft char state = 0; void setup() { pinMode(relay1, OUTPUT); digitalWrite(relay1, LOW); pinMode(relay2, OUTPUT); digitalWrite(relay2, LOW); pinMode(relay3, OUTPUT); digitalWrite(relay3, LOW); pinMode(relay4, OUTPUT); digitalWrite(relay4, LOW); pinMode(relay5, OUTPUT); digitalWrite(relay5, LOW); pinMode(relay6, OUTPUT); digitalWrite(relay6, LOW); pinMode(relay7, OUTPUT); //digitalWrite(relay7, LOW); digitalWrite(relay7, HIGH); delay(500); // incase if the power from battery is disconnected and then connected again then the horn will on and off few times digitalWrite( relay6, HIGH); delay(1000); digitalWrite(relay6, LOW); delay(500); digitalWrite( relay6, HIGH); delay(1000); digitalWrite(relay6, LOW); delay(500); digitalWrite( relay6, HIGH); delay(1000); digitalWrite(relay6, LOW); delay(500); Serial.begin(9600); Blue.begin(9600); } void loop() { while(Blue.available()==0) ; if(Blue.available()>0) { data = Blue.parseInt(); } //delay(100); //Serial.print(data); if (data == password1) { digitalWrite(relay1,HIGH); Serial.println("Switch On"); delay(1000); } if( data == password2) { digitalWrite(relay1,LOW); Serial.println("Switch OFF"); } if( data == password3) // for self on { digitalWrite(relay2,HIGH); Serial.println("Self ON"); delay(200); } if( data == password31) // for self off { digitalWrite(relay2,LOW); Serial.println("Self OFF"); delay(1000); } if( data == password4) // for doors opening { digitalWrite(relay3,HIGH); // press button Serial.println("Doors Opened"); delay(2000); // keep the switch pressed for 2 seconds digitalWrite(relay3,LOW); // release button } if( data == password5) // for doors opening { digitalWrite(relay4,HIGH); // press button Serial.println("Doors Closed"); delay(2000); // keep the switch pressed for 2 seconds digitalWrite(relay4,LOW); // release button } if( data == password6) //to turn on a/c on { digitalWrite(relay5,HIGH); // press button Serial.println("A/c ON"); delay(2000); } if( data == password7) //to turn on a/c on { digitalWrite(relay5,LOW); // press button Serial.println("A/c OFF"); delay(2000); } if( data == password8) //to turn on and off horn switch { digitalWrite(relay6,HIGH); // press button Serial.println("Horn ON"); delay(2000); // keep the switch pressed for 2 seconds digitalWrite(relay6,LOW); Serial.print("Horn OFF"); } if( data == password9) //to turn on anti theft { digitalWrite(relay7,HIGH); Serial.println("Anti theft ON"); delay(2000); } if( data == password10) //to turn off anti theft { digitalWrite(relay7,LOW); Serial.println("Anti theft OFF"); delay(2000); } } |
For the complete explanation watch video tutorial given below.
At the end of this project, I was able to Unlock my car with my phone, I was also able to start the engine, open and close the doors, blow the horn, turn on the A/C, and activate the anti-theft mode. This project was a success, you can watch the practical demonstration in the following video.
Watch Video Tutorial:
Discover more from Electronic Clinic
Subscribe to get the latest posts sent to your email.


its nice can we try my own what cost it iam learner
ya, its very simple. you can make a one by yourself. if you need any help let me know. you can contact on my email id. engrfahad@wordpress-1263046-4550097.cloudwaysapps.com
It’s very nice but can’t login bluematic car app ………
try the default admin and password “admin”.
give me a bluematic car app
username: admin
password: fgrty
cAN we change password?
or can we make diffrent user name or password?
can you send me an email with more information about this project, like how the wires are connected on arduino, and much more things? my email: vlad.bota@yahoo.com
Hi,
I’m not that good at this, but this project is interesting enough to try.
I’ve found online store that can build PCB boards ( https://www.pcbway.com/quotesmt.aspx) based on zip file from you:
https://www.electroniclinic.com/wp-content/uploads/2019/08/Bluetooth.zip
Can I ask you to send me the components list for the PCB board?
Regards
maciek.telecki@gmail.com
i did everything but i dont now how to conect it