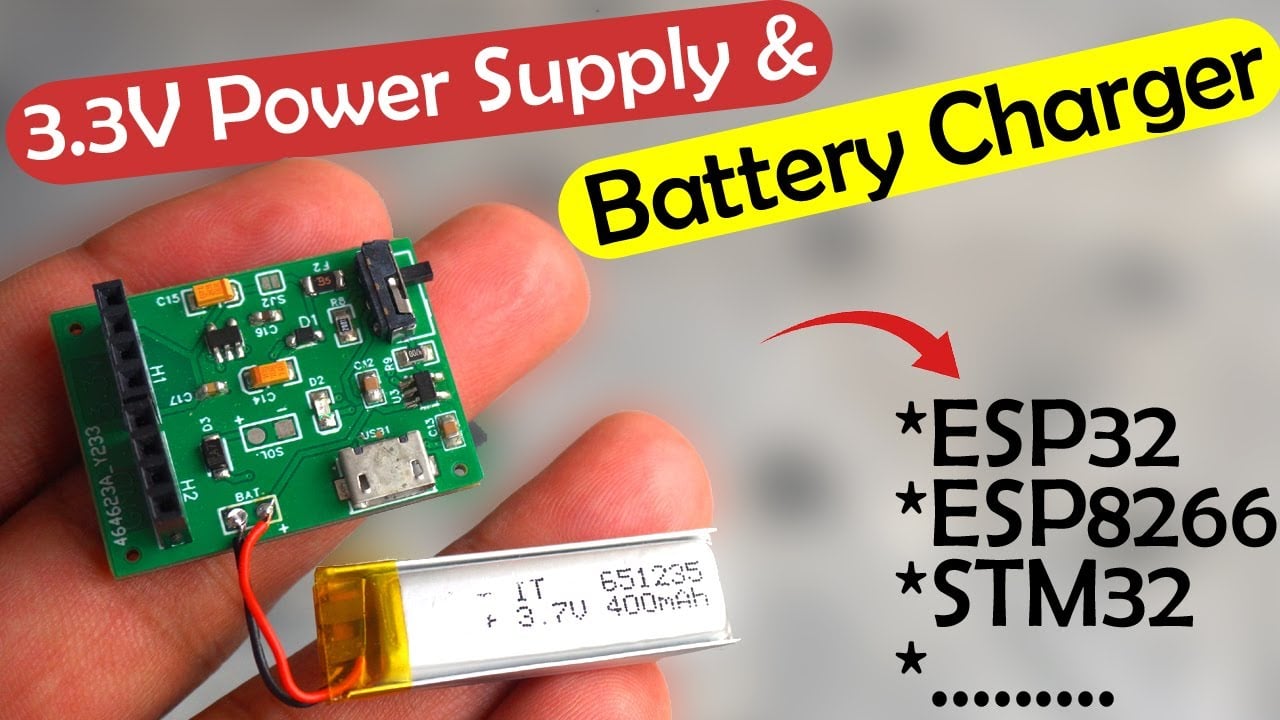
3.3V Power Supply & Lipo or Lithium Ion Battery Charger
Last Updated on April 8, 2024 by Engr. Shahzada Fahad
Table of Contents
3.3V Power Supply:
3.3V Power Supply & Lipo or Lithium Ion Battery Charger- This is the most versatile 3.3V regulated Power supply; because it also has a lithium-Ion / Lipo Battery charger. And after looking at its features, you gonna be like wow!
And trust me sooner or later you gonna need this 3.3V power supply. Because with the help of this circuit using a 5V adaptor, or a cell phone charger, you can directly power up 3.3V compatible controller boards and sensors.

And if you want to provide battery backup to your 3.3V compatible controllers or sensors, there is no need to worry because you can also use this circuit as a Lithium-Ion / Lipo battery charger.
You can charge this battery using a 5V power supply, or you can even use a small 6V solar panel. You can solder the Solar Panel wires to the two contacts labeled as SOL., and the wires of the Lipo battery or Lithium-Ion battery to the contacts labeled as BAT. Using a switch I can turn ON/OFF the 3.3V power supply. There is also a micro USB slot for connecting 5 volts using a USB cable and some headers for 3.3V and GND connections.
Today, I am not going to explain how to design its PCB and how to solder all those tiny SMD components because I have already written quite detailed articles.
You should not provide more than 6V to this circuit, or else the MCP73831 IC will burn out. It’s a miniature single-cell, fully integrated Lithium-Ion/Lipo battery charge Management controller. As you know, there can be significant fluctuations in voltage due to varying sunlight intensity. So, if we use a 12V solar panel instead of a 6V Solar Panel, we can fix all the voltage related issues.
But the problem is, if we connect a 12V solar panel, the IC will get damaged, and then this circuit won’t work at all. Because, as per the datasheet, we can’t provide the MCP73831 charge controller with more than 6V. So, what if we convert the solar panel voltage into regulated 5 volts? Then all worries would vanish.

This is a 5V and 3A power supply, and it can take input voltage up to 28 Volts. So, you can safely use this circuit with even large solar panels. And with its regulated 5 volts, you can charge the Lipo battery and power up 3.3V compatible controller boards and sensors.
This 5V and 3A power supply is one of my favorites, and that’s why I have also added it to my latest ESP32 development board. Using this power supply, I can power up the ESP32 WiFi + Bluetooth Module, SIM7600G 4G LTE module, and all the other sensors and breakout boards. So now you can imagine how powerful this 5V and 3A power supply is.
So, imagine if we put these two power supplies on the same PCB; we can create an outstanding power supply that provides both 5 volts and 3.3V.
If you are making your own product and you just want to use its controller, then you will need a 3.3V power supply. The Nodemcu ESP8266, ESP32 WiFi + Bluetooth Module, STM32, etc., all these boards have onboard 3.3V voltage regulators.

So, using this circuit, you would not only be able to supply regulated 3.3 volts but you would also be able to provide battery backup. Anyway, first, let’s test this 3.3V power supply alone, and then we’ll test it with the 5V and 3A power supply as well.
You can clearly see, during this first test I have not connected any battery and I am going to use a cell phone charger to supply 5 volts to the circuit.

The output voltage is not bad; it’s pretty close to 3.3 Volts.
Next, I am going to use a 12V adaptor which you can think of as the solar panel and I am going to use the 5V and 3A power supply to supply regulated 5 volts to this 3.3V Power Supply.

Look at the voltage on the digital multimeter, it’s working. So, if you are thinking about using a large solar panel with a voltage between 8 to 28 volts then I highly recommend using my designed 5 volts and 3A power supply.
Next, I soldered the wires of this 3.7V 400mAh Lipo battery to the + and – contacts.

And right now you can see the output voltage.
Now, you can provide battery backup to 3.3V compatible controller boards and sensors.

When the RED LED is ON, it means the battery is charging. Right now I am charging the battery using my 5V and 3A power supply and a 12V adaptor. Anyways, when the battery is fully charged the LED turns OFF.
Now, you must have an idea of how powerful is this 3.3V power supply; because it not only charges the Lithium-Ion / Lipo Batteries but also provides battery overcharge protection.
Now, let’s go ahead and take a look at the circuit diagram.
3.3V Power Supply Circuit Diagram:

This circuit has two parts, the battery charger and 3.3V voltage regulator. Let’s first start with the battery charger.

To the CN1, you can connect a 6V solar panel, the diode D3 allows the current to flow only in one direction, and the USB1 is a micro USB port for supplying regulated 5 volts using a cell phone charger or any other 5V power supply. When you connect a 5V power supply, this diode blocks the voltage.
This charging circuit is based on the MCP73831 Miniature Single-Cell, Fully Integrated Lithium-Ion / Lipo battery Charge Management Controller. I highly recommend you should read its datasheet. As per the datasheet along with the integrated current sense, it also provides reverse discharge protection.
You get four voltage regulation options. The charge current is programmable and there are some other features.
Applications:
It is used in Lithium-ion / and Lipo battery chargers, personal data assistants, cellular telephones, digital cameras, mp3 players, Bluetooth headsets, USB chargers, and it can be used in thousands of other products.

This is the Typical Application circuit diagram. I have used the same circuit and it works awesome. I am not going to explain this, because its already explained in the datasheet. This circuit can give you a maximum of 500mA and if you want to increase it up to 800mA then you can use the LTC4054 battery charger.
Anyway with the MCP73831 you can charge a battery up to 1000mAh.

3.3V voltage regulator is based on the MIC5219 500mA Peak Output LDO regulator. Its an efficient linear voltage regulator with high peak output current capability, very low dropout voltage, and better than 1% output voltage accuracy. For the features, applications, pinout, typical circuit diagrams, and technical specifications; I highly recommend you should read its datasheet.
Anyways, this 3.3V power supply also has a protection fuse, and a diode that allows the current to flow only in one direction, and then we have a bunch of decoupling capacitors. And female headers for connecting 3.3V and GND wires. So that’s all for now.
Watch Video Tutorial:
Discover more from Electronic Clinic
Subscribe to get the latest posts sent to your email.


Hi guys!
Has this application been previously project’d / commercialised?
5mm public signs behind window using led string lights (3x 1.5v AA powered) being REused (waste not) (various lengths / w).
RCWL 0516 or similar for frequent (street) human detection (attention) evenings (LDR)
Powered (2-4weeks) by a low-profile as possible rechargeable pack (REuse older 5v phone chargers .5 – 2w)
would love to PCB a quantity ~25~50 , piggyback the radar? (I’m probably breaking some law with the suggestion) interested in your comments / freelancing it possibility? (not an engineer obviously)
Are low profile power packs available with managed power (charging stop). Ideally integrated into signs 5mm thick where wall mounting. alternatively 10mm (for non-profit community signage)