Arduino Capacitive Soil Moisture Sensor V1.0/V2.0 interfacing and programming
Last Updated on September 21, 2024 by Engr. Shahzada Fahad
Table of Contents
Arduino Capacitive Soil Moisture Sensor:
Arduino Capacitive Soil Moisture Sensor V1.0/V2.0 for Plants Watering with a Buzzer–
In today’s article, you will learn how to make a soil moisture monitoring system for plants using Arduino, a capacitive soil moisture sensor V2.0 or V1.0 or V1.2, an I2C-supported SSD1306 Oled display module, and a 5V buzzer.
For this project, you can use Arduino Mega, Arduino Uno, Arduino Nano, or Arduino Pro Micro, etc. You know, there is a long list of the Arduino boards, just make sure, the Arduino board you are going to select has all those pins which are defined in the programming.
If you want to make a 100% diy based project then you can use my designed Arduino Pro Micro

And my designed 5V and 3A power supply.

If you combine these two on a single PCB you can make a product.
Anyway, in my case, I am going to use an Arduino Nano development board and as I said earlier you can also use Arduino Uno.

Capacitive Soil Moisture vs. Resistive Soil Moisture:
A lot of people get confused when it comes to the selection of a soil moisture sensor. There are two major types of Soil Moisture sensors; Capacitive Soil Moisture sensors and Resistive Soil Moisture Sensors.

Both Capacitive and Resistive soil moisture sensors have their own advantages and limitations, and the choice between them depends on the specific requirements of the application.
Capacitive soil moisture sensors work by measuring the dielectric constant of the soil, which is related to the water content. They have the advantage of being less affected by soil salinity and temperature, and they can measure moisture over a wider range than resistive sensors. They also require less power and are less affected by electrical noise. However, they can be affected by the soil type and density, and they may require calibration for accurate readings.
Resistive soil moisture sensors, on the other hand, work by measuring the electrical resistance of the soil, which is also related to the water content. They are generally less expensive than capacitive sensors and can be used in a variety of soil types. They are also relatively simple to use and require no calibration. However, they can be affected by soil salinity and temperature, and they may have limited accuracy and sensitivity.
So, the choice between capacitive and resistive soil moisture sensors depends on the specific requirements of the application, such as the soil type, moisture range, accuracy, and cost. In general, capacitive sensors are better suited for applications that require high accuracy and sensitivity over a wide range of soil types, while resistive sensors are better suited for simpler applications that require lower cost and simpler operation.
Recommended Soil Moisture Level for Plants:

After the soil moisture sensor selection, next, you need to know about the different moisture levels. Trust me, if you don’t know about which moisture level to maintain then using a soil moisture sensor is useless.
The basic objective behind designing a soil moisture monitoring system is to ensure that water will be provided to plants on time and in a rightful quantity. If the soil moisture is too low, plants are at risk of being damaged, and if the soil moisture is high, even then plants are liable to be damaged.
The majority of plants thrive in soil having a moisture level that ranges between 20% to 60%. Any humidity level over 60% can potentially cause damage to the plant, which is relying on moisture from the soil to nourish. The 60% limit may vary.
Some experts believe that majority of flowers, trees, and shrubs require moisture levels between 20% to 40%, while if you are dealing with vegetables, then you need to maintain soil moisture between 40% to 80%.
For the sake of this project, I am going to select 40% to 80% of the soil moisture level. I think I have shared enough useful information with you guys. So, without any further delay, let’s get started!!!
Amazon Links:
Arduino Nano USB-C Type (Recommended)
*Disclosure: These are affiliate links. As an Amazon Associate I earn from qualifying purchases.
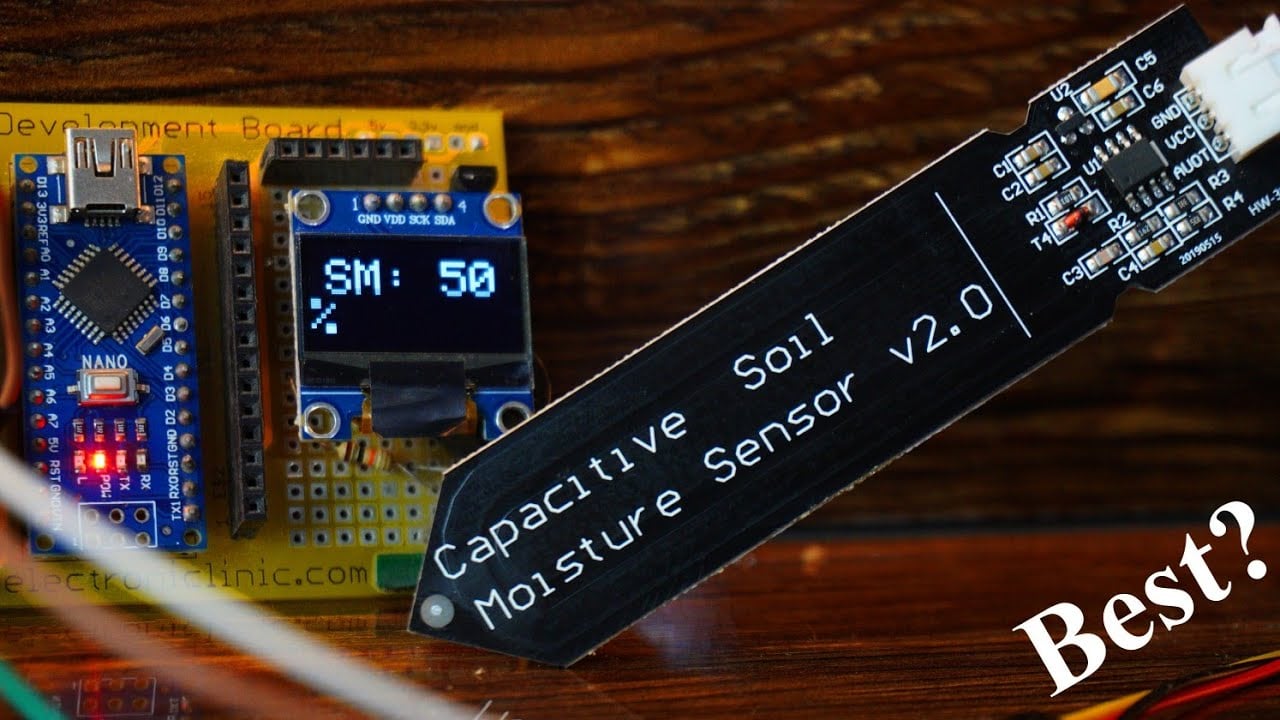
Capacitive Soil Moisture Sensor:

This is the Capacitive Soil Moisture Sensor V2.0 but you can also use V1.0 model. Well, V2.0 is an updated version of the V1.0 model with several improvements. The main difference between the two versions are:
- Design: The v2.0 sensor has a new design with a flat sensing surface that improves the accuracy of the measurements and reduces interference from the surrounding soil.
- Sensing Range: The sensing range of the v2.0 sensor has been increased from 0-50% to 0-70% soil moisture content, making it suitable for a wider range of applications.
- Power Consumption: The v2.0 sensor requires less power to operate, which makes it more energy-efficient and suitable for battery-powered applications.
- Calibration: The v2.0 sensor has a more stable calibration that requires less frequent re-calibration than the v1.0 sensor.
- Compatibility: The v2.0 sensor is compatible with a wider range of microcontrollers and single-board computers than the v1.0 sensor.
Overall, the capacitive soil moisture sensor v2.0 is an improved version of the v1.0 model, with enhanced accuracy, sensing range, power efficiency, and compatibility.

The only thing I don’t like about this version of the capacitive soil moisture sensor is that its components are exposed, which is why it’s the cheapest option. In slightly more expensive versions of the capacitive soil moisture sensor, the electronic components are waterproofed.
The Capacitive Soil Moisture Sensor Module determines the amount of soil moisture by measuring changes in capacitance to determine the water content of soil. This can be used in an automatic plant watering system or to signal an alert of some type when a plant needs watering.
KEY FEATURES OF CAPACITIVE SOIL MOISTURE SENSOR MODULE:
- Analog output of moisture content
- More corrosion resistant than resistive type of sensor
- 3 or 5V operation. Low power so may be driven from digital pin on MCU
This soil moisture sensor module uses capacitance rather than resistance to determine the water content of soil. The main down-side to the common fork type resistance sensor is that the probes inserted into the soil must be conductive bare metal and the small electrical current that flows between them results in corrosion of the probes through electrolysis over time.
The capacitive probe improves that situation because the sensor metal inserted into the soil can be covered in solder resist to minimize corrosion and electrical current is not flowing through the soil to induce electrolysis. The main weakness in the lifespan of the probe is the uncoated cut sides of the PCB which can absorb moisture over time as well as the exposed electronics at the top of the probe if they get splashed by water. The customer can add further protective coating such as clear fingernail polish or similar coating if desired without seriously affecting the performance of the probe.
Theory of Operation
The module uses a TL555I CMOS timer to create a 1.5MHz clock. The TL555I is similar to the ubiquitous NE555 but is newer CMOS technology with a higher frequency capability and other improvements.
A peak voltage detector converts the waveform from the TL555I into a DC voltage that can be read by the ADC input of a microcontroller.
When the probe is exposed to moisture, it affects the capacitance of the circuit which in turn affects the peak amplitude of the signal and therefore the DC voltage output that is being monitored by the MCU. Higher moisture = lower DC voltage output.
Capacitive Soil Moisture Sensor Pinout:

The 3 wires (Yellow, Red, and Black) are clearly labeled as the Analog output wire, VCC, and GND. So the yellow wire which is the analog output wire should be connected to the analog pin on the controller board.
This Capacitive soil moisture sensor accepts a wide range of input voltages due to which it can be used with 3.3V and 5V compatible controller boards like Arduino, ESP8266, ESP32, Raspberry Pi Pico, and lots of other controller boards.
Arduino Capacitive Soil Moisture Sensor Circuit:

The Yellow wire of the Capacitive Soil moisture sensor is connected to the Analog pin A0 on the Arduino Nano. While the VCC and GND pins of the soil moisture sensor are connected to 5V and GND pins.

A 5V buzzer is connected to the digital pin4.
The VCC and GND pins of the I2C supported SSD1306 Oled display module are connected to the 5V and GND pins on the Arduino Nano whereas its SCL and SDA pins are connected to the Arduino pins A5 and A4. A5 is the SCL and A4 is the SDA.
On the left side is the 5V regulated power supply based on the 7805 voltage regulator. The power supply part is optional; you can also use your laptop or computer as a voltage source to perform your initial experiments. But in the long run, you are going to need an external power supply. So, that’s all about the connections. Now, let’s go ahead and take a look at the programming.
Required libraries:
You will need the following libraries for the SSD1306 Oled display module.
Arduino Capacitive Soil Moisture Sensor Programming:
|
1 2 3 4 5 6 7 8 9 10 11 12 13 14 15 16 17 18 19 20 21 22 23 24 25 26 27 28 29 30 31 32 33 34 35 36 37 38 39 40 41 42 43 44 45 46 47 48 49 50 51 52 53 54 |
//Dry: (520 430] //Wet: (430 350] //Water: (350 260] #include <SPI.h> // include libraries #include <Wire.h> #include <Adafruit_GFX.h> #include <Adafruit_SSD1306.h> const int AirValue = 620; const int WaterValue = 310; int soilMoistureValue = 0; int soilmoisturepercent=0; int buzzer = 4; #define SCREEN_WIDTH 128 // ORelay display width, in pixels #define SCREEN_HEIGHT 64 // ORelay display height, in pixels // Declaration for an SSD1306 display connected to I2C (SDA, SCL pins) #define ORelay_RESET -1 // Reset pin # (or -1 if sharing Arduino reset pin) Adafruit_SSD1306 display(SCREEN_WIDTH, SCREEN_HEIGHT, &Wire, ORelay_RESET); int moisturesensor = A0; // moisture sensor is connected with the analog pin A0 of the Arduino void setup() { Serial.begin(9600); pinMode(moisturesensor, INPUT); display.begin(SSD1306_SWITCHCAPVCC, 0x3C); delay(2000); display.clearDisplay(); display.setTextColor(WHITE); } void loop() { soilMoistureValue = analogRead( moisturesensor); Serial.println(soilMoistureValue); soilmoisturepercent = map(soilMoistureValue, AirValue, WaterValue, 0, 100); display.clearDisplay(); display.setCursor(10,10); display.setTextSize(3); display.setTextColor(WHITE); display.print("SM:"+String(soilmoisturepercent)+"%"); display.display(); delay(1000); if ( soilmoisturepercent < 40 ) { digitalWrite(buzzer, HIGH); delay(1000); digitalWrite(buzzer, LOW); delay(1000); digitalWrite(buzzer, HIGH); delay(1000); digitalWrite(buzzer, LOW); delay(1000); } } |
It’s just a few lines of code and there isn’t anything complicated. All I am doing is to read the soil moisture value, then I Map the value to find the percentage, and then I print the values on the Oled display module.
I have also used a condition, so, whenever the soil moisture value drops below 40% the buzzer will turn on. So, that’s all about the programming. I have already uploaded this program and now let’s watch the Arduino and Capacitive Soil Moisture Sensor V2.0 in Action.
Practical Demonstration:

I successfully tested it. For practical demonstration watch video tutorial given below. Anyway, right now on the Oled display module you can see negative value of the soil moisture this is because this sensor is not yet inserted into the soil.

I added some water and the Soil moisture percentage increased to 87%.

You can replace that Buzzer with a relay to control a water pump and in the programming you can add one more condition; so that when the soil moisture reaches the recommended value then you can immediately turn OFF the water pump. I have already explained this in my previous project. All you need is to search for the soil moisture monitoring projects. So, that’s all for now.
Watch Video Tutorial:
Discover more from Electronic Clinic
Subscribe to get the latest posts sent to your email.


Hi, can you modify the code for multiple moisture sensors? also for 5v relay when it reaches a specific level, if moisture levels are less than 40% then the relay should turn on, and should turn off when it reaches 80% like that, thanks.