Diy Mini Refrigerator, Mini Fridge, or Mini Freezer from an old Microwave Oven
Last Updated on September 21, 2024 by Engr. Shahzada Fahad
Table of Contents
Diy Mini Refrigerator using Microwave Oven:
Diy Mini Refrigerator, Mini Fridge, or Mini Freezer from an old Microwave Oven- There are millions out there who can not afford to purchase a new refrigerator and there are guys who want to learn how to make a refrigerator, so that they can start their own business. Using 2nd hand and salvaged parts anyone can build an amazing fridge or freezer. If you learn the basics then you can convert anything into a fridge or freezer. Today we will convert an old Microwave oven into a fully working Mini freezer. For step by step explanation watch video tutorial given at the end of this article.
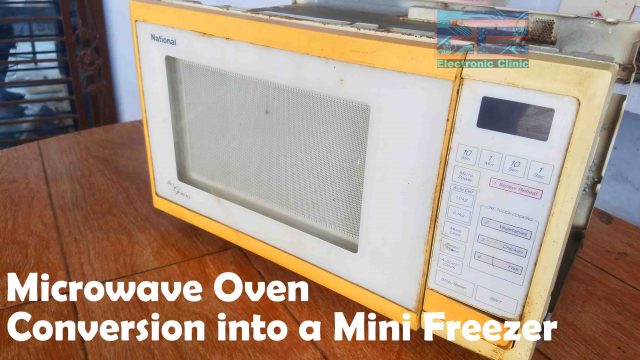
This is the same Microwave Oven from which I previously salvaged a high ampere transformer for building a Spot welding machine so that I can make different battery packs for my upcoming Quadcopter projects and Electric Bikes. Anyways, since then, the microwave oven casing was just lying around and I just thought why not to convert that microwave oven into a mini refrigerator or Mini Fridge or a mini freezer. This article is going to be very informative for the beginners, as I will be explaining each and every detail, including the refrigerator parts, I will also talk about how to identify the compressor gas charging pipe, suction pipe, and discharge pipe. I will also practically show you how to perform welds, how to find and fix gas leakage, etc. So, if you read this article from start to the very end, I am sure you will be able to make any size diy refrigerator, fridge, or freezer. So, let’s go ahead and convert this Microwave Oven into a Mini Refrigerator. Without any further delay let’s get started!!!
Amazon Links:
Refrigerator Copper check Access Valve with chargine Nipple.
Refrigerator Copper filter dryer.
Refrigerator Copper Capillary Tube
*Disclosure: These are affiliate links. As an Amazon Associate I earn from qualifying purchases.
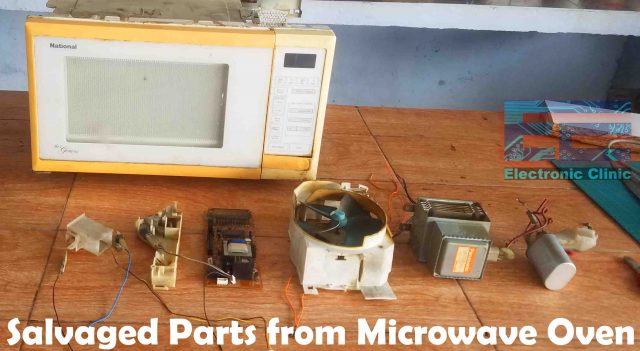
These are all the parts which I just removed and maximum of these parts I can reuse in some of my upcoming videos. For now, among all these salvaged parts, I think, I will need this 220Vac cooling Fan. Anyways, there is nothing on the Inside and on the outside, now it’s just the casing and it’s absolutely ready to be converted into a Mini refrigerator.
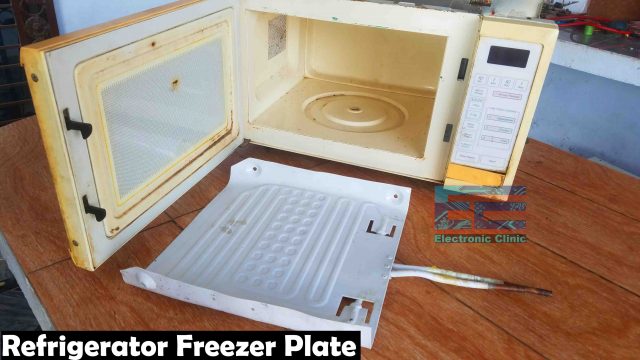
First, I am going to start with this Refrigerator Evaporator Plate or Freezer Plate or plate tube refrigerator evaporator or Refrigerator cooling coil. Basically, there are three types of Evaporator which are Plate type Evaporator, finned evaporator, and bare tube evaporator. The one you can see is the Plate type Evaporator and these are available in different shapes and sizes. I purchased this Freezer plate because it nicely fits inside this microwave oven. I drilled two holes for the pipes.
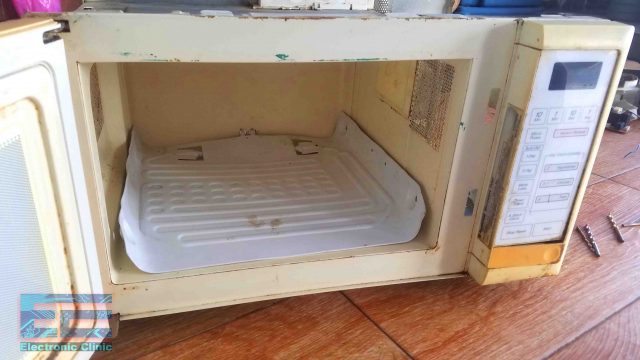
So, now we have these two pipes going outside which I will weld with the compressor and other parts. You can see the freezer plate nicely fits and it looks good.
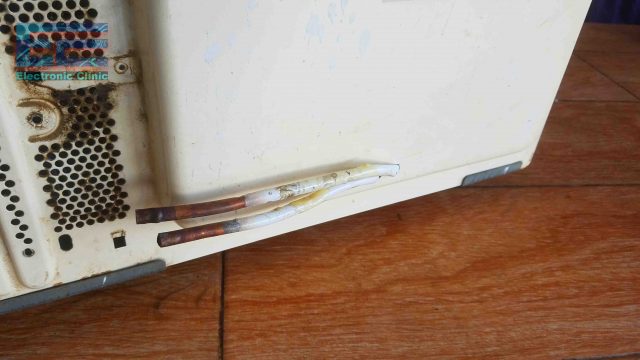
Carefully bend these pipes, avoid sharp bends.
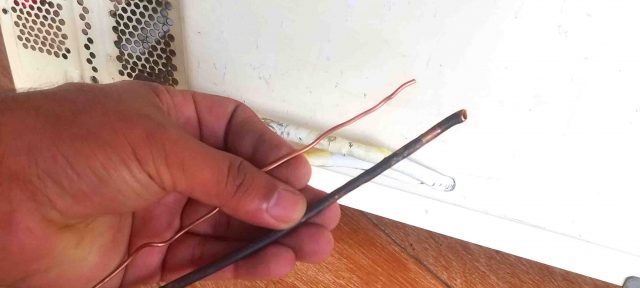
Next, we need these two copper tubes or copper pipes. The thinner one is the Copper Capillary tube and it should be around 6 feet long. We will weld these two copper tubes with the two pipes of the Freezer plate.
The copper tubes are nicely welded. It’s a good practice to double check your welds before you move on to the next step. For now it looks good.
About the Refrigerator Compressor:
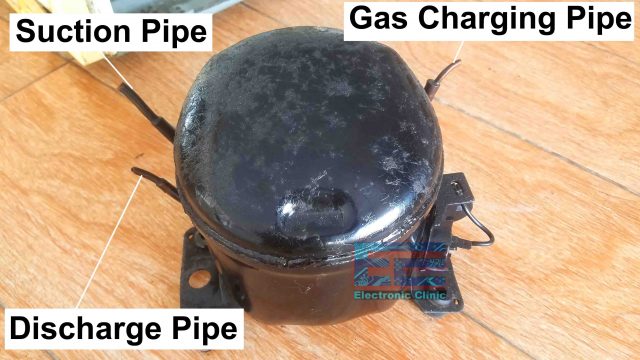
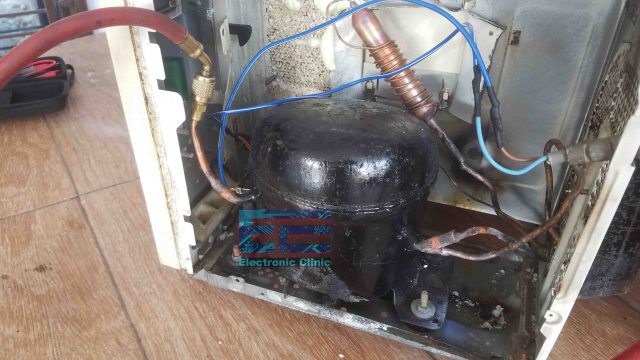
Here I have this 1/10 Refrigerator compressor, which is smaller in size and is perfect for building a mini freezer or a mini fridge or a mini refrigerator. This refrigerator compressor has 2 pipes on the one side and one pipe on the other side. The refrigerator compressors are available in different sizes and ratings. For more details read my article available on www.electroniclinic.com I will provide a link in the description. Anyways, as a beginner you may get confused about how to identify which one is the gas charging pipe, which one is the suction pipe, and which one is the discharge pipe.
In the image you can see this refrigerator compressor has three pipes. To identify these pipes, simply power up the compressor, first use a digital multimeter to check if there is any short circuit, as you will never want an electric shock, it can be dangerous. So, when you have powered up your compressor, the two pipes will suck the air, and you can feel it with your finger, if it pulls your finger then these pipes can be used for the gas charging and for the suction. These pipes are internally connected so you can use the gas charging pipe as the suction pipe and the suction pipe as the gas charging pipe. The gas charging pipe is also known as Charging pipe or process pipe or gas charge line. The 3rd pipe will be the discharge pipe, you can also feel it with your finger, and it will push your finger. The discharge pipe has smaller diameter. So, this was just a basic explanation to help you guys how to identify these three different pipes.

The reason I selected this compressor is just because it nicely fits in this area. It really looks good, I feel like; if it was designed for this casing.
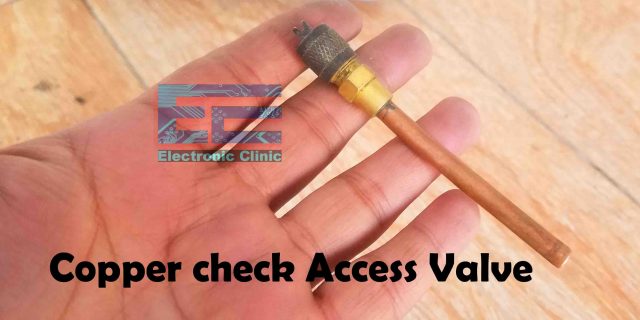
This is the Copper check Access Valve with charging Nipple, we will weld this with the gas charging pipe on the Compressor. I am not good at welding, so that’s why I asked my Cousin Yasir Khan to do it for me. I also suggest the same thing for you, if you don’t know how to do the welding then find someone. The gas charging pipe is ready.
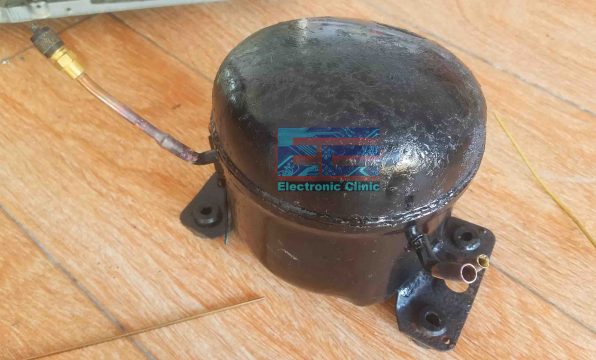
On the other side we have these two pipes, the pipe with the larger diameter is the Suction pipe and the smaller diameter pipe is the discharge pipe.
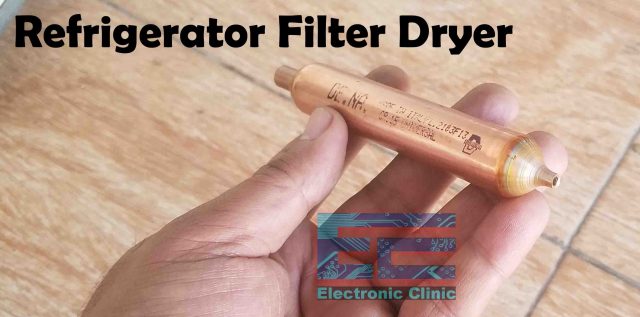
This is the Copper filter dryer. It has a larger opening on one side and a smaller open on the other side. This Copper filter dryer has two functions, the first function is, it trap coarse particulate contamination and copper shavings, and second function is it capture any moisture preset in the system.
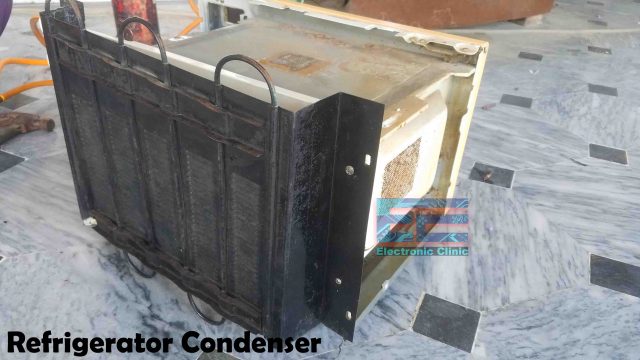
This is the Refrigerator condenser and it is one of the main operating components that make up the cooling system on a standard refrigerator. As the refrigerant passes through the Evaporator plate or freezer plate, it collects heat energy from within the refrigerator or freezer, leaving the inside of the unit cold enough for food and liquids. It’s size selection depends on the compressor size. First, I fixed this condenser on the backside.
Next, we wrapped the Capillary tube which is coming from the freezer plate around the Filter dryer. This Capillary tube is 6 feet long. Weld the other pipe which is coming from the freezer plate with the Suction Pipe of the compressor. The Condenser is welded between the filter dryer and the discharge pipe of the compressor. Confused? There are two pipes coming from the condenser, weld one pipe with the large opening side on the filter dryer and weld the other pipe of the condenser with the Discharge pipe of the compressor. It’s just that simple. If you still find it hard to follow, then watch my video tutorial given at the end of this article.
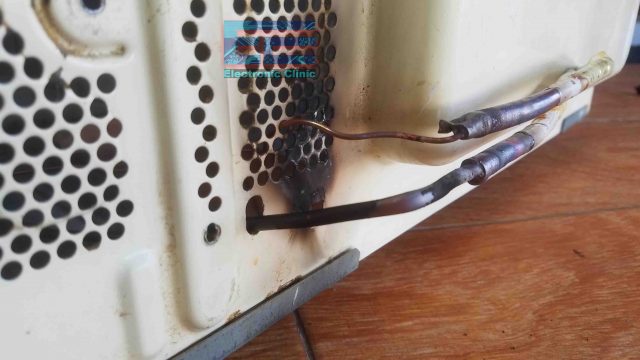
You can see there is a gas pipe connected with the compressor gas charging pipe, it’s just a normal gas to check for any leakage. I checked all the welds, there was only one leakage which I fixed. So, I highly recommend to check all the welds before you fill the refrigerant. Now, there is no leakage and now we are ready for the next step, which is to insulate the freezer from the body and for this I am going to use this Styrofoam.
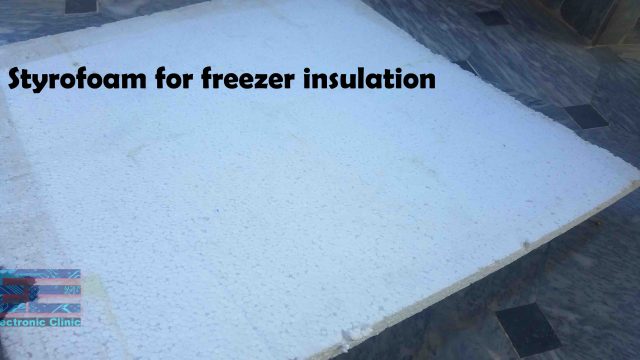
You can see this is quite thick, so, what I am going to do next is to cut this using a hot Nichrome wire.
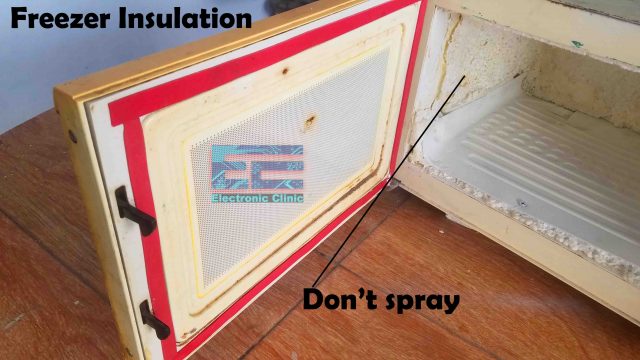
I insulated the bottom side of the freezer plate and all the other sides. I am also going to place some Styrofoam on the top. To make it look nice I sprayed it on the outside and inside but it made it worse in the inside. The spray had a chemical reaction with the Styrofoam, so don’t do this. I will fix it later.
The door was not making a nice contact with the body and this was not good, as I didn’t want the cold air to escape. So, I did it the easy way, I fixed these red color rubber on the door, and now the door makes a nice contact.
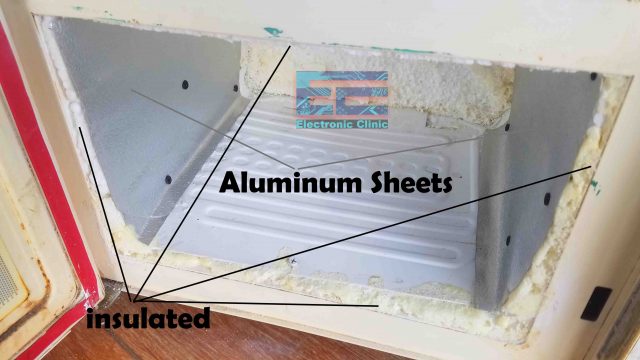
I fixed these thin aluminum sheets on the two side, it’s good to have it on the back side too, but I had only a small sheet of aluminum. Anyways, now it looks good. Now, we have this another box which is not perfectly but nicely insulated and it’s more than enough for explaining my idea of converting a microwave oven into a mini refrigerator or mini freezer.
The next thing which I have to work on is, when I close the door it bounces back and since there is no locking mechanism, so I will have to make it. I am thinking of using the neodymium magnets which I salvaged from a hard drive.
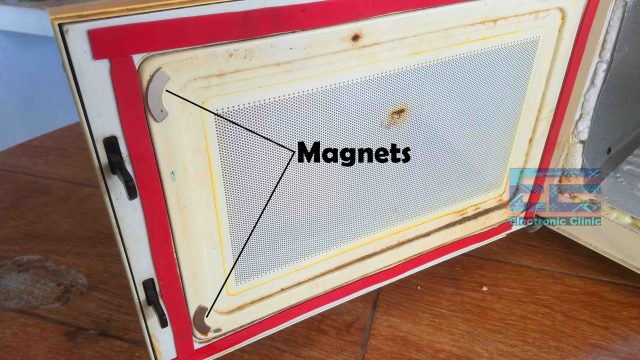
Amazing, now, I can easily close and open the door without putting a lot of effort. These magnets are very strong due to which the door makes a strong contact with the body and I am sure the cold air will not escape. Now, let’s move on to the final step which is charging the Gas.
Refrigerator Gas filling:
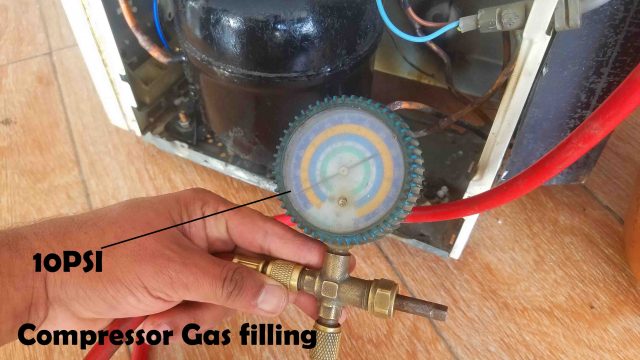
Before filling the refrigerant, first I connected a pipe from the cylinder and then I turned on the compressor. During the gas charging, Keep your eyes on the Gauge and slowly start opening the cylinder valve. For now my target is 10 PSI, later I can fill more Gas, If I will need. Anyways, right now the pressure is 10 PSI. Let’s check the freezer plate.
I am using my Kaiweets smart digital multimeter for check the temperature. I can use my hand to feel the coldness, but it’s good to use a temperature sensor, this way we can know exactly, how quickly the temperature is dropping. As you can see the freezer plate temperature is quickly dropping and it’s a good sign which means everything is done correctly.
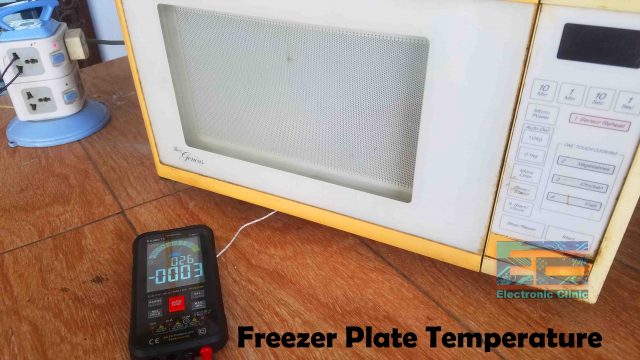
wow its dropped to -3 Celsius and it’s still dropping, Note, there is nothing inside the freezer, the temperature sensor is connected with the freezer plate. while performing my initial test I also kept checking the suction pipe. If you see ice on the suction pipe then it means you have put more gas or it may be due to another issue. You can search about this; there are lots of videos about the suction pipe ice issue. I successfully completed all my tests. it’s good to leave it ON for at least 1 to 2 hours, but I am pretty excited and I just can’t wait. Throughout this test I will use my smart meter for checking the temperature.
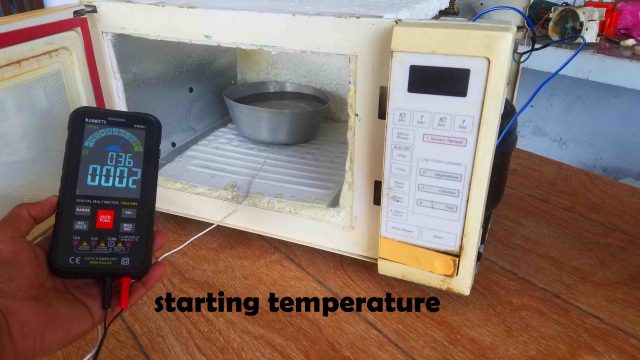
So, right now you can see the temperature is 3 Celsius, initially the temperature drops slowly, so I will be back after when the temperature drops below zero. For the these initial test watch my video. Anyways after 20 minutes the temperature dropped to -3 Celsius.
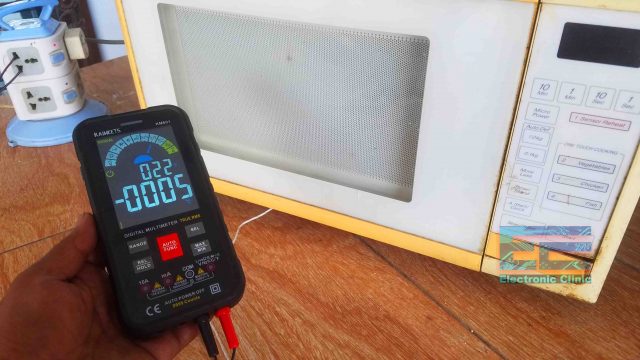
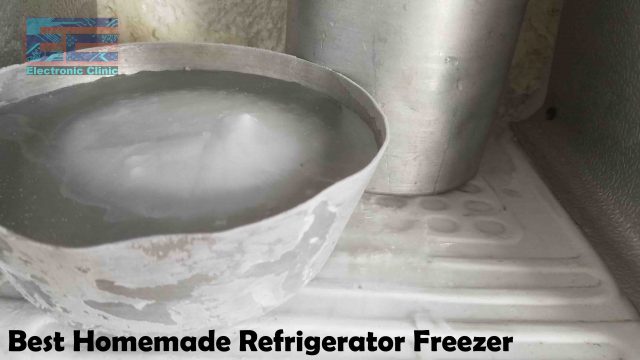
It’s been 30 minutes and now the temperature is -5 Celsius. Even if it stays at this temperature, I can use it for drinks and fruits. At -5C it was already making some ice, I didn’t stop here, I continued with the tests, I waited for around 2 hours, the result you can see in the image below.
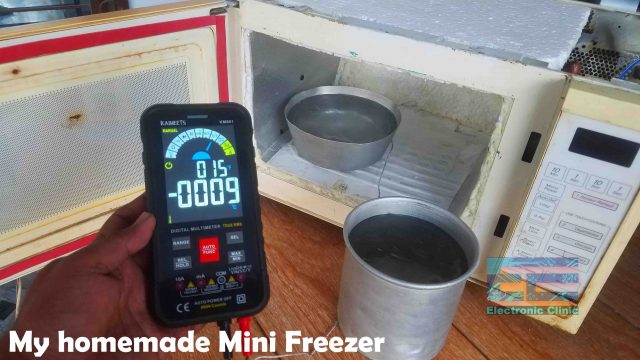
First experiment is quite a success. It’s an amazing feeling; I just built myself a mini freezer using a 2nd hand compressor, some new refrigerator accessories, and a salvaged microwave oven. If you have watched this video completely then I am sure now you should be able to convert any box like thing into a fridge or freezer. Anyways, I left it ON for the entire night and now the result is just in front of you.
The temperature had dropped to -16C. I hope you have learned something new from this article. So, that’s all for now.
Watch Video Tutorial:

Discover more from Electronic Clinic
Subscribe to get the latest posts sent to your email.