Diy battery Spot Welding Machine, Homemade Spot Welder with automatic circuit
Last Updated on August 16, 2024 by Engr. Shahzada Fahad
Table of Contents
Diy Battery Spot Welding Machine, Description:
Diy battery Spot Welding Machine, Homemade Spot Welder with automatic circuit- In my previous article, I built a Trike Electric Scooter using the Hoverboard BLDC motors, 500 Watts Motor controllers, and 4 Lead Acid batteries. I connected four 12 volts batteries in series to get 48 volts. The battery pack was too heavy and I also had less control over its management, and moreover the lead acid batteries are not durable and plus you will have to regularly check the electrolyte solution level, because the Lead Acid batteries when dried, the cells will get short circuited and it will damage all the electronics.
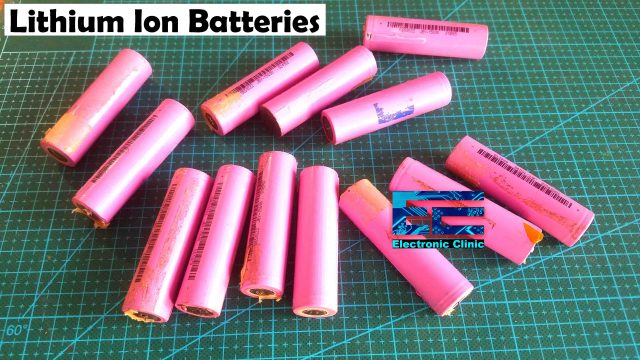
So, that’s why I decided to make my own 48 volts battery pack using the Lithium Ion battery cells. As you know each lithium Ion Cell is 3.7 volts which means you will need to connect many cells in series to get the 48volts and to improve the current you will also need to connect the lithium ion battery cells in parallel. So, for making these series and parallel connections, you have two choices.
- Soldering
- Spot Welding
If you go with the Soldering, it’s going to waste a lot of your time, and during the soldering process you may damage the cells, because it’s hard to solder the nickel strip and the battery, as it needs more heat. So, If you touch the soldering iron for a long time, there are high chances of battery damage and moreover with the soldering, you will never get neat and clean connections, if you are not a pro.

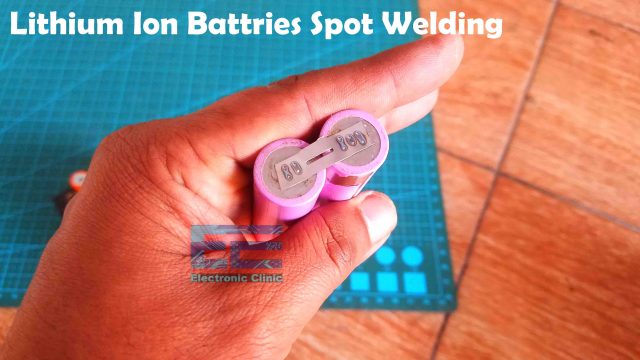
If you go with the 2nd choice, which is the Spot Welding, you can easily make series and parallel connections without putting a lot of effort and without damaging the batteries. With spot welding machine you will get neat and clean connections.
Before, I am going to explain other things, first a few words about the sponsor of this Spot Welding Machine Project for helping me purchase the required components and tools.
Altium Sponsor:

Altium Designer is the world’s most trusted PCB design system. Altium Designer enables engineers to effortlessly connect with every facet of the electronics design process. Over 35 years of innovation and development focused on a truly unified design environment makes it the most widely used PCB design solution. With Altium Designer you can create PCB designs with an intuitive and powerful interface that connects you to every aspect of the electronics design process. Route it your way through any angle, tune for delay, Push, Slide, and Walkaround faster than ever. Interact and collaborate with mechanical designers like never before in a photo-realistic, 3D design environment. If you want to get started with the Altium designer, you can click on the get started.
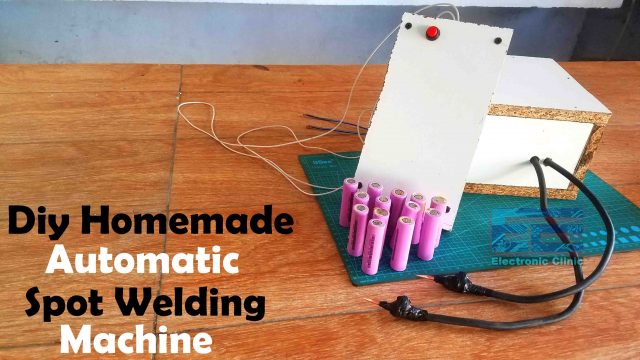
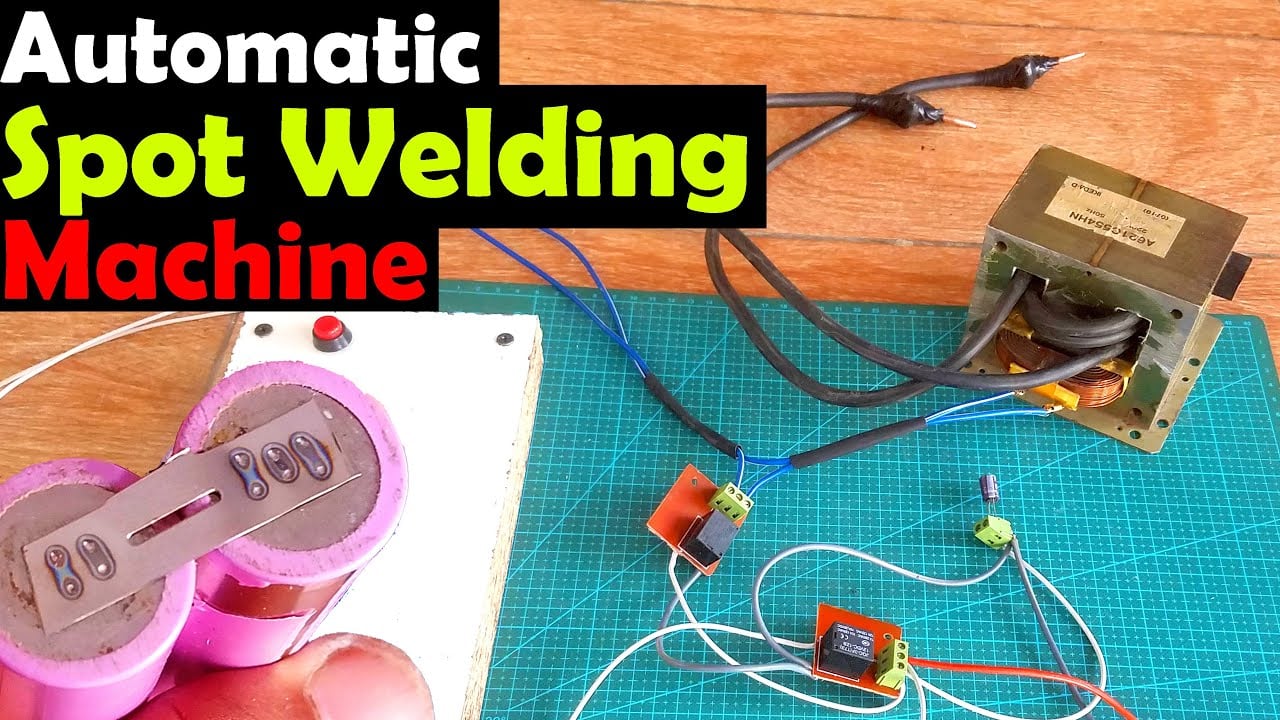
In this article, you will learn how to make this semi-automatic Spot Welding Machine using a 2nd hand microwave oven transformer. While making this spot welding machine I faced some issues which I fixed and I am 100% sure you will also face the same issues.

During my first test I could only see sparks, it may or may not weld the nickel strip to the battery. I was pretty confused and I had no idea for how long I had to connect the electrodes. The welds were not good at all. So, at this point I decided to add some kind of control circuit to my Spot Welding machine.
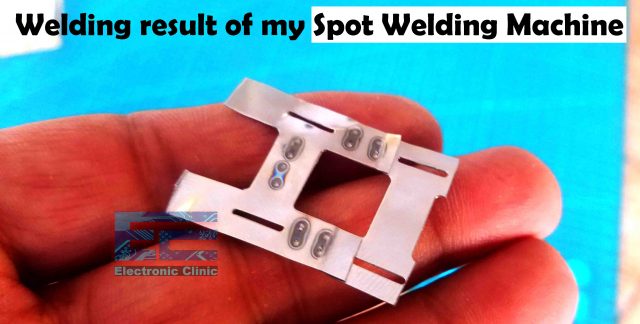
I added a control circuit and then all the issues were just gone. My 2nd test was successful as I fixed all the issues, I designed my own Semi-automatic transformer control circuit, to control the ON/OFF and time duration. I am using these homemade copper electrodes and I am still happy with the results, for professional welds you can order some good quality electrodes. You can see this spot welding machines is doing great. The connections are quite clean.
In this article, I have also explained why not to use the Steel or soldering iron bits as the spot welding electrodes. So, here is my spot welding machine and now I am going to explain the making and how to fix all the issues. Without any further delay, let’s get started!!!
Amazon Links:
Copper electrodes for spot welding machine
Nickel plated strip for lithium ion batteries
*Disclosure: These are affiliate links. As an Amazon Associate I earn from qualifying purchases.
Microwave Oven Transformer for Spot Welding Machine:
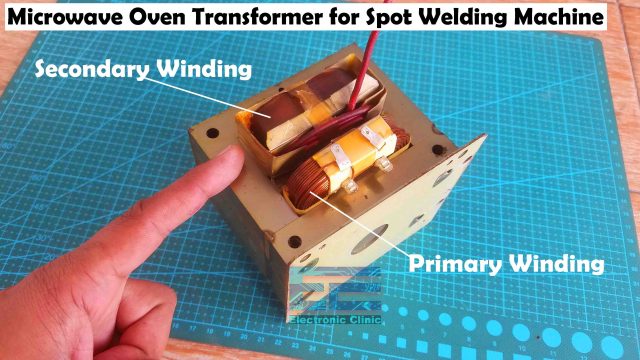
Recently, I purchased this 2nd hand Microwave Oven transformer for around 15 dollars. Microwave Oven transformer is the best choice for building a homemade spot welding machine. This transformer is designed for 220Vac and 50Hz. While purchasing a 2nd microwave oven transformer make sure the Primary winding is not damaged. You can use a digital multimeter to check the winding; if you hear the beep sound then it means the primary winding is good.
There is also another set of winding, which is the secondary winding and I don’t need this winding. While cutting the secondary winding be very careful and don’t cut the primary winding otherwise your transformer will be just useless.
Next, I started off to remove the Secondary winding, seriously this was the only difficult job, as I had to be very careful. I used tooth saw and a grinder. You can use any tools, but you have to be careful, you can’t cut the primary winding. Anyways, somehow I removed the secondary winding. Next, I used a 16mm wire which was 6 feet long, you can make it 7 feet if you want slightly longer wires, I used this wire as the secondary winding. I also connected these Blue color wires with the transformer primary winding to supply 220vac. Your transformer should look something like this.
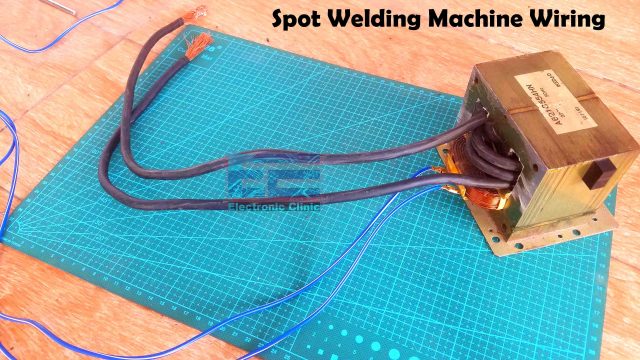
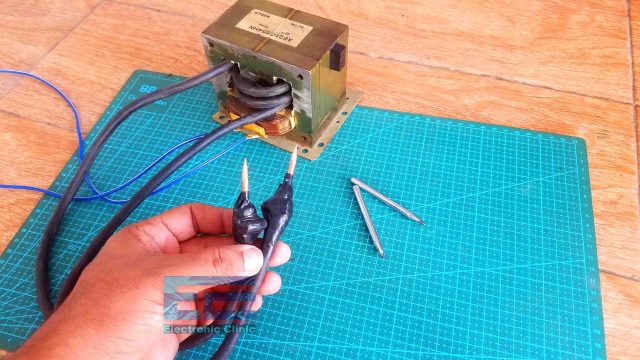
You can see two turns on this side and there are 3 turns on the other side. So, our transformer basic setup is almost completed, the 220Vac wires are connected, the secondary winding is ready, and next we have to connect the electrodes. But, before I am going to connect the electrodes, first I am going to check this setup. This first test was quite easy, I simply connected the 220Vac supply, and I slightly touched the two ends of the secondary winding and I could see sparks.
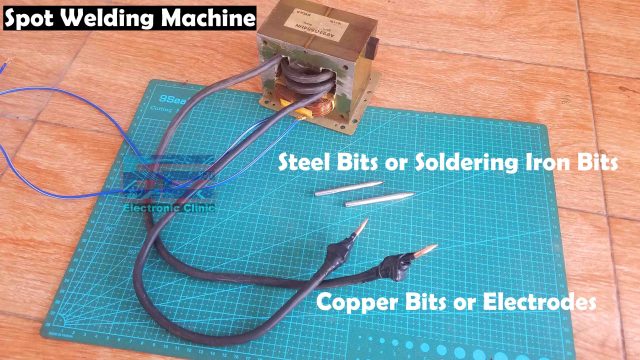
When you have this basic setup completed, then the next step is the electrodes selection, I know the copper electrodes are best, but I have seen guys asking about the soldering iron bits. So, I am starting with these soldering iron bits and you will practically see, why these bits are not good for battery spot welding. The Soldering iron bits are connected and the 220vac on the transformer primary side is connected. The problem with these bits is that, the bits itself get welded to the nickel strip. For the practical demonstration watch video tutorial given at the end of this article.
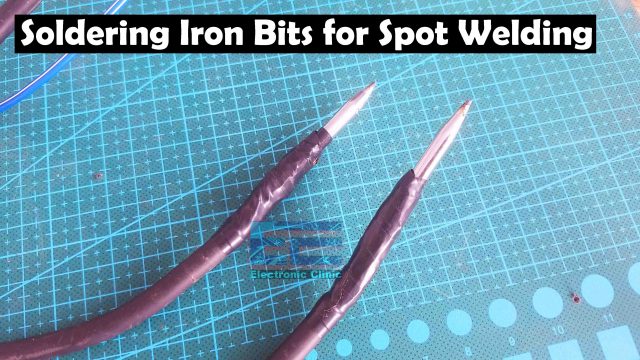
So, the Soldering iron bits or steel bits should not be used for the battery spot welding. But you can use these steel bits for welding metal parts together.
I replaced these soldering iron bits with these homemade copper electrodes. Now, this setup is the most basic setup and most of the videos and articles explain this much of the work, which is not sufficient. You will know about this after practically seeing the results, let’s start testing this very basic spot welding machine.
Spot Welding Machine First Test:
For testing my spot welding machine, I am going to connect two lithium ion batteries in parallel. With this basic setup, having no automatic transformer disconnection circuit you will have to be very careful and very quick, because if you touch the electrodes for even 2 seconds you could easily damage the lithium Ion batteries and this is something that you really don’t want.
Another problem with this basic setup is that, you will need the help of some other person to press the nickel strip for you to get a nice surface contact between the battery and the nickel strip. You can also do it alone but it will definitely waste a lot of your time.
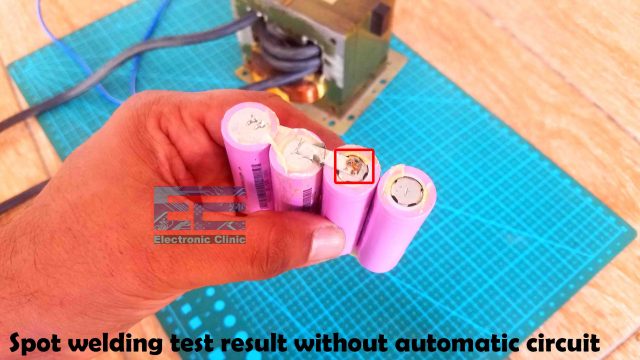
Anyways, you can see I am able to perform the welding, the nickel strip is welded to the battery, but looks very dirty and this is because I don’t get enough time to press the other electrode and the current starts flowing. When I press the first electrode the nickel strip makes a strong contact with the battery surface, now this is the perfect moment and when I press the 2nd electrode, I don’t get enough time to press the nickel strip against the battery surface. As soon as I touch the 2nd electrode there are sparks but no strong welds.
For the perfect weld you will need to press both the electrodes so that there is a strong contact between the welding surfaces. This is exactly what I want. But it’s impossible without a fully automatic or semi-automatic control system.
So, for the perfect spot welding, I want two things.
- I want to turn ON the transformer when I have pressed both the electrodes. For this I can use a push button.
- I want my transformer to turn ON for a few milliseconds and then it should be able to turn OFF by itself.
Spot Welding Simulation & Circuit Diagram:

I have designed this simulation for you guys, so that you can easily understand how this circuit actually works. You will also see this in action after I explain how this circuit actually works. I have designed this using the Proteus simulation software which is quite popular.
Download Simulation: spot welder simulation in proteus

Let me play the simulation so that you can easily understand how this circuit actually works. When the entire system is powered up, means, when the 220Vac wires are connected and the 12V dc power supply is connected. Now, at this point, even if you touch the two electrodes it won’t do the welding as one of the transformer’s AC input wire is disconnected using relay2. As you can clearly see one wire from the 220Vac supply is directly connected with the transformer primary winding. While the other wire from the 220Vac is connected with the other end of the primary winding through this relay2. Right now, the relay2 is off so that’s why the transformer is OFF and as a result there will be no welding.
Relay1 is also OFF. When Relay1 is in the OFF state, it charges the capacitor through this 12v power supply. For the sake of this simulation I selected the capacitor value 1000uF while the actual value is 100uF. I practically tested 100uF capacitor and it worked for me. If you are using a different gauge wire and different number of turns then you will have to use some other value capacitor. You can start with a 50uF capacitor; keep increasing the value until you get the desired output.
This capacitor actually controls the ON time of the Relay2. As you can see, the positive leg of the capacitor is connected with the common leg of relay1 and the other leg of the capacitor is connected with the Gnd of the 12v power supply. The GND of the 12V power supply is also connected with the relay coil. While the other leg of the relay coil is connected with the 12 volts through a push button. Using this push button we can turn ON and turn OFF the relay1.

When the push button is pressed, the relay1 is turned ON and the capacitor starts discharging as it uses its charge to power up the relay2. When the capacitor fully discharges the relay2 is turned OFF and this way the transformer can only turn ON for a few milliseconds. It doesn’t matter if the push button is pressed for a long time, it won’t do the welding. You will have to release the button to charge the capacitor and press the button again to turn ON the relay2. I am sure you have fully understood how this circuit works.
Spot Welding Machine Practical Demonstration:
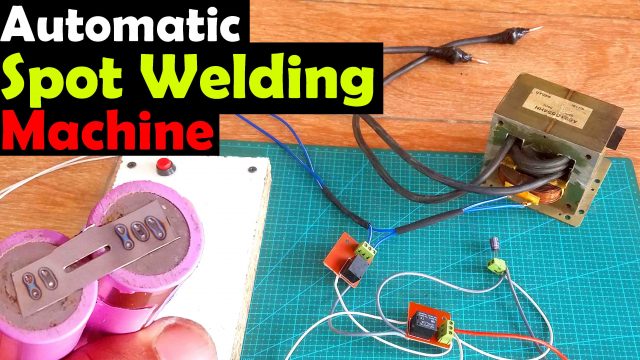
I have done all the soldering. This is relay1”bottom one” to which a push button and a capacitor are connected. This is relay2 “the one on left side” which connects and disconnects the 220Vac. Since this spot welding machine deals with high voltages and currents never touch these circuits and the transformer primary winding, as it can be really dangerous. Never perform these tests alone if you are doing it for the first time. Wear protective gloves and in the end all I want to say is make this Spot welding machine at your own risk.
Finally, I placed everything inside this box. I have already shared with you the test results. If you want to practically see everything then watch my video tutorial given below.
Watch Video Tutorial:
Discover more from Electronic Clinic
Subscribe to get the latest posts sent to your email.