How to make Lead Acid Battery at Home and Required Tools explained
Last Updated on August 23, 2024 by Engr. Shahzada Fahad
Table of Contents
Lead Acid Battery Making, Description:
How to make Lead Acid Battery at Home and Required Tools explained- In this tutorial, you will learn how to make and repair any type of Lead Acid Battery using new and old positive and GND plates. I will also explain what are the necessary tools for making the Lead Acid Battery and how to use them? I will also explain how to make the Battery internal and external terminals using metal dies. I will also explain in detail how to internally connect the positive and GND plates in series? In the end, I will also explain how to prepare electrolyte for the battery using Sulfuric Acid, and how to test the specific gravity of the Lead Acid Battery electrolyte using a Hydrometer.
Read my article on the Basic Working principle of the Lead Acid Batteries. In this article, I explained what are primary and secondary batteries? The charging and discharging chemical reactions, the basic working of a Battery Cell, and so on.
You can also read my article on how to make a Dry battery using Lithium-Ion Battery Cells.
Warning! The process of making the electrolyte can be really dangerous for the beginners, so I highly recommend purchase the readymade electrolyte for the battery or make the electrolyte at your own risk.
About the Sponsor, NextPCB:
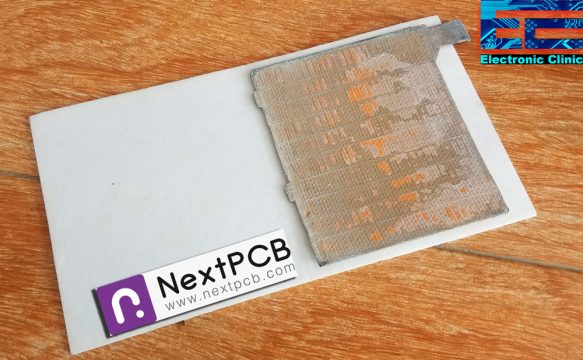
High quality & Only 24 Hours Build time
I am really thankful to NextPCB for sponsoring this article and video tutorial. NextPCB is quite professional in the field of PCBs manufacturing. Feel free to visit their website NextPCB.com to not only find out what awesome PCB and Assembly services they offer but also to easily upload your Gerber files and thus order affordable and high-quality PCBs quickly. The signup process hardly takes 1 minute.
After reading this article, you will be able to make a completely new battery, and you will also be able to repair any type of small and large lead acid batteries. This way you can save a lot of money and you can also start your own business. Making a Lead Acid battery was an amazing experience, and I almost saved more than 60%. If you find this hard to follow then watch my video tutorial, given at the end of this article.
Without any further delay, let’s get started!!!
Amazon Purchase Links:
Hydrometer for the Lead Acid Battery
Disclosure: These are affiliate links. As an Amazon Associate I earn from qualifying purchases.
Tools needed for Making the Lead Acid Battery at home:
If you want to start the Lead Acid Battery making or repairing business then you should have the following tools. Because while making the Lead Acid Battery you will need to open the Battery, cut the welds, make new battery terminals, melt the Lead, Make new welds for making the series connections, you may also need to check the electrolyte and so on.
Metal Dies for Making the Lead Acid Battery Internal Terminals:
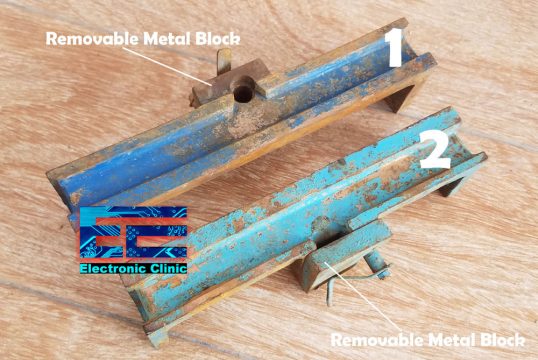
You will need these metal dies for making the Positive and GND plates terminals. Metal die 1 is used for making the main internal 12V and GND terminals which are connected with the battery external 12V and GND terminals.
The Metal die 2 is used for connecting the Positive plates and GND plates, and is also used for making the terminals to make the series connections. So these two are the most important tools that you should have.
Metal Dies for Making the Lead Acid Battery External Terminals:
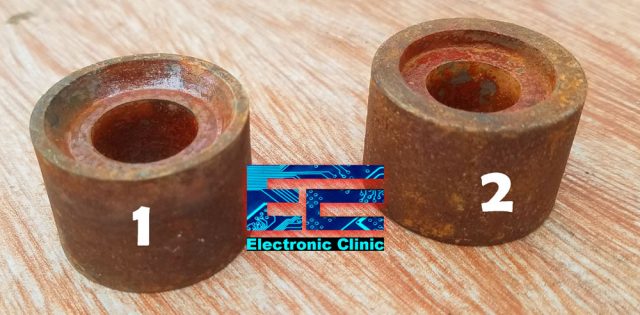
These two Metal dies are used for making the Battery external 12V and GND terminals. These are available in different diameters. Purchase the one as per your requirement. Metal die 1 is used for the large Lead Acid batteries while the metal die 2 is used for the medium size Lead Acid Batteries.
12V Spot Welder based on the Carbon Rods:
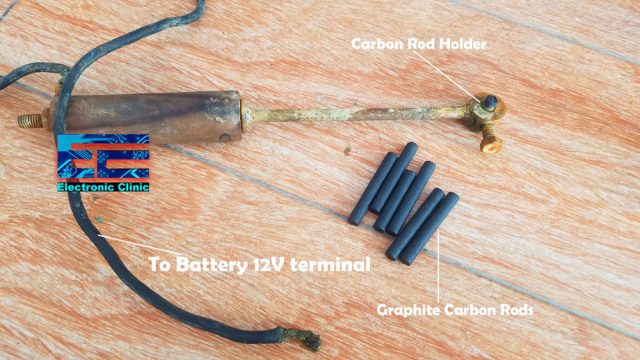
This is a 12V spot welding tool and is used for connecting the battery cells in series. This uses Graphite Carbon Rods. In the picture, you can only see 1 black wire which is connected with the metal rods that hold the Graphite Carbon Rod. This wire should be connected with the 12V battery +VE terminal. You will also need another wire which is connected with the battery’s GND terminal. How does this work? You will know about this while performing the welding. Add this to the list of must-have tools.
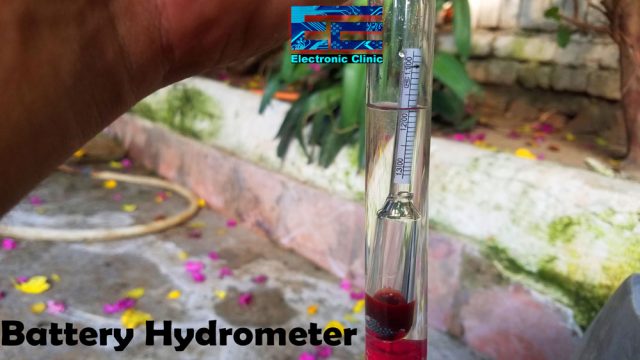
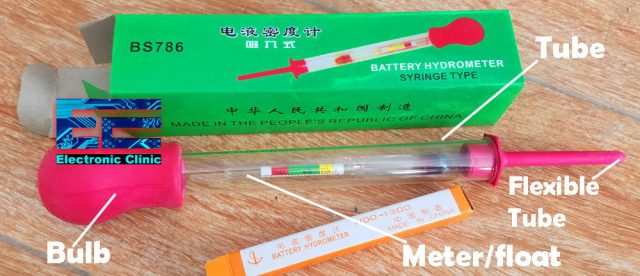
Hydrometer for the Lead Acid Battery:

You should also add this to the list of must-have tools. This is the Battery Hydrometer. You will need this Hydrometer for preparing the Electrolyte for the Battery. This is used for measuring the density of the electrolyte, which is achieved by measuring the specific gravity of the electrolyte. You can see a meter insider the tube has colors Red, Green, and Yellow. The use of the Hydrometer is explained in the Electrolyte preparation section.
Some other Tools and things:
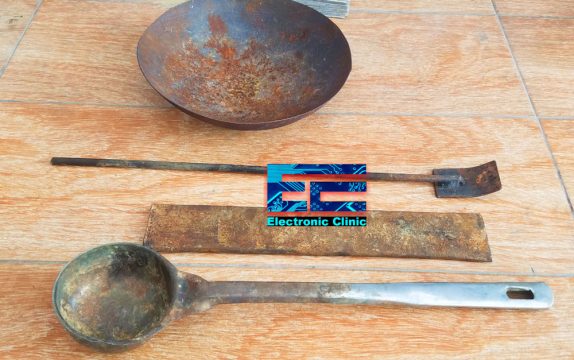
You will need other tools for opening the top cover of the battery, for cutting the battery external terminals, for melting the Lead, etc. You will also add a cutter for cutting the excess Lead.
Making a New or Old Lead Acid Battery at home:
The actual work will start from here. If you carefully read this article and follow all the steps, in the end, you will be able to make and repair any type of small and large Lead Acid Batteries. For the beginners, I recommend starting with the Dead Lead-Acid battery. Anyhow, I have a battery that isn’t working anymore. I thought instead of purchasing a new battery; why not make a homemade Lead Acid battery, and share the knowledge with your guys. So here we start.
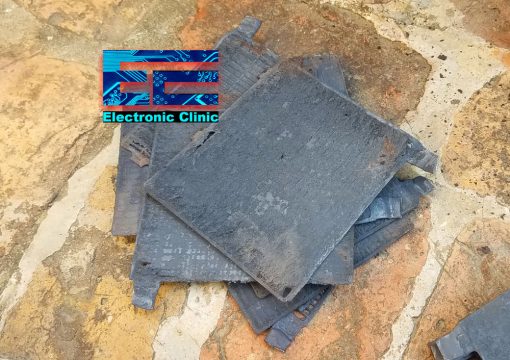
This is a completely dead Lead Acid Battery that we are going to repair.

To open the battery cover, first, you will need to cut the external battery terminals. I know you can open the battery cover, this will waste a few minutes. I am sure you won’t forget to remove the electrolyte.
After opening the cover and removing the electrolyte, the next step is to cut the series connections and get the cells out of the battery container. If you don’t understand any step then watch my video tutorial given at the end.
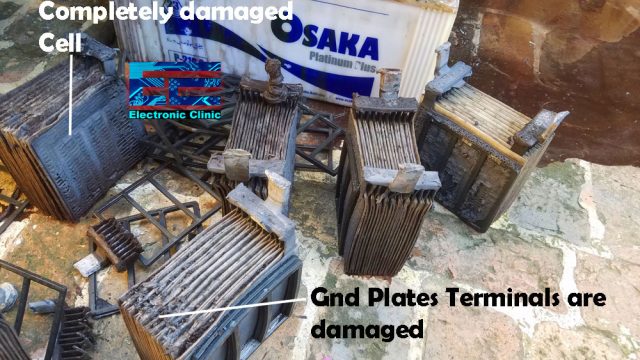
While removing the cells from the battery container, I realized that some plates for already damaged, and some terminals were already disconnected. As you can see in the picture above. One cell is completely damaged, there is nothing to salvage. This cell should be completely replaced by making a new cell or by making a combination of new and old ground cells from another dead battery.
In the other cell, the positive plates are all damaged while the ground plates can be reused, although the ground plates terminals are damaged, but we can make terminals for these plates using the metal dies.

Carefully remove the Positive plates and leave the GND plates. From maximum dead Lead acid batteries, you can salvage many GND plates. This is totally up to you whether you want to reuse the old GND plates or you want to use new GND plates.
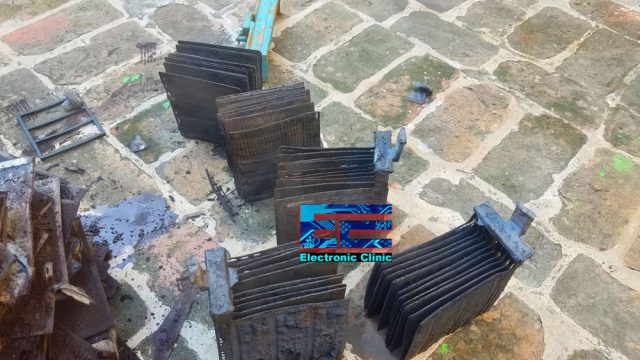
We removed the positive plates from all the cells, as you can see the maximum of the GND plates can be reused. I didn’t even find a single positive plate in a good condition. So, I will have to use new Positive Plates.
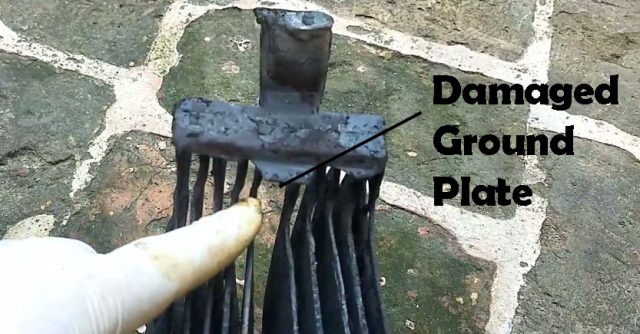
This one has one GND plate which is completely damaged, so we will have to make this again. Carefully cut the GND plates which are in good condition.
These are the GND plates I salvaged from another dead battery. You can also use new GND plates to make a completely new Battery cell by following the process that I am going to explain in a minute.
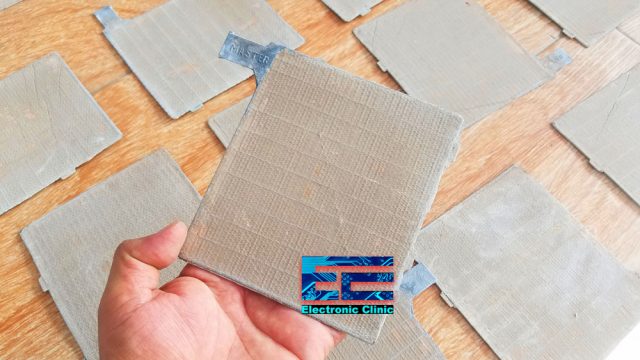
I purchased a total of 64 Positive plates. Each plate cost me around .3 dollars. These Master plates are considered to be the best plates in Pakistan. You can also find low-cost Plates, but my recommendation is to go for the best plates.
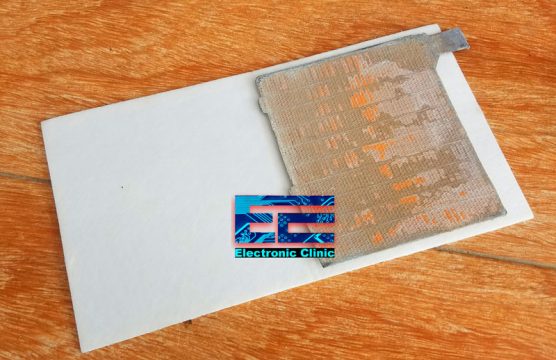
Use these white color insulator or separator sheets to cover the Positive Plates. There will be no physical contact between the Positive and GND plates.
As you can see the positive plates are wrapped in the insulator or separator sheets. This white paper provides insulation and avoids physical contact. I continued adding the remaining positive plates.
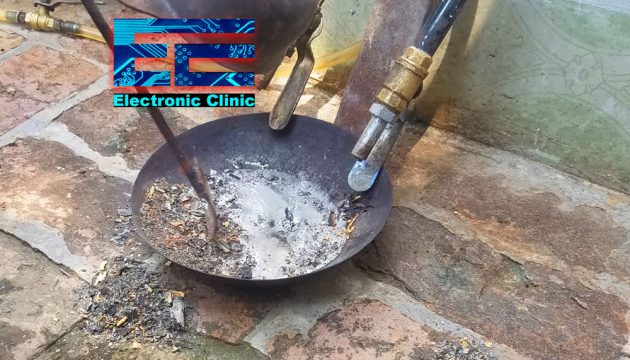
I melted the Lead which I salvaged from the batteries.
Finally, I used the metal Die for connecting the positive plates together and for making the main internal terminal, which you can see in the picture below. Through images it’s hard to show, how to use the metal die, you can watch this in the video tutorial.
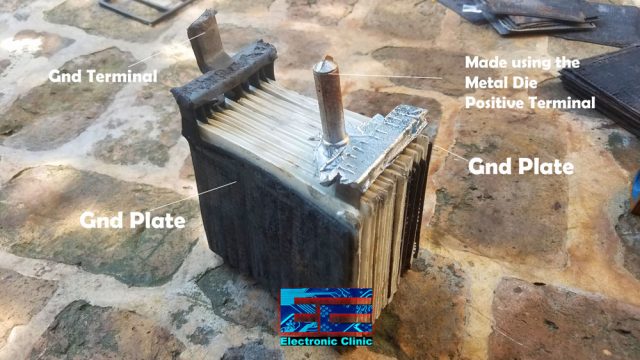
Connecting the new positive plates is a simple and straight forward job. But when it comes to the old ground plates the things get a little messy as we need make small terminals for ground plates, which takes a little time if you are doing it for the first. Clean the edges with the sandpaper or file, for the solid welding.

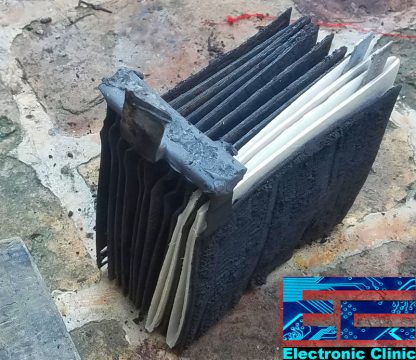
All the ground plates are ready. The making process is explained in the video. To make a cell you will need to repeat the same process. Wrap the positive plates in the separator or insulator sheets and then sandwitch all the positive plates between the ground plates.
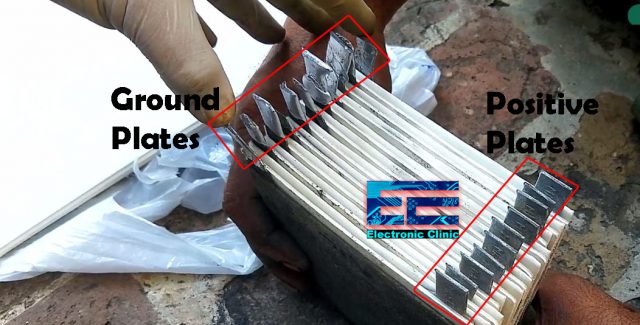
We have a total of 21 plates in each cell. 10 positive plates and 11 negative plates. The external plates are the ground plates. The positive plates are sandwitched between the ground plates. So make sure the external plates are the ground plates. Using the same method we made terminals for all the positive and GND plates. Finally, we started by placing the cells inside the battery container.

All the Battery cells should be placed in the same order to make the series connections. After placing the cells inside the battery container, the next step is to weld the ground and positive terminals together. The welding process is explained in the video.

As you can see we are done with the welding job, all the cells are connected in series. Yahooooo, the hard work is done, now we only need to add the battery cover and make the external 12V and GND terminals of the battery, which is already explained in the video.
Making Electrolyte for the Lead Acid Battery:
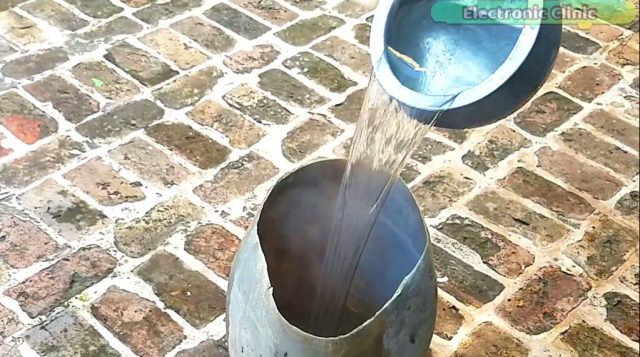
Add water to the Sulfuric acid; be very careful while making the electrolyte for the battery, after adding the water wait at least 30 minutes, so that the electrolyte can get cool. Finally, you can use the Hydrometer to check the specific gravity of the electrolyte.
Warning! While making the electrolyte wear protective gloves and cover your face and eyes. If you are a beginner then you should first ready about the safety tips, search on google.
How to use Hydrometer for checking the Electrolyte?
Apart from the Yellow, Green, and Red colors on the float inside the tube, numbers are also printed. On one side numbers are given while on the other side colors and numbers both. To use the Hydrometer efficiently, first, you need to know about the parts of the Hydrometer.
You will need to go through the following the steps to learn how to use a Hydrometer.
- Squeeze the Bulb.
- Insert the Flexible Tube into the electrolyte.
- Release the bulb slowly, this will suck the electrolyte inside the clear cylinder or tube.
- The float inside the clear cylinder or tube will have risen some.
- Orient the Hydrometer so it’s vertical and the float inside is floating and not touching the inside of the tube or clear cylinder. The top of the electrolyte should be in either the Green, Red, or yellow areas of the float. If none of this is the case get more or less electrolyte as needed.
- Observe the color on the float that’s lined up with the top of the electrolyte or read the adjacent numeric value for the specific gravity.
- Finally, you can squeeze the bulb to put the electrolyte back in.
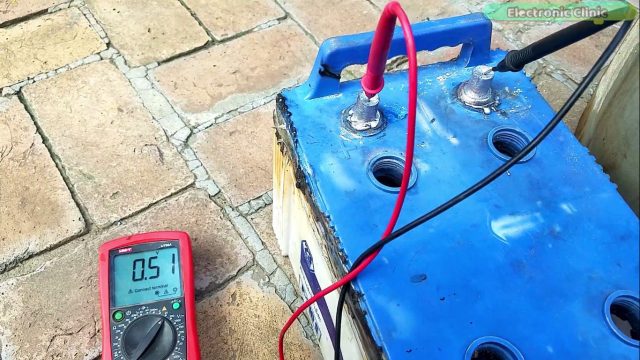
While no electrolyte is added, you can see the voltage is around .5 volts. While the digital Multimeter test leads were connected with the battery terminals, I started adding the electrolyte. When I added the electrolyte due to the chemical reaction the voltage started to increase. This was a green signal for me. I filled all the battery chambers to their desired levels.
Finally, it was time to charge the battery, so we connected the inverter 12V and GND wires with the battery terminals and waited for around 3 hours.
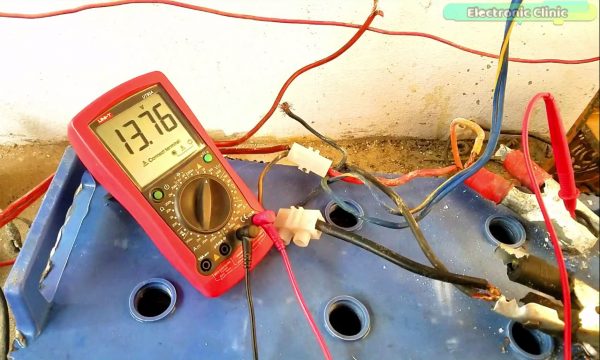
You can see the battery voltage, and still, the battery is charging, The voltage is just like the new battery very close to the 14 volts. While making the Lead Acid Battery I learned a lot of new things. This was a whole new experience. I am writing this article for continuously checking this battery. This battery gives me backup for more than 2 hours, while the fans, TV, DC room Cooler, and some light bulbs are turned ON. Next time, I will make a whole new battery using new positive and GND cells.
Watch Video Tutorial:
Discover more from Electronic Clinic
Subscribe to get the latest posts sent to your email.

Hello !
Isn’t there any ways to make diy positive plates ?
Just a friendly suggestion. NEVER add water to the acid! This is a very exothermic reaction. Always add acid to water.
Thanks for the article, very informative.
By the where I can buy to metal dies?
Chim Cuevas from Philippines
Please email me where I can buy the dies? cuevaschim48@gmail.com
Thanks
Please email me where I can buy the battery dies and positive plates
Thanks David
Where can I buy the metal die blocks?? The terminal dies can be found online, but the metal blocks for the gnd and positive I can’t find them. Also, is there a link for the plates or the separator?
Hello can you please let us know where to buy the metal die blocks and the plates or separators online?
Gud how can I get the tools
can you publish the positive plate paste recipe
I like that video very much. Thanks for the good information. please send me the link to where to purchase the Metal dies. My email contact is neiwavie@gmail.com
Thanks Sir for the give good information and I like very much this video. please send me the link to where to purchase the Metal dies and all chamicle Detais in this my E_Mail : premsolanki8076@gmail.com and whats App No. 9824906553, Please sir Thaks
i am sri lankan (how to make Positive and GND plates terminals)
Where to buy terminal dies and plate
Hello sir your Video tutorial about lead acid battery are very informative and i am interested about DIY
for my car battery. can you provide me where to buy the tools needed and the Lead plate neg and Positive and the separator.
i’m here in Philippines.