Gmail Outlook Settings, Configure Gmail in Outlook, Arduino Send Email
Last Updated on August 18, 2024 by Engr. Shahzada Fahad
Table of Contents
Description:
Gmail Outlook Settings, Configure Gmail in Outlook, Arduino Send Email- In this tutorial, you will learn how to configure Gmail in Outlook and how to design your own computer application in Visual basic dot net “VB.Net”, for accessing your Gmail account. This is going to be an amazing project which can be used in complex level SCADA “Supervisory control and data acquisition” systems.
In this tutorial, apart from the basic Gmail Outlook Settings, we will also make an Arduino and VB.net based Automatic Sensor data email system. In this project, the Arduino is connected with the computer/Laptop through the USB cable. The Arduino reads the Sensor and sends the Sensor data to the designed computer application using Serial communication. The VB.net application then sends the Sensor data through email. The email sending time can be adjusted.
To keep things simple, I have connected only one Sensor “Variable Resistor” with the Arduino Uno; by rotating the knob of the variable resistor the values are changed. Later you can modify this project as per your requirement and you can connect multiple Analog and digital Sensors with the Arduino Uno, Arduino Nano, or Arduino Mega.
So, before we can work on the Arduino and VB.net based Automatic Sensor data email system first, we will have to setup our Gmail account in Outlook.
If you want to learn in detail about the Email architecture, Email protocols like SMTP, POP3, and IMAP, Gmail account basic and Advanced level Security so that nobody can hack your Gmail account then read the article.
Without any further delay let’s get started!!!
Amazon Purchase Links:
Arduino Nano USB-C Type (Recommended)
*Disclosure: These are affiliate links. As an Amazon Associate I earn from qualifying purchases.
Gmail Outlook Settings, Configure Gmail in Outlook:
If you already have a Gmail account that’s great, if don’t, you can start by creating a new Gmail account and make sure you activate the two step verification. Make sure Microsoft Office Outlook 2007 or latest is installed on your computer system. Follow the steps give below.
Open Microsoft Outlook.
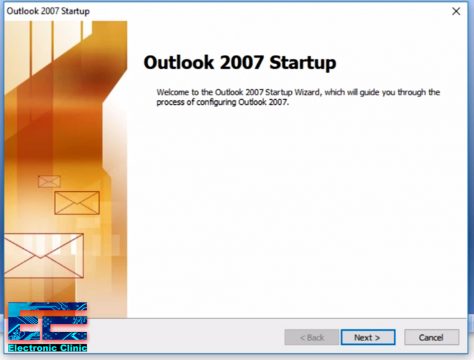
It really doesn’t matter if you are using Outlook 2007 or latest, the Gmail Outlook settings are exactly the same. Click on the Next button, which opens the Account Configuration window.
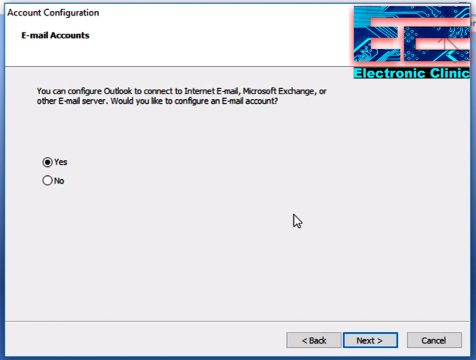
While the Yes Radio option is selected again click on the Next button. This will open the Add New E-mail Account window.
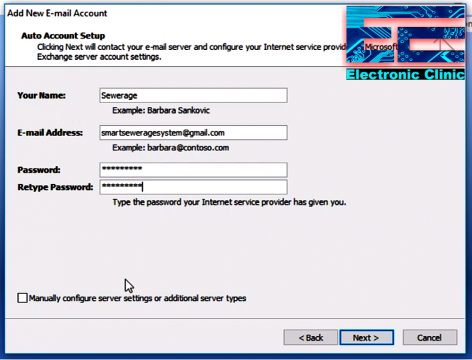
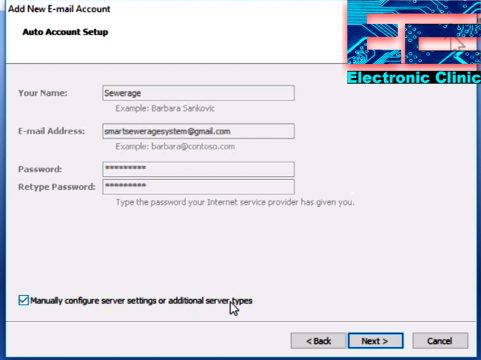
Enter any name you like, I selected the name: Sewerage as later I am going to use this account for the Sewerage monitoring.
E-mail Address: smartseweragesystem@gmail.com
Finally, enter your Gmail ID password. Make sure you check the manual configure server settings or additional server types before you like on the next button.
After you click on the Next button, a new window will be opened, where you have to select the Internet E-mail option.
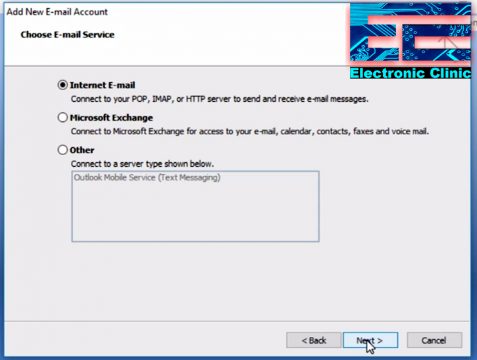
While the Internet E-mail option is selected click on the Next button. This will open the Internet E-mail settings.
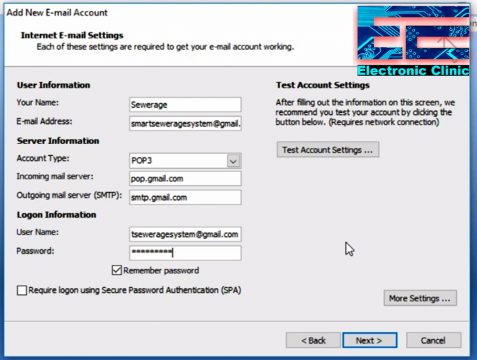
Each of these settings is required to get your email account working.
User Information
Your Name: Sewerage
Email Address: smartseweragesystem@gmail.com
Server Information
Account Type: POP3
Incoming mail Server: pop.gmail.com
Outgoing mail server (SMTP): smtp.gmail.com
Logon Information
User Name: smartseweragesystem@gmail.com
Password: **********
Check the remember password text box.
After you have entered all the necessary information, now click on the more settings button. This step is really important.
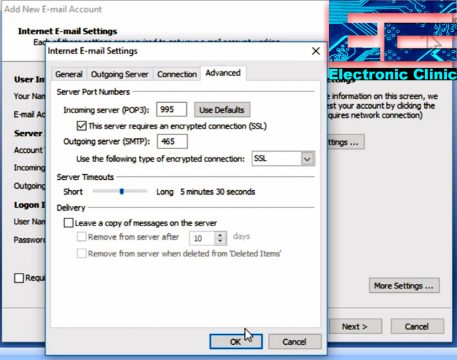
Make sure the Advanced Tab is selected. Enter the Server Port Numbers.
Incoming server (POP3): 995
Make sure the checkbox next to the server requires an encrypted connection (SSL) is checked.
Outgoing server (SMTP): 465
Use the encrypted connection type as SSL.
Server Timeouts, select 5 seconds or more and click on the OK button.
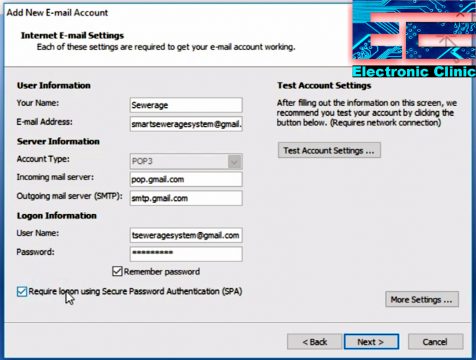
Check the box next to the Require logon using secure password authentication (SPA). Now you have to test your account settings; for this click on the Test Account Settings… button.
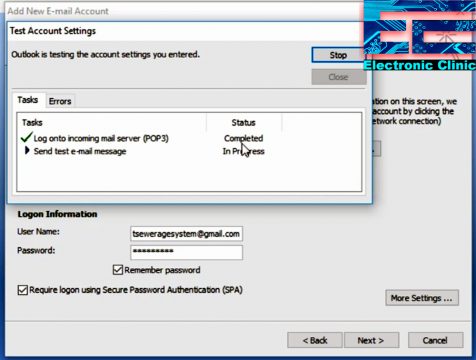
If you have done everything in the same way as explained you will get a green tick. Don’t worry if you get the failed message, you can try again. If still not able, then you can open your Gmail account and activated the less secure apps.
Some apps and devices use less secure sign-in technology, which makes your account vulnerable. You can turn off access for these apps, which we recommend, or turn it on if you want to use them despite the risks. Google will automatically turn this setting OFF if it’s not being used.
This setting is not available for accounts with 2-step verification enabled. So make sure the 2-step verification OFF.
Note: do not use your Gmail account which is connected with PayPal, YouTube channel, Adsense Accounts, etc. I recommend using a new Gmail account will be great.
So after you allow the less secure apps, then again you can click on the Test Account Settings button and this time you should get a green tick. So after your settings are verified then you can click on the Next button.
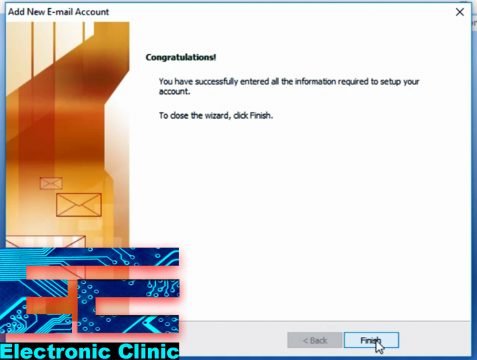
Congratulations!
You have successfully entered all the information required to setup your account. Now you can click on the Finish button.
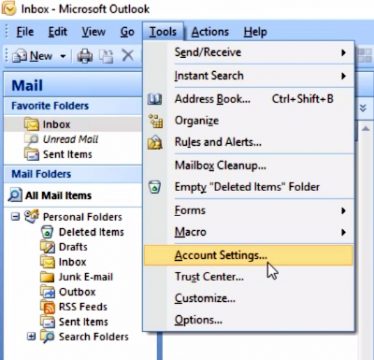
While the Microsoft Office Outlook is opened. Click on the Tools menu and then click on the Account Settings, if in case you want to change any of the settings.
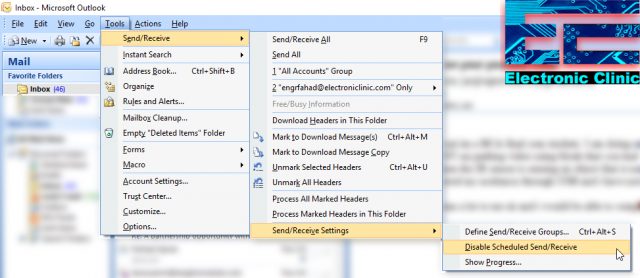
Again click on the Tools Menu > Send/Receive > Send/Receive Settings > Define Send/Receive Groups.
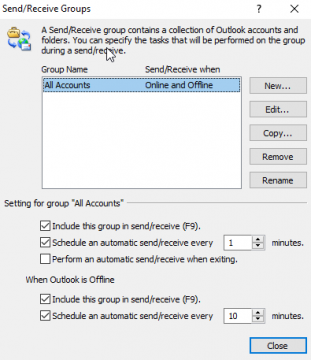
You can set the Schedule an automatic send/receive every 1 minute. You can change this time. So the Outlook will automatically fetch new emails. This setting should be done.
So our Gmail Outlook settings are completed. Now you don’t need to open your Gmail account, again and again, now you can use Outlook. You can stop over here or you can continue to read this article and learn other things like how to make an Automatic Email sending system using VB.net and Arduino. This project can also help you in designing your own Email marketing system, which can send emails automatically.
Arduino and VB.net based Automatic Sensor data Email system:
As I said earlier, this project can be easily modified and so many other amazing projects can be designed using the VB.Net and Arduino. Or you can also use the Visual Basic alone. You can make
- an automatic Email marketing Application using VB.net
- Security System with Email alerts.
- Advanced SCADA system with automatic email alerts etc.
VB.net and Arduino Serial Communication Circuit Diagram:
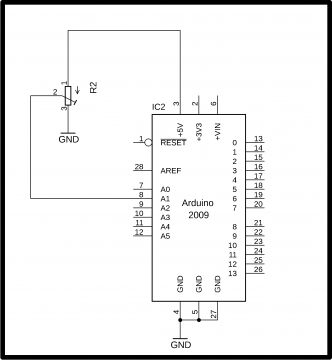
As you can see the circuit diagram is very simple. A potentiometer or variable resistor is connected with the Arduino Uno. You can also use Arduino Nano or Arduino Mega. The middle leg of the potentiometer is connected with the analog pin A1. While the other two legs of the potentiometer are connected with the Arduino’s 5 volts and GND pins.
If you don’t have a variable resistor it’s fine, you can send any text from Arduino to the Visual Basic application using Serial Communication. Now, let’s have a look at Arduino Programming.
Project Code:
|
1 2 3 4 5 6 7 8 9 10 11 12 13 14 15 16 17 18 19 20 21 22 23 24 25 26 |
int Vresistor = A1; int Vrdata = 0; String finaldata; void setup() { Serial.begin(9600); pinMode(Vresistor, INPUT); } void loop() { Vrdata = analogRead(Vresistor); Vrdata = map(Vrdata,0,1023,0,200); finaldata = finaldata + "Variable Resistor Value:" + Vrdata; Serial.print(finaldata); delay(1000); finaldata = ""; delay(100); } |
Program Explanation:
I simply started off, by defining a pin for the variable resistor. As you can see I am using the Arduino’s Analog pin A1.
int Vresistor = A1;
Next, I defined a variable for storing the variable resistor value.
int Vrdata = 0;
Finally, I defined a variable finaldata of the type String for making a complete string message consisting of the variable resistor data.
String finaldata;
In the void setup() function, I simply activated the serial communication using the Serial.begin() function and selected 9600 as the baud rate. This is really important. If you forgot to activate the serial communication then you won’t be able to send data serially from Arduino to visual basic or from Visual Basic to Arduino Uno.
Next, I set the Vresistor as the INPUT. Instead of using the Variable resistor you can use any other type of sensor.
void setup()
{
Serial.begin(9600);
pinMode(Vresistor, INPUT);
}
Then starts the void loop() function, which is executed repeatedly.
void loop()
{
First, we read the variable resistor and store the data in variable Vrdata.
Vrdata = analogRead(Vresistor);
Next, I mapped the data using the map function, this is used to limit the min and max values.
Vrdata = map(Vrdata,0,1023,0,200);
Then I created a complete string message.
finaldata = finaldata + “Variable Resistor Value:” + Vrdata;
Finally, sent the data to the visual basic application using the Serial.println() function. the sensor data is sent to the visual basic application after every 1 second. And finally, we empty the finaldata variable, so that new data can be stored.
Serial.print(finaldata);
delay(1000);
finaldata = “”;
delay(100);
}
So, now that we are done with the Circuit diagram and Basic Arduino programming for reading the Sensor and then sending the data to the Visual Basic application. Now it’s time to discuss the Visual basic application designing for monitoring the sensor and sending the data through email.
Visual Basic Application for Sensor Monitoring and Sending Email:
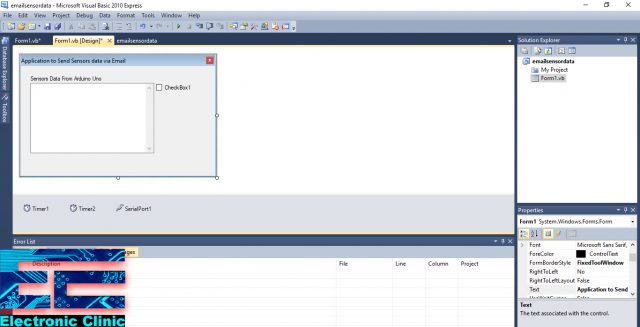
As you can see the Application is very simple. It consists of only one form. I have only used three components on the form, a label “Sensors Data From Arduino Uno”, CheckBox1, and a Textbox “the white rectangular area”.
Below you can see, I have used two timers Timer1 and Timer2 and a Serial Port “SerialPort1”.
After you make this, you can then copy and paste the following code.
|
1 2 3 4 5 6 7 8 9 10 11 12 13 14 15 16 17 18 19 20 21 22 23 24 25 26 27 28 29 30 31 32 33 34 35 36 37 38 39 40 41 42 43 44 45 46 47 48 49 50 51 52 53 54 55 56 57 58 59 60 61 62 63 64 65 66 67 68 69 70 71 72 73 74 75 76 77 78 79 80 81 82 83 84 85 86 87 88 89 90 91 92 93 94 95 96 97 98 99 100 101 102 103 |
' import libraries Imports System.Runtime.InteropServices Imports System.Threading Imports System.IO Imports System.Net Imports System.Net.Mail Imports System.Net.NetworkCredential Imports System.Reflection Imports System.Text Imports Microsoft.Win32 Imports System.IO.Ports Public Class Form1 ' thread-safe calling for thread_hide Delegate Sub Change() Private Declare Function InternetGetConnectedState Lib "wininet.dll" (ByRef lpdwFlags As Int32, ByVal dwReserved As Int32) As Boolean Delegate Sub SetTextCallback(ByVal [text] As String) Private Sub Form1_Load(ByVal sender As System.Object, ByVal e As System.EventArgs) Handles MyBase.Load SerialPort1.Close() SerialPort1.PortName = "com6" SerialPort1.BaudRate = "9600" SerialPort1.DataBits = 8 SerialPort1.Parity = Parity.None SerialPort1.StopBits = StopBits.One SerialPort1.Handshake = Handshake.None SerialPort1.Encoding = System.Text.Encoding.Default SerialPort1.Open() End Sub Private Sub DataReceived(ByVal sender As Object, ByVal e As SerialDataReceivedEventArgs) Handles SerialPort1.DataReceived Try Dim mydata As String = "" mydata = SerialPort1.ReadExisting() If txtOutput.InvokeRequired Then txtOutput.Invoke(DirectCast(Sub() txtOutput.Text &= mydata, MethodInvoker)) Else txtOutput.Text &= mydata End If Catch ex As Exception MessageBox.Show(ex.Message) End Try End Sub Private Sub Timer1_Tick(ByVal sender As System.Object, ByVal e As System.EventArgs) Handles Timer1.Tick CheckBox1.Checked = True Timer1.Enabled = False End Sub Private Sub Timer2_Tick(ByVal sender As System.Object, ByVal e As System.EventArgs) Handles Timer2.Tick If CheckBox1.Checked = True Then Dim smtp As New SmtpClient Dim message As New MailMessage Dim username As String Dim password As String Dim destination As String Dim subject As String Dim lngFlags As Integer username = "sendingend@gmail.com" password = "password" destination = "smartseweragesystem@gmail.com" subject = "Sewerage Data" smtp.Host = "smtp.gmail.com" smtp.EnableSsl = True smtp.Port = 587 smtp.Credentials = New Net.NetworkCredential(username, password) message.To.Add(destination) message.From = New MailAddress(username) message.Subject = subject message.Body = txtOutput.Text If InternetGetConnectedState(lngFlags, 0) Then ' checks if internet connection is available or not smtp.Send(message) txtOutput.Text = "" CheckBox1.Checked = False Else txtOutput.Text = txtOutput.Text + "" + vbNewLine + " net connection not available" + vbNewLine + "" End If CheckBox1.Checked = False Timer1.Enabled = True End If End Sub End Class |
Project Testing:
Finally, I connected the Arduino Uno with the Laptop and run the application.
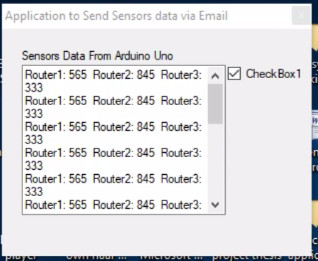
A sent a random Text message from the Arduino to the application, if you want you can use the above Arduino program. You can see the CheckBox1 is checked which means it’s sending the email.
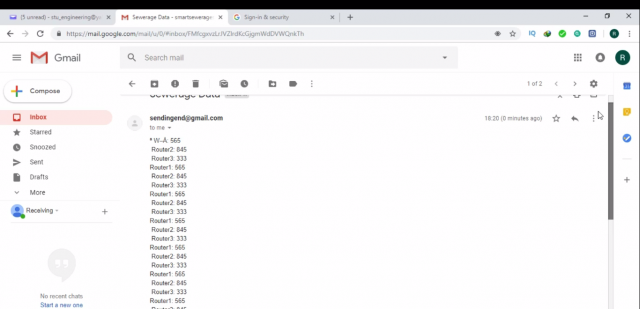
As you can see I successfully received the emails.
Now instead of opening the inbox, we can receive these emails in our designed Visual Basic application. We have already setup our Gmail account in Outlook.
Now Let’s make another visual Basic application for fetching emails from the Gmail account using the Outlook.
Gmail Outlook Email Fetching Visual Basic Application:
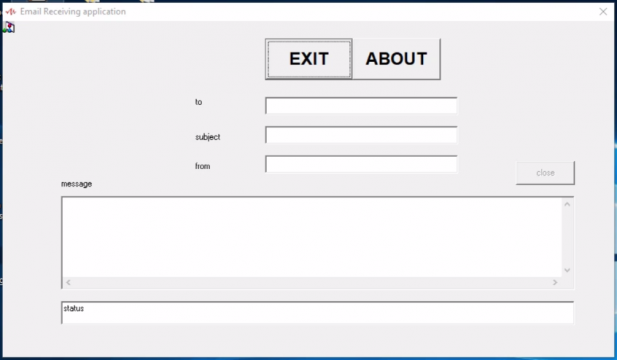
Download the Email Receiving Visual Basic Application: email receiving
Gmail Outlook Visual Basic Application Programming:
|
1 2 3 4 5 6 7 8 9 10 11 12 13 14 15 16 17 18 19 20 21 22 23 24 25 26 27 28 29 30 31 32 33 34 35 36 37 38 39 40 41 42 43 44 45 46 47 48 49 50 51 52 53 54 55 56 57 58 59 60 61 62 63 64 65 66 67 68 69 70 71 72 73 74 75 76 77 78 79 80 81 82 83 84 85 86 87 88 89 90 91 |
Option Explicit Dim Value As Integer Dim password As String Dim compare As Integer Dim BUFFERS$ Dim recmsg As String Dim search As String Private Declare Sub Sleep Lib "kernel32" (ByVal dwMilliseconds As Long) Dim message As Integer Dim X As Long Private Sub Command3_Click() Dim a As String a = MsgBox("Do you want to Exit", vbOKCancel, "Email receiving application designed in vb 6") If a = 1 Then Value = 0 End End If End Sub Private Sub Command4_Click() frmAbout.Visible = True End Sub Private Sub Command5_Click() MAPISession1.SignOff Unload Me End Sub Private Sub Form_Load() MAPISession1.SignOn MAPIMessages1.SessionID = MAPISession1.SessionID MAPIMessages1.Fetch If MAPIMessages1.MsgCount > 0 Then Text1.Text = MAPIMessages1.RecipDisplayName Text2.Text = MAPIMessages1.MsgSubject Text3.Text = MAPIMessages1.MsgOrigDisplayName Text4.Text = MAPIMessages1.MsgNoteText Command5.Enabled = True Else Command5.Enabled = False End If Timer1.Enabled = True Timer2.Enabled = True End Sub Private Sub Timer1_Timer() If MAPISession1.SessionID <> 0 Then MAPIMessages1.Fetch If X + 1 > MAPIMessages1.MsgCount Then X = MAPIMessages1.MsgCount Else X = X + 1 MAPIMessages1.MsgIndex = X - 1 Text1.Text = MAPIMessages1.RecipDisplayName Text2.Text = MAPIMessages1.MsgSubject Text3.Text = MAPIMessages1.MsgOrigDisplayName Text4.Text = MAPIMessages1.MsgNoteText End If Else Text4.Text = Text4.Text + "net connection not available" + vbNewLine + "" End If End Sub Private Sub Timer2_Timer() Text4.Text = "" End Sub |
Final Testing:
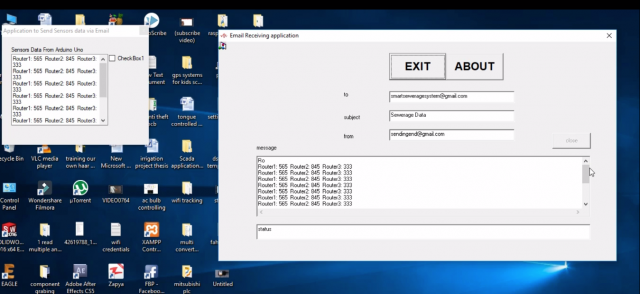
You can see I can send emails using the designed application and I can also receive emails using my designed application.
Note: The Sending email application is designed in Microsoft visual basic express edition 2010.
While the receiving Email application is designed in VB6.
Watch Video Tutorial:
Related Tutorial:
Discover more from Electronic Clinic
Subscribe to get the latest posts sent to your email.


