HX711 Load cell or Strain Gauge and Arduino
Last Updated on October 21, 2024 by Engr. Shahzada Fahad
Table of Contents
HX711 Load Cell with Arduino, Description:
HX711 and Arduino– This tutorial is based on the HX711 breakout board, Arduino Uno and a Load cell or Strain gauge. This tutorial explains step by step how to use the load cell or Strain gauge with the HX711 breakout board and how to write a basic Arduino Uno program to access the values and print them on the Serial monitor. The HX711 and Load cell are used in building a weighing scale. The same program which is used in this tutorial can also run on Arduino Mega.
This article only explains the extreme basics, like for example, the HX711 breakout board pinout. The HX711 break-out board interfacing with the load cell and Arduino Uno or Mega. In this article, we are doing the calibration of the load cell or weight measurement. The load cell calibration and weight measurement will be covered in future articles.
Read my latest article, in which i used the HX711 with the Nodemcu ESP8266 Wifi Module and designed an IoT based Weighing Scale. With the help of this project, the weight can be measured from anywhere around the world using the Blynk application.
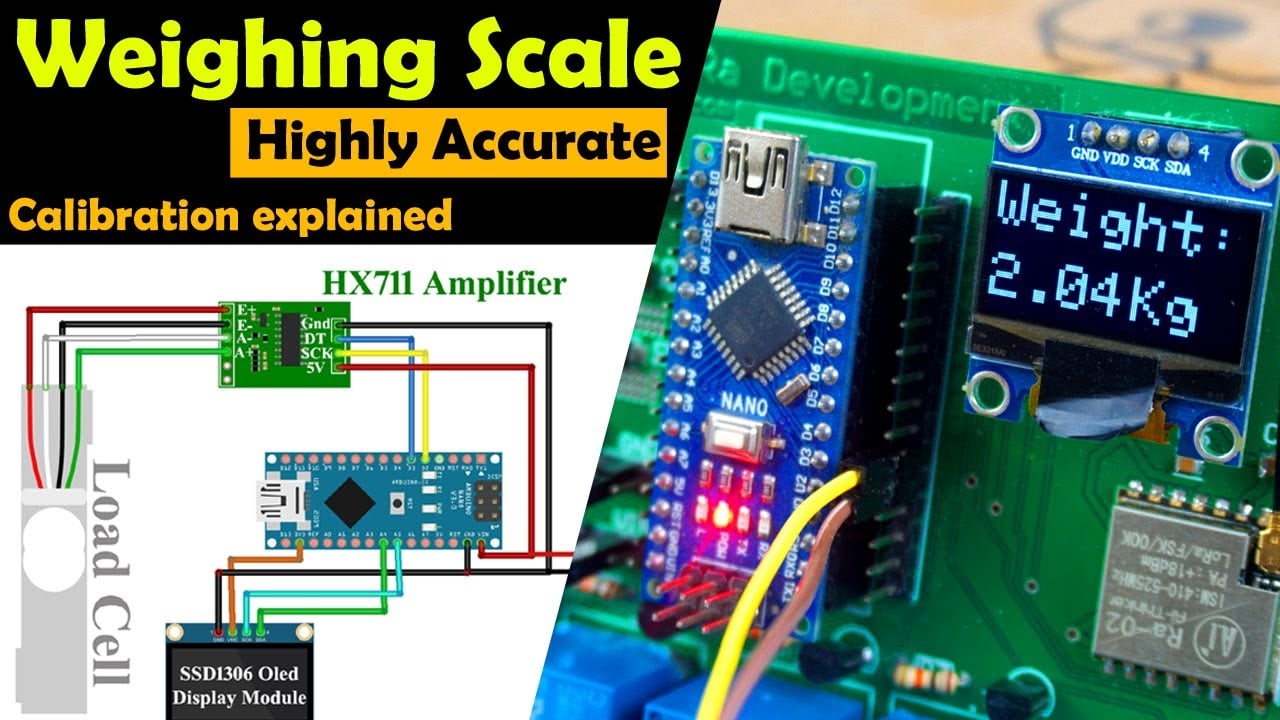
Recently, I designed a highly accurate version of the Weighing Scale using ESP32 WiFi Module. I was simply amazed by the final measured values. I highly recommend reading this article. Read my Latest Article on HX711 and Arduino.
Video is Available at the end of this Article.
Amazon Links:
Arduino Nano USB-C Type (Recommended)
HX711 Load cell / Strain Gauge:
*Disclosure: These are affiliate links. As an Amazon Associate I earn from qualifying purchases.
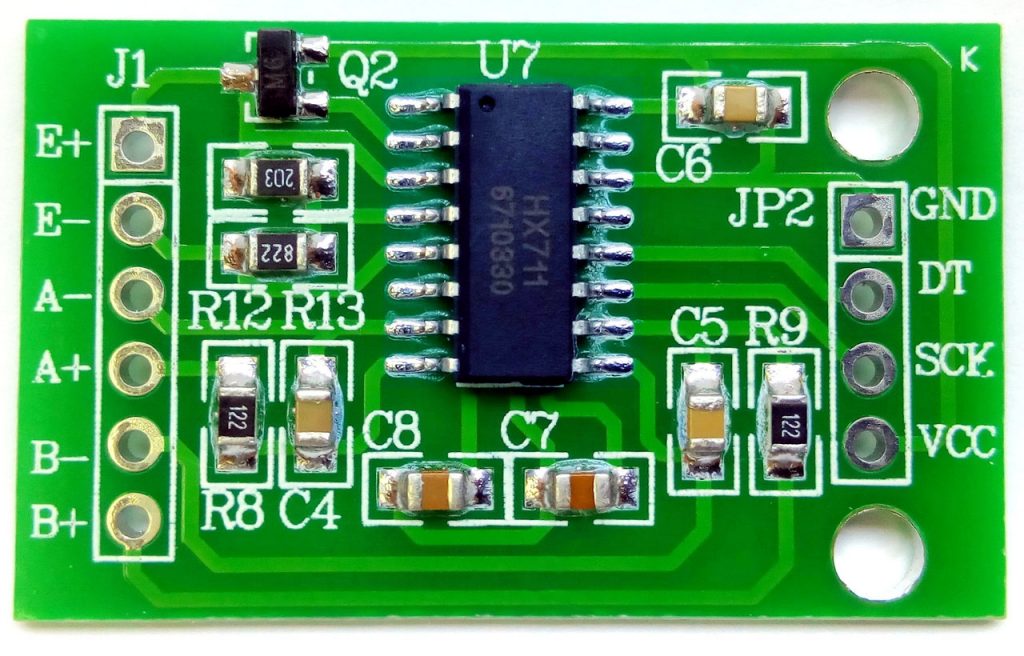
HX711 Breakout board:
Hx711 has different gain values which are selectable 32, 64 and 128. Any of the mentioned gains can be selected and used in the programming.
About Load Cell:
Definition:
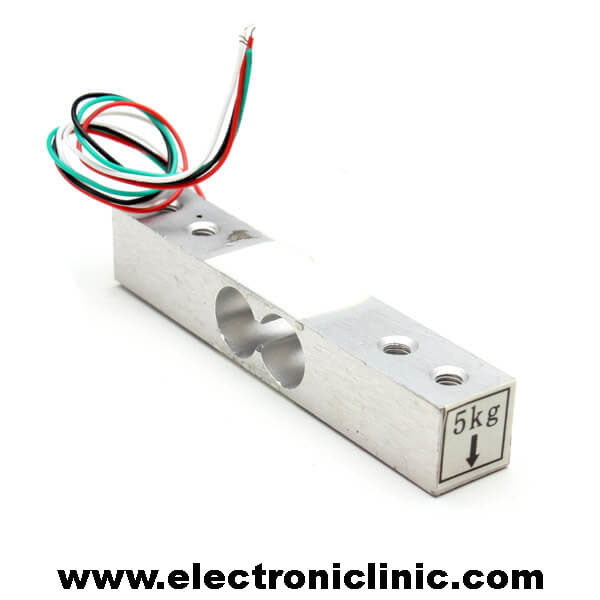
A load cell or a Strain Gauge is basically a Transducer which generates an electrical signal whose magnitude is proportional to the force applied. The various load cell types include Pneumatic, Hydraulic, and strain gauge.
The load cells or Strain gauges can be used in different automation projects. The load cells can be used for the precise weight measurement if properly calibrated. The load cells are commonly used in industrial processes where the weight of certain products is measured. The load cells can be used in automatic bag filling machines. The load cells or strain gauges can be used in infinitely different ways.
HX711 Connection with Arduino and Load cell Circuit Diagram:
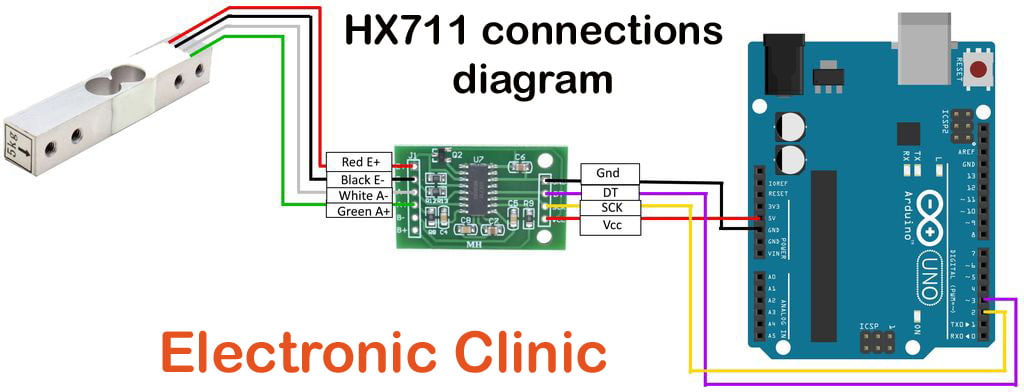
As you can see in the connections diagram. The four wires of the Load cell or Strain Gauge are connected with the HX711. The four wires of the load cell should be connected in the correct way otherwise this will not work. The red wire of the Strain gauge or Load cell should be connected with the E+ pin of the HX711 break out board. The black wire of the Load cell has to be connected with the E- terminal of the HX711 board. The white wire will be connected with the A- pin of the HX711, while the green wire of the Load cell or Strain Gauge is connected with the A+ of the HX711.
On the right side of the HX711 breakout board, the four terminals are clearly labeled with Gnd, DT, SCK, and VCC. The ground of the HX711 is connected with the Arduino’s Ground. The DT is connected with the Arduino’s pin number 3. The SCK of the HX711 is connected with the Arduino’s pin number 2. Finally, connect the VCC of the HX711 break out board with the Arduino’s 5 Volt.
For the Easy interfacing, you can solder some jumper wires with the contacts of the HX711 break out board for this you can use male to male type jumper wires. After the soldering makes sure you check the short circuit using the digital multimeter.
As you can see in the picture above, the Load cell has an Arrow. While installing the load cell make sure this arrowhead points downward. For the best performance install the load cell or strain gauge on a metal base and secure the load cell with the screws, so that there is no movement.
HX711 Arduino Programming:
Before you Start the Programming, first of all, make sure you download the necessary library. The HX711 library can be downloaded from the GitHub, the download link is given below.
HX711 Library:
|
1 2 3 4 5 6 7 8 9 10 11 12 13 14 15 16 |
#include "HX711.h" HX711 scale(2,3); // pin2 is sck and pin3 is DT long int values = 0; void setup() { Serial.begin(9600); } void loop() { //values = scale.read(); //Serial.println(values); Serial.println(scale.read()); delay(500); } <!-- displayad4 --> |
HX711 Arduino Programming number 2:
|
1 2 3 4 5 6 7 8 9 10 11 12 13 14 15 16 17 18 19 20 21 22 23 24 25 26 27 28 29 30 31 32 33 34 35 36 |
#include "HX711.h" #define DOUT 3 #define CLK 2 HX711 scale(DOUT, CLK); float calibration_factor = -7050; //-7050 worked for my 440lb max scale setup void setup() { Serial.begin(9600); Serial.println("HX711 calibration sketch"); Serial.println("Remove all weight from scale"); Serial.println("After readings begin, place known weight on scale"); Serial.println("Press + or a to increase calibration factor"); Serial.println("Press - or z to decrease calibration factor"); scale.set_scale(); scale.tare(); //Reset the scale to 0 long zero_factor = scale.read_average(); //Get a baseline reading Serial.print("Zero factor: "); //This can be used to remove the need to tare the scale. Useful in permanent scale projects. Serial.println(zero_factor); } void loop() { scale.set_scale(calibration_factor); //Adjust to this calibration factor Serial.print("Reading: "); Serial.print(scale.get_units(), 1); Serial.print(" lbs"); //Change this to kg and re-adjust the calibration factor if you follow SI units like a sane person Serial.print(" calibration_factor: "); Serial.print(calibration_factor); Serial.println(); if(Serial.available()) { char temp = Serial.read(); if(temp == '+' || temp == 'a') calibration_factor += 10; else if(temp == '-' || temp == 'z') calibration_factor -= 10; } } |
Read my article on how to make a DIY commercial-level Weighing Scale using Arduino. I compared my created Diy weighing scale with the commercial scale and was amazed by the final results. Diy Scale Vs. Comercial Scale.
Watch Video:
Discover more from Electronic Clinic
Subscribe to get the latest posts sent to your email.


Hello, thank you so much for the video and instruction. Do you have a second one where you explain the second part of the programming and how to calibrate the scale?
Cheers
Phil
https://www.electroniclinic.com/arduino-hx711-and-load-cell-weight-measurement-and-calibration/
Excellent resource. Good work!