Arduino Sensor Values on Gauges designed in Processing Software, Sensors Dashboard
Processing Software with Arduino for Sensors Dashboard Designing
Last Updated on September 21, 2024 by Engr. Shahzada Fahad
Table of Contents
Processing Software with Arduino:
Arduino Sensor Values on Gauges designed in Processing Software– When it comes to the monitoring of different types of sensors, we have many options to monitor sensors. As, for example, we can monitor the sensor values on the serial monitor. This is the most basic way to monitor sensors. And this method is used by almost everyone for project debugging.
Another way to monitor the sensors is to print the sensor values on the LCD, or on the OLED display module, or on the HMI screens.
A third method of monitoring the sensors can be to send the sensor values from the controller board to the loT platform, where we can display the sensor values on different gauges or on other types of widgets. We have many IoT platforms like Blynk, Arduino IoT cloud, Google Spreadsheet, Ubidots, Thingspeak, Google Assistant, Adafruit IO, Firebase, etc.
The 4th method to monitor the sensor can be to design our own Android application and then use that application to monitor the sensors. I have already made videos on this, visit my YouTube channel Electronic Clinic.
And the 5th method can be that we design our own software, in VB.net or C# or Processing. Apart from this, there are many programming languages, by using which we can create desktop applications. I have already made videos on VB6 and VB.NET. In which, I have explained how we can monitor different types of sensors with our designed softwares.
I also talked about the processing software a little while back, I had used the processing software long ago, but I did not make any video on it and I also didn’t write any article about it. So, I decided why not to write a detailed article on the Arduino and Processing. The interface of the processing software is exactly like the Arduino IDE, so it is quite easy to use.
So, in this article, you will learn how to make three gauges in processing software for monitoring Temperature, Humidity, and a Potentiometer. For simplicity, I am using a DHT11 temperature and humidity sensor, and a potentiometer.
Before, I am going to explain the circuit diagram and programming. First, let’s kick off our practical demonstration.
Practical Demonstration:
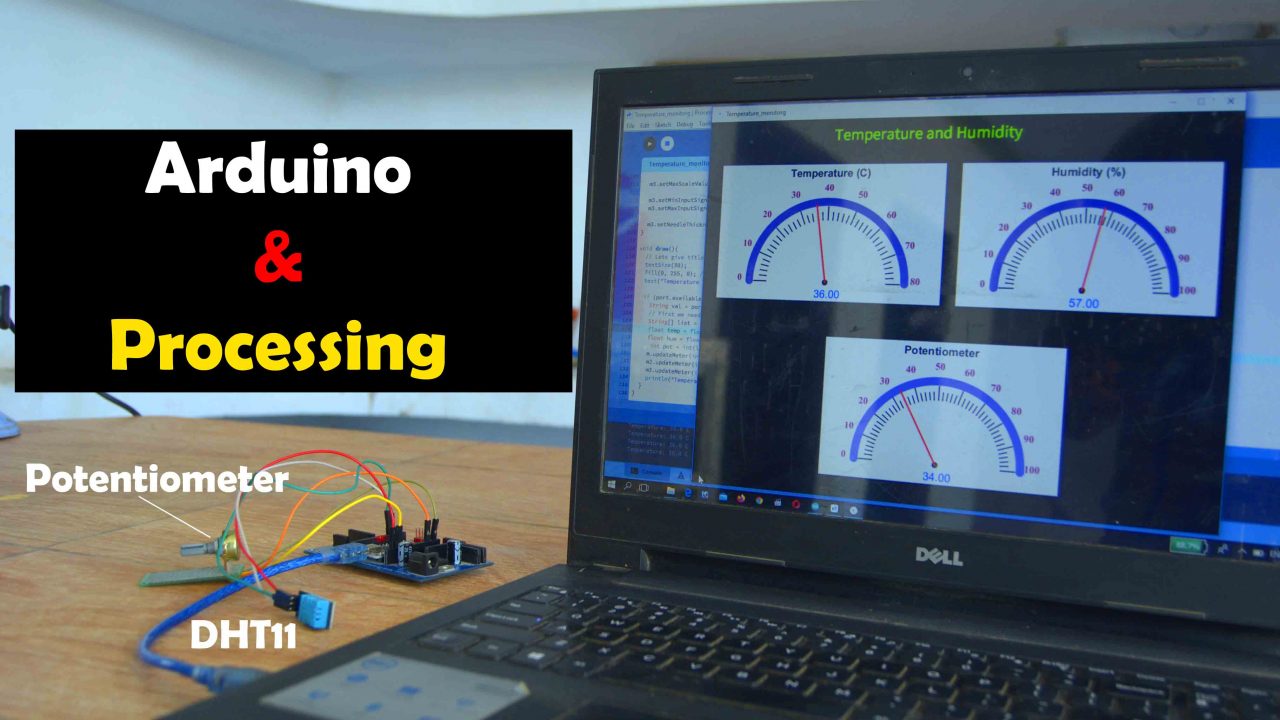
I have connected everything as per the circuit diagram which I will explain in a minute. I have connected my Arduino board with the Laptop using a USB cable. After connecting the Arduino with the Laptop; then I opened the Processing Software. To Run the code I simply clicked on the play button. Right now you can see values of the Temperature, Humidity, and Potentiometer on the Gauges.
Next, I applied heat to the DHT11 Temperature and Humidity Sensor. The DHT11 is quite a slow sensor, it takes a while to update the values. Any I kept applying heat to the sensor for around 10 seconds and the needle on the gauges started to move. It was a moment of delight for me. Then after that I started to rotate the knob of the Potentiometer and it was really quick, there was just a 200ms delay, and this is because, I am using 200 milliseconds delay in the Arduino code.
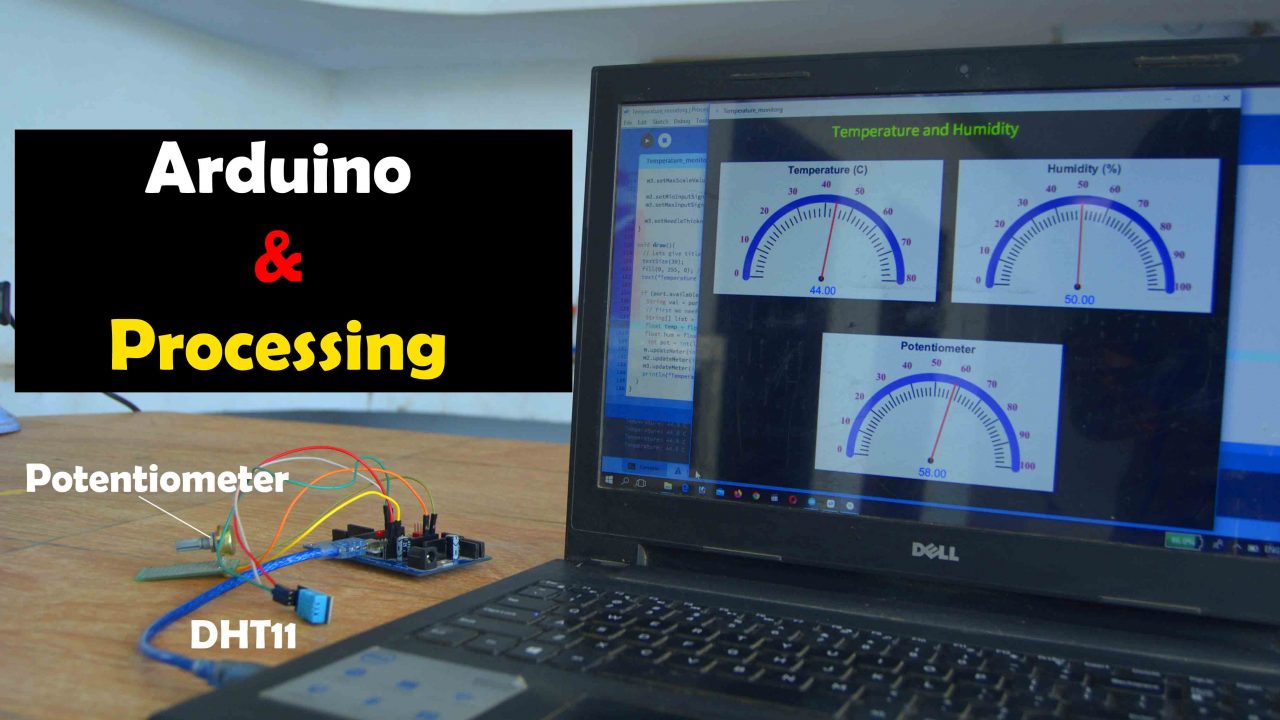
You can see the updated Temperature, Humidity, and Potentiometer values on the Gauges. I am sure by now, you might have got an idea of how does this system work. So, without any further delay let’s get started!!!
Amazon Links:
Arduino Nano USB-C Type (Recommended)
DHT11 Temperature and Humidity Sensor
*Disclosure: These are affiliate links. As an Amazon Associate I earn from qualifying purchases.
DHT11 Sensor:
The DHT11 is a basic, ultra low-cost digital temperature and humidity sensor. It uses a capacitive humidity sensor and a thermistor to measure the surrounding air, and spits out a digital signal on the data pin. It is simple to use, but requires careful timing to grab data.
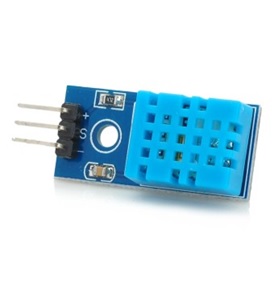
Description:
- Low cost
- 3 to 5V power and I/O
- 5mA max current use during conversion (while requesting data)
- Good for 20-80% humidity readings with 5% accuracy
- Good for 0-50°C temperature readings ±2°C accuracy
- No more than 1 Hz sampling rate (once every second)
- Body size 15.5mm x 12mm x 5.5mm
DHT11 with Arduino, Circuit:
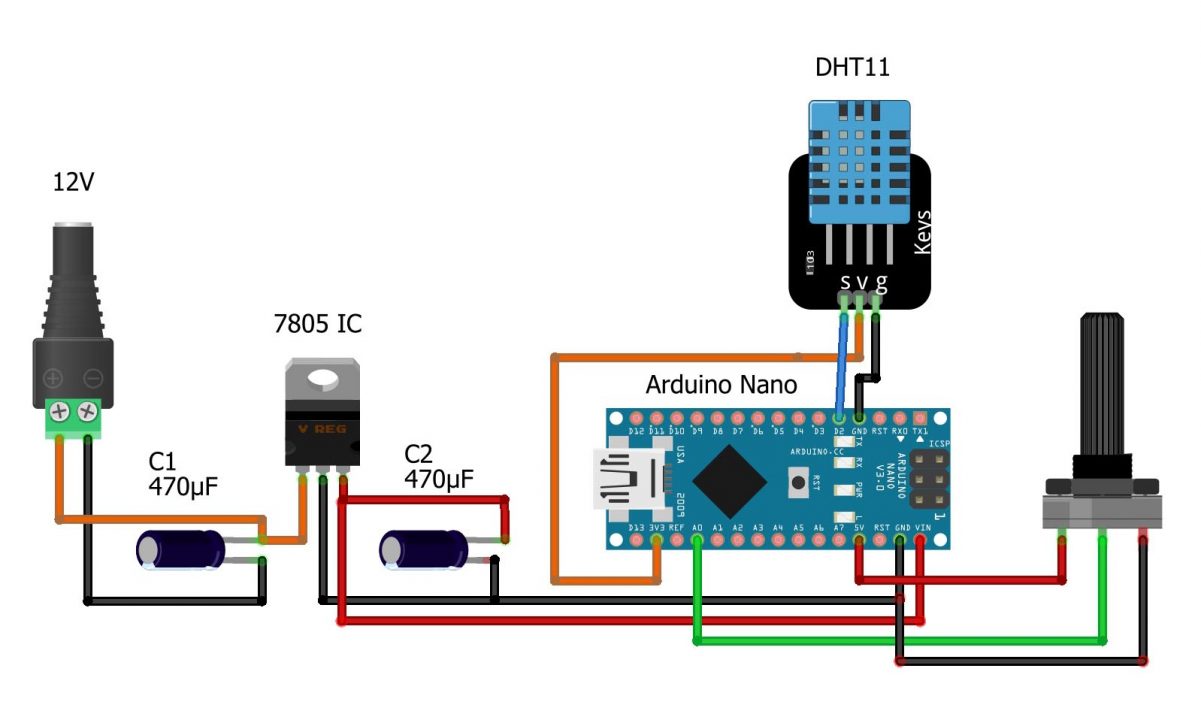
Basically, for this project, we don’t need this 5V regulated power supply, as I will use my laptop to power up the Arduino board. The potentiometer is connected with the Analog pin A0. The other two legs of the Potentiometer are connected with the 5V and GND.
The data Pin is connected with the Arduino Nano D2 pin. The voltage pin is connected with 3.3 volts and the GND pin is connected with the Arduino’s ground.
PCB’s from JLCPCB:

These are the PCBs, I received from the JLCPCB as you can see the quality is really great. The silkscreen is quite clear and the Blue Solder mask looks amazing. After completing the Soldering, I connected everything as per the circuit diagram which I just explained.
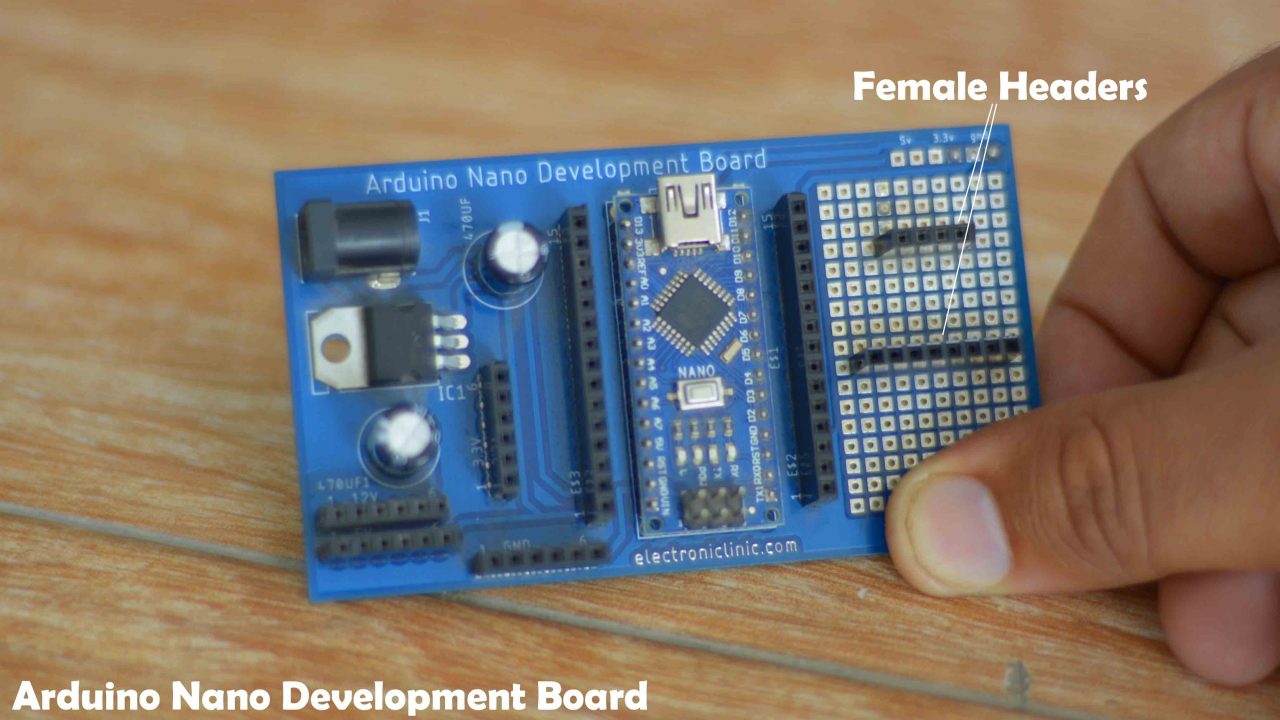
Don’t get confused with these female headers, I added these for connecting the Oled display module since I will be using this as the development board for testing my other Arduino based projects. Now, let’s take a look at the Arduino programming.
Arduino Programming:
|
1 2 3 4 5 6 7 8 9 10 11 12 13 14 15 16 17 18 19 20 21 22 23 24 25 26 27 28 29 30 |
#include "DHT.h" #define DHTPIN 2 //connect DHT data pin to D2 #define DHTTYPE DHT11 // DHT 11 DHT dht(DHTPIN, DHTTYPE); float temp = 0; float hum = 0; int pot=A0; int potvalue; void setup() { Serial.begin(9600); pinMode(pot,INPUT); pinMode(DHTPIN, OUTPUT); dht.begin(); //Begins to receive Temperature and humidity values. } void loop() { temp = dht.readTemperature(); hum = dht.readHumidity(); potvalue=analogRead(pot); int potvalue1=map(potvalue,0,1023,0,100); Serial.print(temp); Serial.print(","); Serial.print(hum); Serial.print(","); Serial.print(potvalue1); delay(200); } |
For this project, You will also need to install the DHT11 library for this click on the Sketch Menu then go to the Include Library and then click on the Manage Libraries. Type dht in the search box and then install the dht sensor library.
The purpose of this program is to read the DHT sensor and Potentiometer. And to send these values to the processing Software. Now, let take a look at the Processing code.
Required Library for Processing:
First open the Arduino processing then import the meter library, click on the import library and then click on the manage libraries…

Write meter and install the library.
As you can see, I have already installed this library. When you are done with installing the meter library. Then you will need code given below. Simply copy and paste it in the Processing software.
Designing Gauges using Processing Software:
|
1 2 3 4 5 6 7 8 9 10 11 12 13 14 15 16 17 18 19 20 21 22 23 24 25 26 27 28 29 30 31 32 33 34 35 36 37 38 39 40 41 42 43 44 45 46 47 48 49 50 51 52 53 54 55 56 57 58 59 60 61 62 63 64 65 66 67 68 69 70 71 72 73 74 75 76 77 78 79 80 81 82 83 84 85 86 87 88 89 90 91 92 93 94 95 96 97 98 99 100 101 102 103 104 105 106 107 108 109 110 111 112 113 114 115 116 117 118 119 120 121 122 123 124 125 126 127 128 129 130 131 132 133 134 135 136 |
// Lets create a simple meter // Import Meter library import meter.*; // Import serial library import processing.serial.*; Serial port; // Define a port Meter m, m2, m3; void setup(){ // First we need to create a empty window size(950, 700); // Size of the window (width, height) background(0, 0, 0); // Background color of window (R,G,B) // Create new port port = new Serial(this, "COM14", 9600); //name of the port would be different for linux // Lets add a default meter to empty window // TEMPERATURE METER m = new Meter(this, 25, 80); // here 25, 10 are x and y coordinates of meter's upper left corner m.setTitleFontSize(20); m.setTitleFontName("Arial bold"); m.setTitle("Temperature (C)"); // Change meter scale values String[] scaleLabels = {"0", "10", "20", "30", "40", "50", "60", "70", "80"}; m.setScaleLabels(scaleLabels); m.setScaleFontSize(18); m.setScaleFontName("Times new roman bold"); m.setScaleFontColor(color(200, 30, 70)); // We can also display the value of meter m.setDisplayDigitalMeterValue(true); // Lets do some more modifications so our meter looks nice m.setArcColor(color(141, 113, 178)); m.setArcThickness(15); m.setMaxScaleValue(80); m.setMinInputSignal(0); m.setMaxInputSignal(80); m.setNeedleThickness(3); // HUMIDITY METER // lets take some refference from first meter int mx = m.getMeterX(); // x coordinate of m int my = m.getMeterY(); // y coordinate of m int mw = m.getMeterWidth(); m2 = new Meter(this, mx + mw + 20, my); m2.setTitleFontSize(20); m2.setTitleFontName("Arial bold"); m2.setTitle("Humidity (%)"); // Change meter scale values String[] scaleLabels2 = {"0", "10", "20", "30", "40", "50", "60", "70", "80", "90", "100"}; m2.setScaleLabels(scaleLabels2); m2.setScaleFontSize(18); m2.setScaleFontName("Times new roman bold"); m2.setScaleFontColor(color(200, 30, 70)); // We can also display the value of meter m2.setDisplayDigitalMeterValue(true); // Lets do some more modifications so our meter looks nice m2.setArcColor(color(141, 113, 178)); m2.setArcThickness(15); m2.setMaxScaleValue(100); m2.setMinInputSignal(0); m2.setMaxInputSignal(100); m2.setNeedleThickness(3); ////Potentiometer // lets take some refference from first meter int mx1 = m.getMeterX(); // x coordinate of m int my1 = m.getMeterY(); // y coordinate of m int mw1 = m.getMeterWidth(); m3 = new Meter(this, 250, 400); m3.setTitleFontSize(20); m3.setTitleFontName("Arial bold"); m3.setTitle("Potentiometer"); // Change meter scale values String[] scaleLabels3 = {"0", "10", "20", "30", "40", "50", "60", "70", "80", "90", "100"}; m3.setScaleLabels(scaleLabels3); m3.setScaleFontSize(18); m3.setScaleFontName("Times new roman bold"); m3.setScaleFontColor(color(200, 30, 70)); // We can also display the value of meter m3.setDisplayDigitalMeterValue(true); // Lets do some more modifications so our meter looks nice m3.setArcColor(color(141, 113, 178)); m3.setArcThickness(15); m3.setMaxScaleValue(100); m3.setMinInputSignal(0); m3.setMaxInputSignal(100); m3.setNeedleThickness(3); } void draw(){ // Lets give title to our window textSize(30); fill(0, 255, 0); // Font color , (r,g,b) text("Temperature and Humidity", 250, 40); // ("text", x, y) if (port.available() > 0){ String val = port.readString(); // read incoming string on serial port // First we need to separate temperature and humidity values String[] list = split(val, ','); // splits value separated by ',' float temp = float(list[0]); // first value is Temperature float hum = float(list[1]); // second value is Humidity int pot = int(list[2]); // third value potentiometer m.updateMeter(int(temp)); // int is used due to updateMeter accepts only int values m2.updateMeter(int(hum)); m3.updateMeter(int(pot)); println("Temperature: " + temp + " C " + "Humidity: " + hum+ "%"+"Potentiometer: "+pot); } } |
port = new Serial(this, “COM14”, 9600);
Next, make sure you enter the same Arduino communication port which you can check by going to the device manager or to the Arduino IDE while your Arduino is connected with the Laptop. My Arduino board was installed on COM14, so that’s why I entered the communication port in the Processing code. Once you are done with all the settings, then finally you can click on the Play button. You should be able to see the Temperature, Humidity, and Potentiometer values on the three gauges respectively.
Watch Video Tutorial

Discover more from Electronic Clinic
Subscribe to get the latest posts sent to your email.


Good day Engr Fahad,
I am new to the Arduino IDE and very interested in your processing software on the Arduino.
Please advice me as to how I can import the “meters” library using the Arduino IDE v1.8.19.
I would really like to do this project!
Thank you in advance.
JoevW
I have explained this in the Video which i am going to upload tomorrow. You will get a notification if you have subscribed my channel “Electronic Clinic”.