Cayenne and ESP8266, Send SMS and Email, IoT Security Project
Table of Contents
IoT Project using Cayenne and ESP8266:
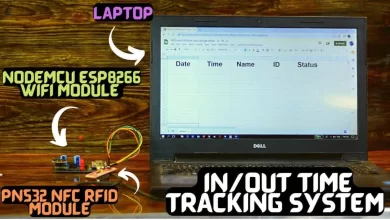
Cayenne and ESP8266, Send SMS and Email, IoT Security Project– in this tutorial, you will learn how to make an IoT-based security project using the Cayenne IoT Platform, PIR sensor, and the most popular Nodemcu ESP8266 WiFi module.
Maybe almost 90% of you guys might still be unaware of the Cayenne IoT Platform. To be very frank, I also came to know about the cayenne platform just a few days back, and when I first started using it, I was really astonished after seeing its unbelievable features. I am quite sure you might be quite well acquainted with Blynk application which is a popular IoT platform. A number of other parallel platforms do exist e.g. Ubidots, Thingspeak, Google Spreadsheet, IFTTT, Google Assistant, Arduino loT Cloud, etc.
Believe me, the IoT platforms which I have just conferred, the Cayenne platform is a perfect competitor for each one of these. I must, rather say the Cayenne platform is actually far better than those mentioned and I am claiming all this based on my personal experience. And you are also going to learn about it quite shortly because I am about to make an IoT based Human Motion detection security system, using a PIR sensor, Nodemcu ESP8266 WIFI module, and Cayenne IoT Platform.
You might be thinking that this security system can be built by means of using any IoT platform, then why have I been stressing so much on the cayenne platform? Well, its main reason is that through the application of Cayenne IoT platform, you can send a notification message on any cell number around the world and you can also send an email notification message, and you can do it absolutely free of cost. You will be able to realize it for yourself when I practically demonstrate it in a minute.
Anyways, the objective behind carrying out such a simple type of project is to make you understand, how to get started with the Cayenne IoT Platform. So, before I am going to explain the circuit diagram, How to create the Cayenne IoT dashboard, and ESP8266 programming, first, let’s watch the Cayenne and Nodemcu ESP8266 IoT based security system in action.
Altium Designer:

Altium Designer is the world’s most trusted PCB design system. Altium Designer enables engineers to effortlessly connect with every facet of the electronics design process. Over 35 years of innovation and development focused on a truly unified design environment makes it the most widely used PCB design solution. With Altium Designer you can create PCB designs with an intuitive and powerful interface that connects you to every aspect of the electronics design process. Route it your way through any angle, tune for the delay, Push, Slide, and Walkaround faster than ever. Interact and collaborate with mechanical designers like never before in a photo-realistic, 3D design environment. If you want to get started with the Altium designer, you can click on the get started.
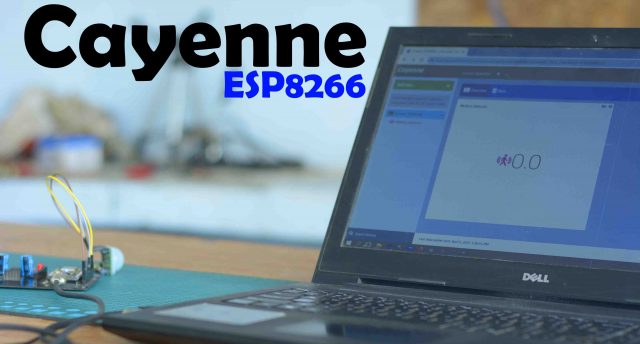
No, when motion is detected than on the widget 0.0 is printed.
When Motion is detected than on the widget 1.0 is printed.
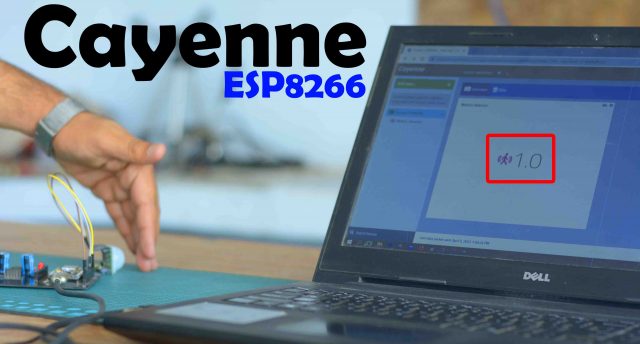
And at the same time, a message is sent on the predefined cell phone number.

You can see in the image, I have received multiple messages, as I have been testing this project for hours.
At the same, an Email notification is also sent.
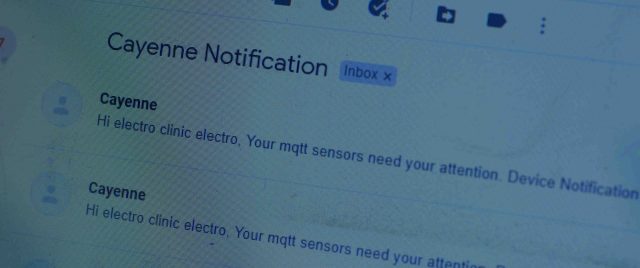
These SMS and Email notifications are sent at the same.
Amazon Links:
Other Tools and Components:
Super Starter kit for Beginners
PCB small portable drill machines
*Please Note: These are affiliate links. I may make a commission if you buy the components through these links. I would appreciate your support in this way!
ESP8266 (NodeMCU):
ESP8266 is a highly integrated chip designed for the needs of a new connected world. It offers a complete and self-contained Wi-Fi networking solution, allowing it to either host the application or offload all Wi-Fi networking functions from another application processor.
ESP8266 has powerful onboard processing and storage capabilities that allow it to be integrated with the sensors and other application-specific devices through its GPIOs with minimal development up-front and minimal loading during runtime. Its high degree of on-chip integration allows for minimal external circuitry, and the entire solution, including the front-end module, is designed to occupy minimal PCB area.
Specifications:
Serial/UART baud rate: 115200 bps
Input power: 3.3V
I/O voltage tolerance: 3.6V Max
Flash Memory Size: 1MB (8Mbit)
WiFi security modes: WPA, WPA2
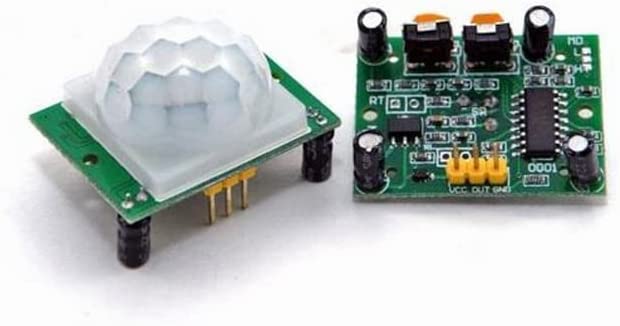
PIR Motion sensor:
PIR Sensor is called with so many different names like PIR sensor, PIR motion sensor, motion detector, passive infrared sensor, Arduino motion Sensor, human detection sensor, etc.
PIR stands for the Passive Infrared Sensor. PIR motion sensor is specially designed for humans and animal detection. PIR sensor is commonly used in automatic lighting systems, security projects, etc.
Features
- Product Name: HC-SR501 Body Sensor Module
- Operating voltage range: DC 4.5-20V
- Quiescent Current: <50uA
- Trigger: L cannot be repeated trigger/H can be repeated trigger (Default repeated trigger)
- It has pin header to select trigger mode
Usage:
This PIR motion sensor can automatically and quickly open various types of incandescent, fluorescent lamps, buzzers, automatic doors, electric fans, automatic washing machines, dryer Machines, and other devices is a high-tech product.
Pir Sensor Interfacing with Nodemcu ESP8266:
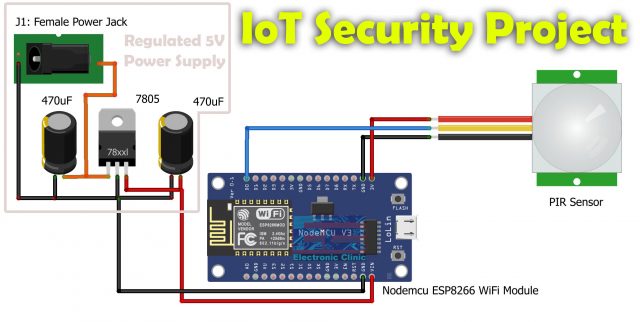
The Red wire of the PIR sensor which is the VCC wire is connected with the 3.3V pin of the Nodemcu ESP8266. The yellow wire is the signal wire and is connected with the D0 pin of the Nodemcu module. The black wire is the ground wire and it should be connected with the ground pin of the Nodemcu ESP8266 WiFi module. These are the minimal connections that you will need for this project. In case you plan to power up the Nodemcu ESP8266 WiFi module using your computer or laptop which is good for the initial testing but in the long run, you will need an external power supply.
On the left side, you can see a regulated 5V power supply which is based on the LM7805 Linear voltage regulator. J1 is the DC female power jack and this is where you can connect your 12Vdc Adaptor, a solar panel, battery, etc. The input voltage should be below 28 volts. Don’t forget to add these 470uF decouple capacitors at the input and output sides of the voltage regulator.
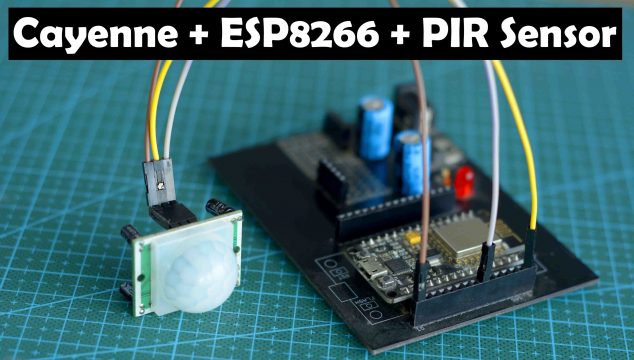
I completed all the connections as per the circuit diagram, and now let’s start with the Cayenne IoT platform.
Designing Cayenne Dashboard:
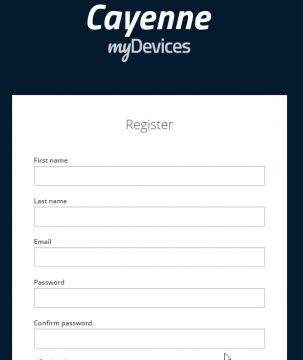
So first of all, we will create an account. If you go to Google and type in Cayenne dashboard I think the first one to pop will be the one that we are going to use.

If you click on it, you have a login interface, if you do not have an account you can go ahead and create one. First of all, you have to enter your first name, last name, and email and then enter your password and then click on the register button.
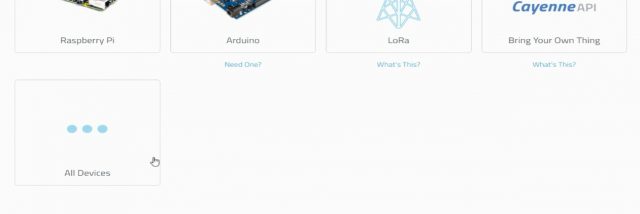
After entering these credentials we have logged in successfully. I am asked to choose the device that I am going to use in my project. In the basic, we have a raspberry pi, Arduino, Lora and bring your own thing.
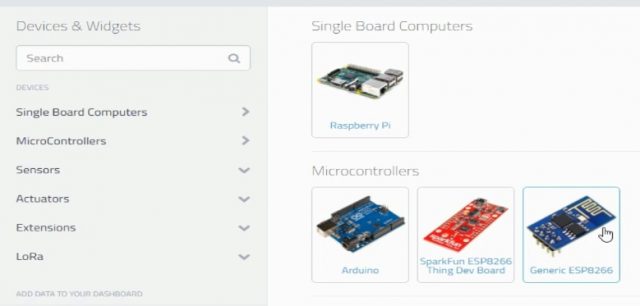
In my case, I am going to use the ESP8266. So you can see that we don’t have ESP8266 in this list that’s why we need to choose to bring your own thing. I am going to click on all devices.
When we will click on the devices then we have to select the Generic ESP8266.
Then the second step is to connect your device. How are we going to connect our device we need to use the MQTT protocol. MQTT is message queuing telemetry transport which is a lightweight message protocol that was developed by IBM in the early 1990s. So this means it allows sensors may be devices, and microcontrollers to transfer lightweight data into the cloud. So we are going to need the MQTT username, we are going to need the MQTT password and the client id. This is very useful information.
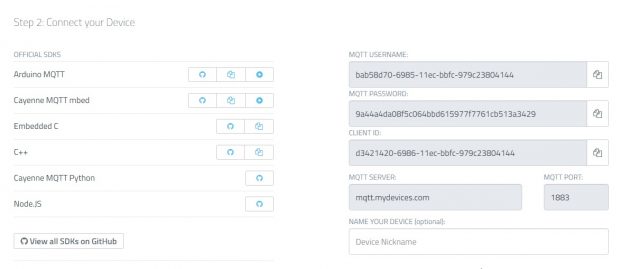
Simply, copy the MQTT USERNAME, MQTT PASSWORD, AND CLIENT ID, and paste these credentials into the Arduino code in their respective variables.
If you see down here the dashboard is waiting for the board to connect. So when is the board going to get connected?
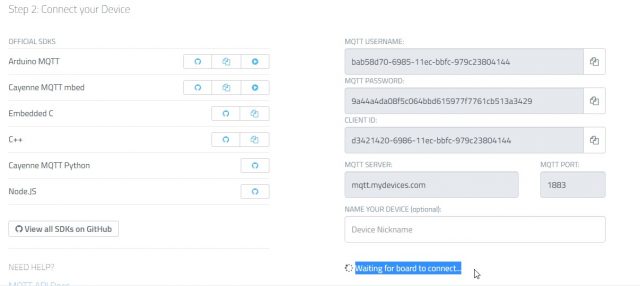
You can see it’s waiting for the board to connect, as I have not uploaded the code and my ESP8266 board is not connected with the WiFi.
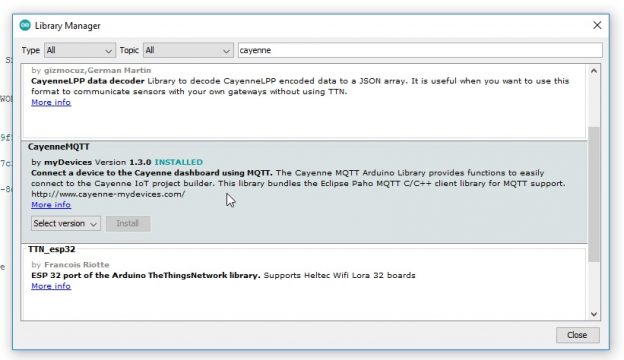
Installing the Cayenne Library:
First of all go to the sketch and then go to the manage library and write cayenne in the search and install the library.
Cayenne ESP8266 Complete code:
|
1 2 3 4 5 6 7 8 9 10 11 12 13 14 15 16 17 18 19 20 21 22 23 24 25 26 27 28 29 30 31 32 33 34 35 36 37 38 39 40 |
#include <CayenneMQTTESP8266.h> #include <ESP8266WiFi.h> char ssid[] = "AndroidAP3DEC"; // YOUR SSID char password[]="electroniclinic"; // YOUR PASSWORD char username[] = "a61ceba0-793a-11ec-9f5b-45181495093e"; // char mqtt_password[] = "f253c8627228397c3bc6d91a7818b933e6e67846"; char client_id[] = "d2b4efa0-793a-11ec-8da3-474359af83d7"; const int PIRpin = D0;// pir pin int PIRval = 0;// for reading pir value void setup() { pinMode(PIRpin,INPUT);//......| Seting sensors and modules input or output Serial.begin(115200); Cayenne.begin(username,mqtt_password,client_id,ssid,password);// starting cayenne } void loop() { Cayenne.loop(); PIRval = digitalRead(PIRpin); // read and store pir value Serial.println(PIRval); // send sensor values to cayenne Cayenne.virtualWrite(0,PIRval); } |
Code Explanation:
As we have already discussed that we will first install the cayenne library and include the library in the code.
|
1 |
#include <CayenneMQTTESP8266.h> |
If we are using NodeMCU then we will write the ESP82266WiFi and if we are using ESP32 then we will only write the Wifi.
|
1 |
#include <ESP8266WiFi.h> |
After that in order to connect the NodeMCU we will enter the Wifi name and password,
|
1 2 3 |
char ssid[] = "AndroidAP3DEC"; // YOUR SSID char password[]="electroniclinic"; // YOUR PASSWORD |
Now copy the user name, mqtt password, and client id from the cayenne platform and past it in the code.
|
1 2 3 4 5 |
char username[] = "a61ceba0-793a-11ec-9f5b-45181495093e"; // char mqtt_password[] = "f253c8627228397c3bc6d91a7818b933e6e67846"; char client_id[] = "d2b4efa0-793a-11ec-8da3-474359af83d7"; |
As we have connected the PIR sensor with the digital pin D0 of the NodeMCU so we will define it.
|
1 |
const int PIRpin = D0;// pir pin |
In order to store the value of the PIR sensor we will declare a variable.
|
1 2 3 4 5 |
int PIRval = 0;// for reading pir value void setup() { |
Now declare the PIR sensor as input because we will get the data from it whether a person or animal is present or not.
|
1 2 3 |
pinMode(PIRpin,INPUT);//......| Setting sensors and modules input or output Serial.begin(115200); |
Then we will connect with the Cayenne platform which will take few seconds.
|
1 2 3 4 5 6 7 |
Cayenne.begin(username,mqtt_password,client_id,ssid,password);// starting cayenne } void loop() { |
Now the cayenne platform will start and the PIR sensor will start to detect an movement.
|
1 2 3 4 5 6 7 |
Cayenne.loop(); PIRval = digitalRead(PIRpin); // read and store pir value Serial.println(PIRval); // send sensor values to cayenne |
The “0” in this code represent channels zero which will be created in the Cayenne platform.
|
1 2 3 |
Cayenne.virtualWrite(0,PIRval); } |
Now after uploading the code to the NodeMCU, go back to Cayenne IoT platform, and wait for the board to connect. We are receiving the data on channel 0, which is also defined in the code.
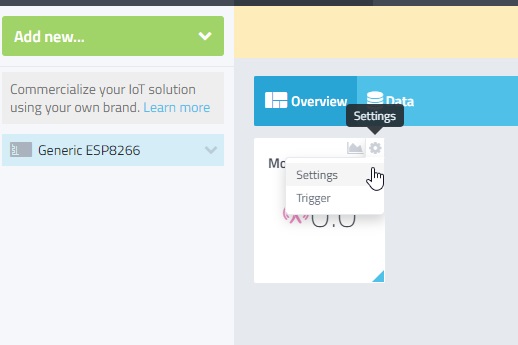
Click on Add to dashboard button and then click on the settings to select the widget name, Channel, Icon, and Number of decimals.
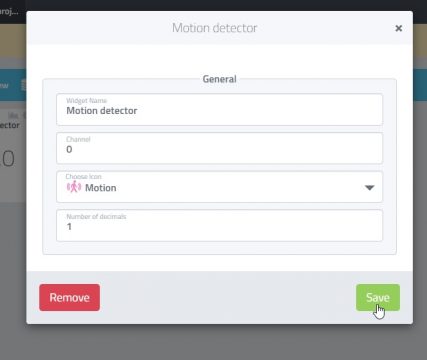
Click on the Save button.
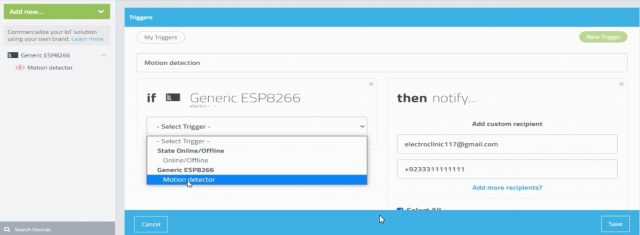
Again, click on the settings, and this time click on the Trigger…name your trigger…
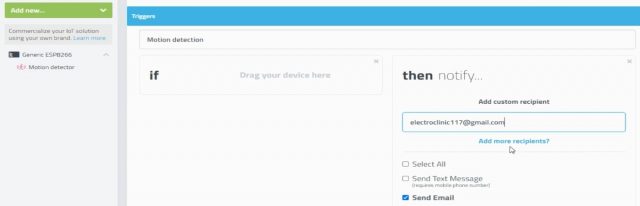
First of all we will give the name to our trigger which is “Motion detection” and then in the then part click on the setup notification.

Now in the setup notification we will enter the email address and mobile number by clicking on the add recipients.
After entering the email and mobile number the then part is completed and now we will click on the Generic ESP8266 and drag it to the “if” and then select the Trigger “Motion detector”.
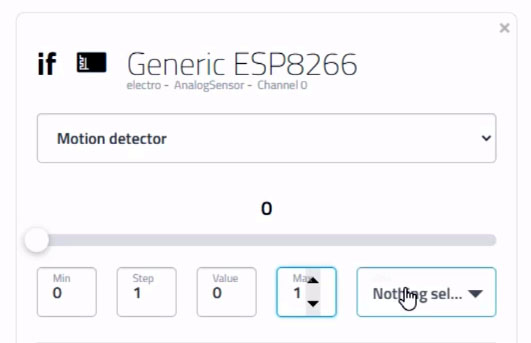
Enter the Min = 0, Step = 1, Value = 0, Max = 1.
After entering all the values, then finally, you can click on the Save button. Now, you can open the dashboard and start monitoring the PIR Sensor. If you face any issues, watch the video tutorial given below.