IoT based Flood Monitoring System using Ultrasonic Sensor and ESP8266
Table of Contents
IoT based Flood Monitoring System, Introduction:
IoT based Flood Monitoring System using Ultrasonic Sensor and ESP8266– This is the 2nd version of the Flood Monitoring System based on the IoT “Internet of things” based technology. Version 1 of the Flood monitoring system was based on the Arduino and GSM based Flood alert system.
A few days back I got an email from Sneha Shinde asking for the IoT early Flood Detection and avoidance system. I found this project very interesting and decided to build the one using the internet of things based technology.
If you search on the Google you will find different IoT-based Flood monitoring projects based on the ThingSpeak IoT platform, which I personally didn’t like. Those projects send the Flood alert values after every 10 or 20 seconds. These are long delays, due to which the water levels cannot be monitored in real-time. We need a quick system that can send the values at least every 1 second.
The IoT-based Flood Monitoring System that we are going to build is capable of sending the water level data at 1 second interval, due to which the water level can be monitored in real-time using the cell phone application designed in Blynk. My designed IoT based Flood Monitoring system is based on the Nodemcu ESP8266, Ultrasonic Sensor “HC-SR04”, and Blynk Application. All the processing is done by the Nodemcu ESP8266. In this project the Ultrasonic Sensor is used for measuring the distance. When the distance between the Ultrasonic Sensor and the water level is less than or equal to 10 an alert message is sent to the Blynk application. On the Blynk application I have added the widgets which display the distance values.
Without any further delay, let’s get started!!!
Amazon Purchase Links of the Components used in this project:
Other Tools and Components:
Super Starter kit for Beginners
PCB small portable drill machines
*Please Note: These are affiliate links. I may make a commission if you buy the components through these links. I would appreciate your support in this way!
Why we need an IoT based Flood Monitoring System?
In the peninsular countries like Pakistan and India, with extreme weather and climatic conditions, the occurrence of heavy rainfall is normal. Multiple times, the arrival of very heavy rains results in the heavy discharge of water or because of the sudden melting of the glaciers due to global warming.
Especially, in the monsoon which normally begins in the mid of June and lasts till October, thousands of people lost their lives by drowning and their habitats were collapsed. The leftover were evacuated by the state and central disaster relief authorities. The severe water logging brought daily work to halt. In order to save the lives of the people, their habitat and the economy, the major step is to monitor the data on real time basis and if the situation is reaching a certain threshold, then alert is to be provided to the concerned person living in the area which is currently at risk. Even if it is difficult to abandon the natural calamity but the mandatory steps are to be taken by the government agencies to shift the population to a safe region and the losses will get reduced to less than 30%.
In this modern era, there are multiple systems working and are deployed at different locations but the alert notification is passed to government agencies and this ends up in slowing down the process. The reason behind this is that flood is very spontaneous disaster and government agencies have to follow multiple steps before reaching to a decision. In this case, awareness among the people is very necessary along with the government officials. So, that a combined and better result will be achieved.
In my proposed system the water level can be monitored in real-time using a cell phone, no matter you are in a meeting, outside your home, etc. You will be able to see everything in real-time. You can check the App at anytime and find out about the water level, if it’s increasing or decreasing. Different level can be defined. Alert messages are generated automatically when the desired conditions are met.
My previously designed Flood monitoring system was based on the GSM and Arduino. This GSM based flood monitoring system also works perfectly. It can generate alert messages. The only drawback is we cannot monitor the water level in real-time, and moreover messages takes time to send. This is the reason I decided to make another Flood Monitoring system using IoT.
Ultrasonic Sensor HC-SR04:
This is the HC-SR04 Ultrasonic Sensor which will be used for monitoring the water level. This Module has a total of 4 male headers clearly labeled as VCC, Trig, Echo, and Gnd. The connection of the Ultrasonic Sensor with the Nodemcu ESP8266 is explained in the Circuit Diagram.
IoT based Flood Monitoring System Circuit Diagram:
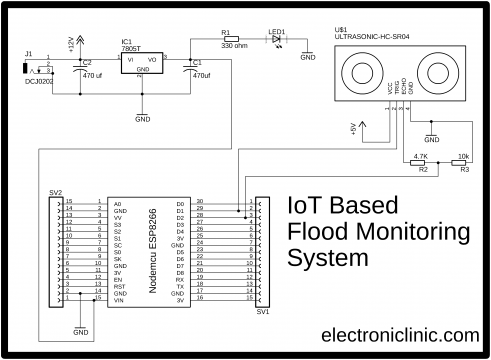
The circuit diagram of the IoT based Flood Monitoring System is very simple. The Nodemcu ESP8266 WiFi module is powered up using the 5V regulated power supply based on the LM7805 Voltage regulator. As the LM7805 Voltage Regulator accepts a wide range of input voltages (7 to 25 Volts), this project can be powered up using a 12V battery, a solar Panel, etc. Make sure the Input voltage does not exceed the maximum input voltage of the LM7805 Voltage Regulator.
J1 is the female power jack and this is where we connect the external power supply used to power up the entire circuit. The external supply can be a 12V battery, an adaptor, a solar panel, etc. The voltage and ground pins of the female power jack J1 are connected with the Input and ground legs of the LM7805 voltage regulator. Two 470uF decoupling capacitors are connected at the input and output sides of the voltage regulator.
A 330-ohm resistor is connected in series with a 2.5v LED. This is a current limiting resistor. This is the circuit power ON LED. It has no role in this project, except to let you know that the circuit is powered up.
The Trigger and Echo pins of the Ultrasonic Sensor “HC-SR04” are connected with the Nodemcu ESP8266 pins D1 and D2. While the VCC and GND pins of the Ultrasonic Sensor are connected with the VIN pin and GND pin of the Nodemcu ESP8266 Module.
As you know Nodemcu ESP8266 and ESP32 Modules are based on the 3.3V controllers. The voltages greater than 3.3V on any pins can damage the Nodemcu ESP8266 or ESP32 module. The type of the Ultrasonic Sensor I am using needs 5 volts. This means this ultrasonic Sensor can damage the Nodemcu ESP8266 Wifi Module. While testing this project nothing bad happened and it worked without damaging the Nodemcu Module. But as a protection you can use a voltage divider on the Echo pin of the Ultrasonic Sensor to reduce the voltage to 3.3Volts. You can follow the circuit given below.
Two resistor R2 “4.7K” and R3 “10K” are connected in series which makes the voltage divider circuit. This simply works as the voltage level converter; it converts 5 volts from the Ultrasonic Sensor into 3.3Volts.
You can also find Ultrasonic Sensor modules that can be powered up using the 3.3volts. Then you won’t need the voltage divider. You might be wondering about the SV1 and SV2, these are the female headers.
First I checked all my connections on a breadboard. After, I was satisfied with the results then I designed a PCB board for the Nodemcu ESP8266 WiFi Module, which I can use as the development board.
To reduce the wiring, and to make everything look good, I designed my own PCB board for the Nodemcu ESP8266 Wifi module using the CadeSoft Eagle PCB designing software.
After I completed the PCB design, then I sent my PCB board Gerber files to the PCBWay Company for making High-Quality PCB’s. If you don’t know how to generate the Gerber files then watch my video given below.
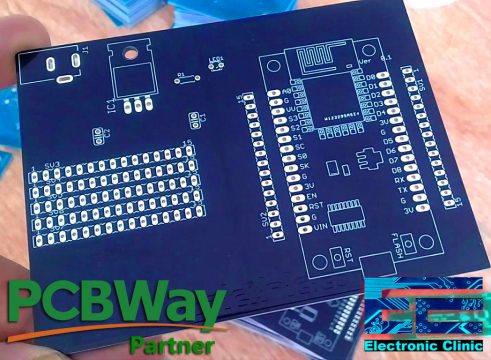
This is how the final PCB board looks like. This PCB is manufactured by the PCBway Company. As you can see the quality is really great, the silkscreen is quite clear and the black solder mask looks amazing. I am 100% satisfied with their work. The download link of the Gerber files is give above.
Then I completed the soldering and double checked all the connections for any short circuits.
After the testing, then I checked the board with the simple led program to confirm my hardware works. When I was completely satisfied with the hardware. Then, finally, I interfaced the Ultrasonic Sensor with the Nodemcu ESP8266 as per the circuit diagram already explained.
Our IoT Based Flood Monitoring System Hardware is ready and now we can start with the programming. The Nodemcu ESP8266 WiFi module can be programmed using the Arduino IDE, but prior to the programming, you will need to install the ESP8266 board.
Programming Nodemcu with Arduino IDE
If you have never used the Nodemcu ESP8266 Wifi Module, then I highly recommend read my article on the Nodemcu ESP8266 which explains the Nodemcu ESP8266 pinout, features, and specifications.
The Nodemcu Development Board can be easily programmed using the Arduino IDE since it is easy to use. Programming Nodemcu with the Arduino IDE will hardly take 10-20 minutes. All you need is the latest version of the Arduino IDE, a USB cable, and the Nodemcu board itself. You can check this Getting Started Tutorial for NodeMCU to prepare your Arduino IDE for Nodemcu. You can also check my getting started tutorial for ESP32 Wifi + Bluetooth Module to prepare your Arduino IDE for the ESP32 module.
NodeMCU Getting Started Tutorials:
If you have never used the Nodemcu ESP8266 Wifi Module, then I highly recommend watching my previous getting started and basics video tutorials explaining how to get started with the Nodemcu ESP8266 Wifi module.
- Nodemcu wifi Module Basics, Board installation, Library, Blynk Application, Usb uart Drive
- Power Supply Designing and making for the Nodemcu
After, I installed the Nodemcu ESP8266 Board, and download the Blynk Library. Then I was ready for the programming. The download link of the libraries used in this project is given below.
IoT based Flood Monitoring System Programming:
|
1 2 3 4 5 6 7 8 9 10 11 12 13 14 15 16 17 18 19 20 21 22 23 24 25 26 27 28 29 30 31 32 33 34 35 36 37 38 39 40 41 42 43 44 45 46 47 48 49 50 51 52 53 54 55 56 57 58 59 60 61 62 63 64 65 66 |
/* Project: IoT Based Flood Monitoring System using Nodemcu ESP8266 and Ultrasonic Sensor Libraries Link: https://www.electroniclinic.com/arduino-libraries-download-and-projects-they-are-used-in-project-codes/ */ #define BLYNK_PRINT Serial #include <ESP8266WiFi.h> #include <BlynkSimpleEsp8266.h> #include <SoftwareSerial.h> #include <SimpleTimer.h> const int trigPin1 = D1; const int echoPin1 = D2; char auth[] = "tXLaDKkJUwVZ_1mr3h5llhvjfIn4Gg0F"; // Your WiFi credentials. // Set password to "" for open networks. char ssid[] = "AndroidAP7DF8"; char pass[] = "jamshaid"; SimpleTimer timer; unsigned long startMillis; unsigned long currentMillis; const unsigned long period = 1000; // 1 seconds long duration1; int distance1; void setup() { pinMode(trigPin1, OUTPUT); pinMode(echoPin1, INPUT); Serial.begin(9600); Blynk.begin(auth, ssid, pass); startMillis = millis(); //initial start time } void loop() { digitalWrite(trigPin1, LOW); delayMicroseconds(2); digitalWrite(trigPin1, HIGH); delayMicroseconds(10); digitalWrite(trigPin1, LOW); duration1 = pulseIn(echoPin1, HIGH); distance1 = duration1 * 0.034 / 2; Serial.println(distance1); if (distance1 <= 10) { Blynk.notify("Alert!!! Water Level Exceeded"); } else { } currentMillis = millis(); if (currentMillis - startMillis >= period) { Blynk.virtualWrite(V2, distance1); startMillis = currentMillis; } } |
IoT based Flood Monitoring System Code Explanation:
As usual I started off by adding the necessary libraries.
#define BLYNK_PRINT Serial
#include <ESP8266WiFi.h>
#include <BlynkSimpleEsp8266.h>
#include <SoftwareSerial.h>
#include <SimpleTimer.h>
The Trigger pin and Echo pin of the Ultrasonic Sensor are connected with the Nodemcu ESP8266 D1 and D2 pins respectively.
const int trigPin1 = D1;
const int echoPin1 = D2;
Below is the authentication token generated while making the Blynk application. This authentication token is sent via email.
char auth[] = “tXLaDKkJUwVZ_1mr3h5llhvjfIn4Gg0F”;
// Your WiFi credentials.
// Set password to “” for open networks.
char ssid[] = “AndroidAP7DF8”; // router name
char pass[] = “electroniclinic”; // password
SimpleTimer timer;
unsigned long startMillis;
unsigned long currentMillis;
const unsigned long period = 1000; // 1 seconds
the period is 1000 which is equal to 1 second. This is used to control the time, how frequently you want to send data to the blynk application. With the 1000 the ultrasonic sensor distance value is sent after every 1 second. you can change this period. If you want to send the distance value after every 5 seconds the make the period equal to 5000.
The following two variables are used to store the duration and distance values.
long duration1;
int distance1;
void setup()
{
pinMode(trigPin1, OUTPUT);
pinMode(echoPin1, INPUT);
Serial.begin(9600);
Blynk.begin(auth, ssid, pass);
startMillis = millis(); //initial start time
}
void loop()
{
digitalWrite(trigPin1, LOW);
delayMicroseconds(2);
digitalWrite(trigPin1, HIGH);
delayMicroseconds(10);
digitalWrite(trigPin1, LOW);
duration1 = pulseIn(echoPin1, HIGH);
distance1 = duration1 * 0.034 / 2;
Serial.println(distance1);
The following condition is used to send a notification message when the water level increases, the distance is reduced as the water level increases. When this the level is less than or equal to 10, it will send the alert, that the water level is exceeded.
if (distance1 <= 10)
{
Blynk.notify(“Alert!!! Water Level Exceeded”);
}
else
{
}
currentMillis = millis();
if (currentMillis – startMillis >= period)
{
Blynk.virtualWrite(V2, distance1);
startMillis = currentMillis;
}
}
I uploaded the code, and performed some tests. I was able to monitor the values on the serial monitor. For the testing, I placed an object in front of the Ultrasonic Sensor, changed the distance and I was able to get the distance values.
After, successfully running the code, then I started making the blynk application. Follow the same exact steps.
Note: this old version of the Blynk app is no more functional. For the blynk mobile App setup and Blynk.cloud dashboard setup ready my article on the New Blynk V2.0. In this article I have explained how to migrate your projects from Blynk 1.0 to the new Blynk V2.0. You can also watch the video.
Blynk application designing for IoT Flood Monitoring System:
Make sure, you have downloaded and installed the Blynk application.
- First of all, open the blynk
- Click on the new project and enter the project name as “IoT Flood Monitoring”. If you want you can select any other name. Later you can also modify the name.
- Click on the choose device and select Nodemcu.
- Make sure the connection type is set to WIFI.
- Finally, click on the create button, an authentication token will be sent on your email id, which later will be used in the Nodemcu programming.
- Now, click anywhere on the screen and search for the Level V Widget and add it. Now click on the Level V widget, enter the name as the Water Level, Select V2 as the input, select the limits as per your requirements.
- Now, click anywhere on the screen and search for the Value Display widget and add it to the screen. Now click on the Value Display Widget and select V2 as the input.
- Now, go back to the main screen, click on the screen and search for the notification widget and add it. Click on the notification widget, this will open the notification widget settings. Complete the settings as per the image given below.
The Blynk application should look something like this,
After I was done with the IoT based Flood Monitoring Blynk application designing. I powered up my hardware, and pressed the play button on the Blynk application. I kept moving my hand in front of the Ultrasonic Sensor and I was able to monitor the distance value and I was also able to receive the notification messages.
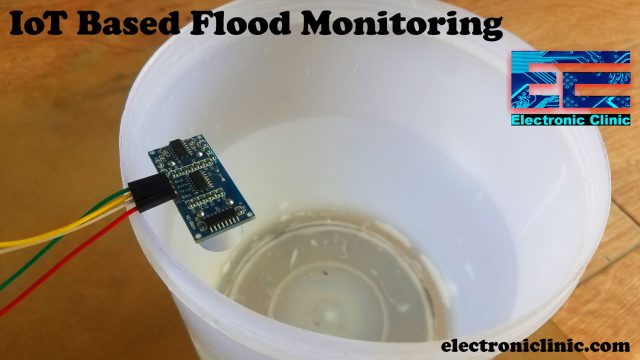
For the final testing of my project “IoT based Flood Monitoring System”, I fixed the Ultrasonic Sensor on top of the Plastic Bucket containing the Water.
I powered up my circuit using a 12V Adaptor and opened my Blynk application and pressed the Play button. While my IoT based Flood monitoring application was connected with the Nodemcu ESP8266, I started adding the water, to increase the water level. I could monitor the water level in real time, I continued add the water till I received the notification. You can see this in the picture given below.
In the first image you can see the level was 16, then 13, then 11, and when reduced below 10 it generated the Alert. I tested this project many times and it worked perfectly. I hope you have learned something new from this project. If you have any questions regarding this project, let me know in a comment.


