IoT CNC Shield, Nodemcu CNC shield, ESP8266 CNC Shield, Mobile CNC Shield
Table of Contents
IoT CNC Shield:
IoT CNC Shield– In my previous tutorial “Arduino CNC Shield V3.0 and A4988 Hybrid Stepper Motor Driver + Joystick” I used the CNC shield with Arduino and covered the maximum basic things including the technical specifications and how to use the male headers and how to use the CNC shield in custom made projects. If you are a beginner and you have never used the CNC shield then I highly recommend read my previous article which also explains how to control the speed and direction of the stepper motor automatically and then how to use a joystick to control a stepper motor.
In this tutorial, we will control the same CNC shield using the Nodemcu ESP8266 Wifi Module this way the two Hybrid Stepper motors can be controlled from anywhere around the world using the Blynk application. You will learn a lot of new things in this tutorial, like for example, how to control the speed and limits of the stepper motor using the sliders, how to manually adjust the starting position of the stepper motor using a potentiometer, and how to control a stepper motor using the Joystick on the blynk application.
Before I am going to explain the circuit diagram and programming, first let me explain how this project works, so that you know exactly what we are going to make.
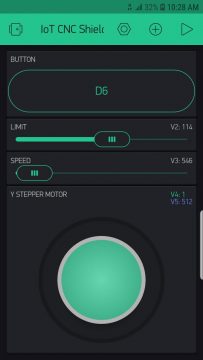
This button labeled with D6 is used to switch between the two stepper motors. When this button is turned off then you can manually control the Y stepper motor using the Joystick there are no limits you can infinitely rotate the stepper motor in forward direction and in the reverse direction.
While the button is turned OFF, you can also set the starting position of the X stepper motor using the potentiometer or variable resistor. This technique can be used in some cool advanced level projects.
When you are done with the adjustments, finally, you can turn ON the button, this will activate the X stepper motor. Now these two sliders “LIMIT and SPEED” can be used to adjust the limit and speed of the stepper motor. You can change the speed and limits in real time.
In this tutorial I will not explain the things which I have already explained in my previous tutorial. In this video I will only explain the circuit diagram, blynk application designing, and programming.
Without any further delay let’s get started!!!
Note: for the step by step explanation and practical demonstration watch video given at the end of this article.
Amazon Links:
24BYJ48 5V DC unipolar stepper motor:
Other Tools and Components:
Super Starter kit for Beginners
PCB small portable drill machines
*Please Note: These are affiliate links. I may make a commission if you buy the components through these links. I would appreciate your support in this way!
IoT CNC Shield Circuit Diagram:
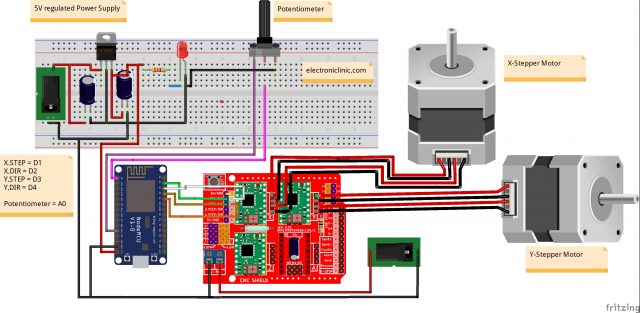
The X stepper motor, Y stepper motor, and the External Power Supply connections remains the same as I explained in my previous tutorial “Arduino CNC Shield V3.0 and A4988 Hybrid Stepper Motor Driver + Joystick”. This time I added the Nodemcu ESP8266 Wifi module, a 5V regulated Power Supply and a potentiometer.
So first let’s start with the 5V regulated power supply based on the LM7805 Voltage regulator. The positive and GND pins of the DC female power jack are connected with the input and middle legs of the 7805 voltage regulator. Two 470uf capacitors are connected at the input and output sides of the voltage regulator. A 330 ohm resistor is connected in series with a 2.5V LED. This is a current limiting resistor. A wire from the output of the voltage regulator is connected with the Vin pin of the Nodemcu ESP8266 Wifi module while the ground of the power supply is connected with the ground pin of the Nodemcu module and also with the ground pin of the CNC shield.
The right and left legs of the potentiometer are connected with the Nodemcu 3.3V and GND pins, while the middle leg of the potentiometer is connected with the analog pin A0 of the Nodemcu module. As I said earlier this potentiometer is used for manually adjusting the starting position of the X stepper motor.
The X.STEP pin of the CNC shield is connected with the digital pin D1 of the Nodemcu Module. X.DIR pin of the CNC Shield is connected with the digital pin D2 of the Nodemcu ESP8266 Wifi module.
The Y.STEP pin of the CNC Shield is connected with the digital pin D3 of the Nodemcu Module.
The Y.DIR pin of the CNC Shield is connected with the digital pin D4 of the Nodemcu ESP8266 Wifi Module.
Finally, to enable the CNC Shield short the EN and GND pins using a jumper camp or female to female type jumper wire. So, that’s all about the circuit connections of the IoT CNC Shield, based on the Nodemcu ESP8266 Wifi module, A4988 stepper motor drivers, and Hybrid Stepper motors.
About the Nodemcu ESP8266 Power Supply PCB board:
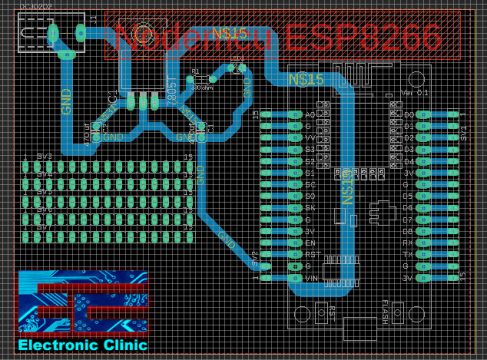
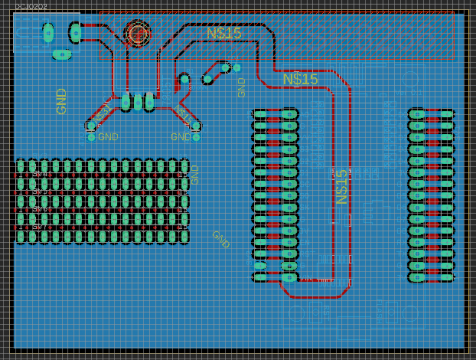
To reduce the wiring, and to make everything look good, I designed my own PCB board for the Nodemcu ESP8266 Wifi module using the CadeSoft Eagle PCB designing software.
After I completed the PCB design, then I sent my PCB board Gerber files to the PCBWay Company for making High-Quality PCB’s. If you don’t know how to generate the Gerber files then watch my video given below.
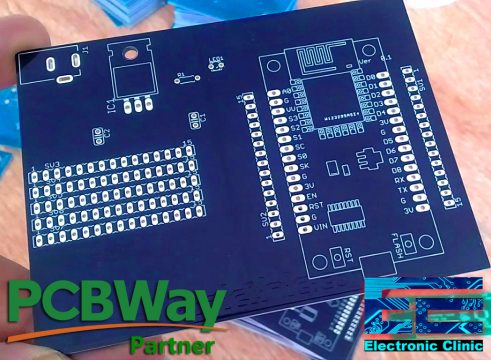
High quality & Only 24 Hours Build time
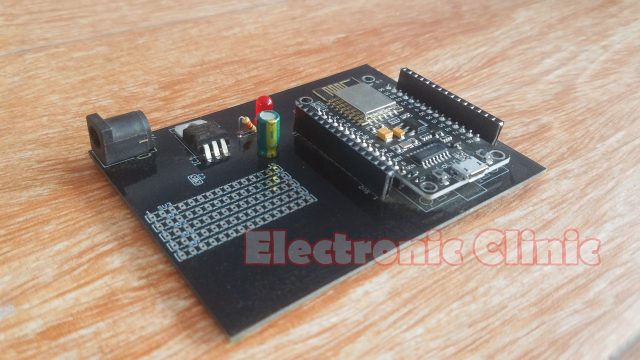
This PCB is sponsored and manufactured by the PCBway Company, which is one of the most experienced PCB and PCB assembly manufacturer. They create high-quality PCBs at reasonable prices, Only 5 dollars for 10 PCBs and 30 dollars in total for 20 PCBs assembly; besides this the new members also get a 5 Dollars bonus. As you can see the quality is really great, the silkscreen is quite clear and the black solder mask looks amazing. I am 100% satisfied with their work.
Download link of the Nodemcu library for Cadsoft eagle:
This is how the Nodemcu ESP8266 Wifi Module Breakout board looks after soldering.
Finally, I connected everything as per the circuit diagram already explained.
Now, let’s make the Blynk application. Follow the same exact steps given below, or you can watch a video tutorial available at the end of this article.
Note: this old version of the Blynk app is no more functional. For the blynk mobile App setup and Blynk.cloud dashboard setup ready my article on the New Blynk V2.0. In this article I have explained how to migrate your projects from Blynk 1.0 to the new Blynk V2.0. You can also watch the video.
IoT CNC Shield Blynk Application Designing:
I always first start with the Blynk application designing, this way I know which digital and virtual pins I have to use in the programming. Moreover this also helps me in checking my code, as I keep testing my project. Make sure you have downloaded and installed the Blynk application.
- First of all open the blynk application.
- Click on the new project and enter the project name as “IoT CNC Shield”. If you want you can select any other name. Later you can also modify the name.
- Click on the choose device and select Nodemcu.
- Make sure the connection type is set to WIFI.
- Finally, click on the create button, an authentication token will be sent on your email id, which later will be used in the Nodemcu programming.
- Click anywhere on the screen and search for the button and add it. Now, click on the button, change the name or leave it as it is. Click on the output and select digital pin D6. Select the button mode as the switch and finally you can change the font size. Do settings as per the picture given below.
- Once you are done with the button settings, you can go back and click on the screen again.
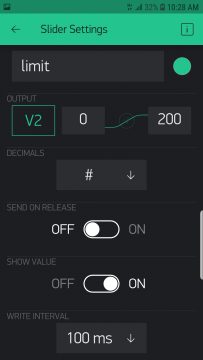
- This time search for the Slider and add it. Now, click on the slider and change the name to limit. Click on the output and select virtual pin V2. Select the minimum value as 0 and the maximum value of 200. As for one complete revolution we need 200 steps. Now off the send on release button, while keeping the show value button ON. Select 100ms as the write interval. Do the settings as per the following picture.
- Once you are done with the Slider settings you can go back to the home screen.
- Click on the screen and again search for the slider and add it. Click on the screen, set the name as speed, select the virtual pin V3. Select the minimum and maximum values as 400 and 3000. Don’t use values greater than 3500 otherwise the Nodemcu module will disconnects. The other settings remains the same as we did for the limit Slider.
- After you are done with the Slider settings for the speed.
- Click on the screen and this time search for the joystick widget and add it.
- Click on the joystick. Set the name is Y Stepper Motor. Make sure the output is set to SPLIT. Select Virtual pins V4 and V5, while keeping the minimum and maximum to the default values of 0 and 1023. Keep the autoreturn ON and rotate on tilt OFF, and finally select 100ms as the write interval.
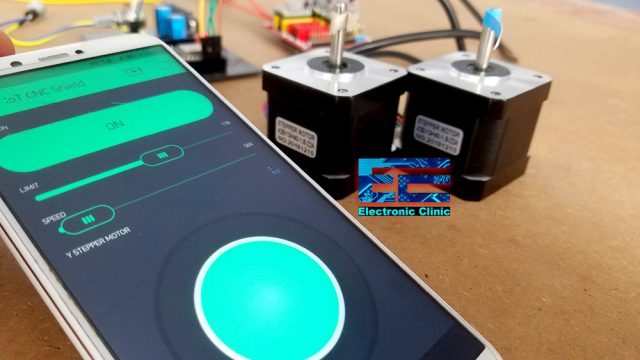
We are done with the app designing for the IoT CNC Shield. Your application should look something like this.
After, making the Blynk application, now we know exactly which pins we have to use in the programming. Now, we are ready for the Nodemcu programming. But fore you start the programming first of all make sure you download all the necessary libraries by clicking on the download libraries button given below.
IoT CNC Shield Nodemcu ESP8266 Programming:
|
1 2 3 4 5 6 7 8 9 10 11 12 13 14 15 16 17 18 19 20 21 22 23 24 25 26 27 28 29 30 31 32 33 34 35 36 37 38 39 40 41 42 43 44 45 46 47 48 49 50 51 52 53 54 55 56 57 58 59 60 61 62 63 64 65 66 67 68 69 70 71 72 73 74 75 76 77 78 79 80 81 82 83 84 85 86 87 88 89 90 91 92 93 94 95 96 97 98 99 100 101 102 103 104 105 106 107 108 109 110 111 112 113 114 115 116 117 118 119 120 121 122 123 124 125 126 127 128 129 130 131 132 133 134 135 136 137 138 139 140 141 142 143 144 145 146 147 148 149 150 151 152 153 154 155 156 157 158 159 160 161 162 163 164 165 166 167 168 169 170 171 172 173 174 175 176 177 178 179 180 |
/* * X.step = D1 * X.DIR = D2 * Y.Step = D3 * Y.DIR = D4 * https://www.electroniclinic.com/ */ #define BLYNK_PRINT Serial #include <ESP8266WiFi.h> #include <BlynkSimpleEsp8266.h> #include <SoftwareSerial.h> #include <SimpleTimer.h> char auth[] = "Yz558gb7lZmylfta71ZrxtszvVFPWgYT"; // Your WiFi credentials. // Set password to "" for open networks. char ssid[] = "ZONG MBB-E8231-6E63"; char pass[] = "08659650"; // X Stepper Motor int XstepPin = D1; int XdirPin = D2; int limitx = 200; // X stepper motor limit int speedx = 500; // Y Stepper Motor int YstepPin = D3; int YdirPin = D4; int speedy = 500; int Movey = 512; // value from blynk joystick "default value" // Manual control X stepper motor int vresistor = A0; int vrdata = 0; SimpleTimer timer; int pinValue1; int pinValue2; int pinValue3; int pinValue4; int firstVal, secondVal,thirdVal; // sensors // This function sends Arduino's up time every second to Virtual Pin (1). // In the app, Widget's reading frequency should be set to PUSH. This means // that you define how often to send data to Blynk App. void myTimerEvent() { // You can send any value at any time. // Please don't send more that 10 values per second. Blynk.virtualWrite(V1, millis() / 1000); } void setup() { // Debug console Serial.begin(9600); Blynk.begin(auth, ssid, pass); pinMode(XstepPin,OUTPUT); pinMode(XdirPin, OUTPUT); pinMode(YstepPin,OUTPUT); pinMode(YdirPin, OUTPUT); pinMode(vresistor, INPUT); timer.setInterval(4000L, StepperMotor); timer.setInterval(300L, StepperMotorY); } void loop() { timer.run(); // Initiates SimpleTimer Blynk.run(); } // From Blynk application to Nodemcu ESP8266 // in Blynk app writes values to the Virtual Pin V2 BLYNK_WRITE(V2) // X stepper Motor limits { pinValue1 = param.asInt(); // assigning incoming value from pin V2 to a variable limitx = pinValue1; } BLYNK_WRITE(V3) // X stepper Motor Speed { pinValue2 = param.asInt(); speedx = pinValue2; } BLYNK_WRITE(V5) // Y Stepper motor control { pinValue3 = param.asInt(); Movey = pinValue3; } void StepperMotor() { if( digitalRead(D6) == 1 ) { digitalWrite(XdirPin,HIGH); // Enables the motor to move in a particular direction for(int x = 0; x < limitx; x++) { digitalWrite(XstepPin,HIGH); delayMicroseconds(speedx); digitalWrite(XstepPin,LOW); delayMicroseconds(speedx); } delay(500); // half second delay digitalWrite(XdirPin,LOW); //Changes the rotations direction for(int x = 0; x < limitx; x++) { digitalWrite(XstepPin,HIGH); delayMicroseconds(speedx); digitalWrite(XstepPin,LOW); delayMicroseconds(speedx); } delay(500); } } void StepperMotorY() { if( digitalRead(D6) == 0 ) { vrdata = analogRead(vresistor); if ( vrdata < 100 ) { digitalWrite(XdirPin,LOW); digitalWrite(XstepPin,HIGH); delayMicroseconds(speedx); digitalWrite(XstepPin,LOW); delayMicroseconds(speedx); } if ( vrdata > 900 ) { digitalWrite(XdirPin,HIGH); digitalWrite(XstepPin,HIGH); delayMicroseconds(speedx); digitalWrite(XstepPin,LOW); delayMicroseconds(speedx); } if ( Movey > 512 ) { digitalWrite(YdirPin,HIGH); // Enables the motor to move in a particular direction digitalWrite(YstepPin,HIGH); delayMicroseconds(speedy); digitalWrite(YstepPin,LOW); delayMicroseconds(speedy); } if ( Movey < 512 ) { digitalWrite(YdirPin,LOW); // Enables the motor to move in a particular direction digitalWrite(YstepPin,HIGH); delayMicroseconds(speedy); digitalWrite(YstepPin,LOW); delayMicroseconds(speedy); } } } |
IoT CNC Shield Nodemcu ESP8266 Code Explanation:
/*
* X.step = D1
* X.DIR = D2
* Y.Step = D3
* Y.DIR = D4
*/
The X.STEP pin of the CNC Shield is connected with the digital pin D1 of the Nodemcu Module.
The X.DIR pin of the CNC Shield is connected with the digital pin D2 of the Nodemcu Module.
Y.STEP pin of the CNC Shield module is connected with the digital pin D3 of the Nodemcu ESP8266 Wifi module.
Y.DIR pin of the CNC Shield module is connected with the digital pin D4 of the Nodemcu ESP8266 Wifi module.
#define BLYNK_PRINT Serial
#include <ESP8266WiFi.h>
#include <BlynkSimpleEsp8266.h>
#include <SoftwareSerial.h>
#include <SimpleTimer.h>
These are the necessary libraries, the download link is already given above.
char auth[] = “Yz558gb7lZmylfta71ZrxtszvVFPWgYT”;
This is the authentication token which was sent via email while making the blynk application. I simply copied and paste it over here.
char ssid[] = “ZONG MBB-E8231-6E63”;
This is the name of the Wifi router.
char pass[] = “08659650”;
this is the password of the Wifi router.
// X Stepper Motor
int XstepPin = D1;
int XdirPin = D2;
int limitx = 200; // X stepper motor limit
int speedx = 500;
Then I defined pins for the X Stepper Motor. The limitx and speedx variable used to set the limit and speed. The default values are 200 and 500. These values can be then changed in real time using the Blynk application.
// Y Stepper Motor
int YstepPin = D3;
int YdirPin = D4;
int speedy = 500;
int Movey = 512; // value from blynk joystick “default value”
Then I defined pins for the Y Stepper Motor. The speedy variable is used to set the speed of the Y Stepper motor, this value will remain the same. The Movey variable is used to store the value sent from the joystick widget.
// Manual control X stepper motor
int vresistor = A0;
int vrdata = 0;
SimpleTimer timer;
A variable resistor is connected with the Analog pin A0 of the Nodemcu Module. I also defined a variable vrdata of the type integer for storing the variable resistor value, then I defined a timer.
int pinValue1;
int pinValue2;
int pinValue3;
int pinValue4;
These four variables are used to store the values sent from the blynk application. These are the values coming from the sliders and joystick.
void setup()
{
// Debug console
Serial.begin(9600);
Blynk.begin(auth, ssid, pass);
pinMode(XstepPin,OUTPUT);
pinMode(XdirPin, OUTPUT);
pinMode(YstepPin,OUTPUT);
pinMode(YdirPin, OUTPUT);
pinMode(vresistor, INPUT);
timer.setInterval(4000L, StepperMotor);
timer.setInterval(300L, StepperMotorY);
}
In the void setup() function. I activated the serial communication for the debugging purposes and then using the pinMode() function, I set the Xstep, Xdir, Ystep, and Ydir as the output and the vresistor as the input. StepperMotor and StepperMotorY are the two user-defined function which are executed at regular intervals as defined 4000 and 300.
void loop()
{
timer.run(); // Initiates SimpleTimer
Blynk.run();
}
Inside the void loop function as usual we have only two functions which are the timer.run() and Blynk.run() functions. Do not add other codes and functions inside the loop() function, otherwise your Nodemcu module will keep resetting.
BLYNK_WRITE(V2) // X stepper Motor limits
{
pinValue1 = param.asInt(); // assigning incoming value from pin V2 to a variable
limitx = pinValue1;
}
The stepper motor limit value coming from the slider through the virtual pin V2 is stored in the pinValue1 which is then stored in the limitx variable.
BLYNK_WRITE(V3) // X stepper Motor Speed
{
pinValue2 = param.asInt(); // assigning incoming value from pin V2 to a variable
speedx = pinValue2;
}
Similar mechanism is used for the speed slider. This value is stored in the variable speedx.
BLYNK_WRITE(V5) // Y Stepper motor control
{
pinValue3 = param.asInt();
Movey = pinValue3;
}
The joystick value is stored in the variable Movey.
void StepperMotor()
{
if( digitalRead(D6) == 1 )
{
digitalWrite(XdirPin,HIGH); // Enables the motor to move in a particular direction
for(int x = 0; x < limitx; x++) {
digitalWrite(XstepPin,HIGH);
delayMicroseconds(speedx);
digitalWrite(XstepPin,LOW);
delayMicroseconds(speedx);
}
delay(500); // half second delay
digitalWrite(XdirPin,LOW); //Changes the rotations direction
for(int x = 0; x < limitx; x++) {
digitalWrite(XstepPin,HIGH);
delayMicroseconds(speedx);
digitalWrite(XstepPin,LOW);
delayMicroseconds(speedx);
}
delay(500);
}
}
The StepperMotor() function is a user defined function. The purpose of this function is to rotate the stepper motor within the specified limits at a specific speed. This code is executed only if the button on the Blynk app is turned ON.
The stepperMotorY() function is also a user-defined function. The purpose of this function is to manually adjust the start position of the X stepper Motor using the variable resistor or potentiometer; and also to control the Y Stepper motor using the on screen Blynk application Joystick. This code is only functional if the button on the Blynk application is turned off.
So, that’s all about the programming.
Finally, In the end, I uploaded the program and I successfully controlled the two Hybrid stepper Motors using the Blynk application. For the step by step explanation and practical demonstration watch video tutorial given below.
Don’t forget to like, share, and subscribe. If you have any questions regarding this project or any other project, let me know in a comment.
Watch Video Tutorial:






i’m getting this error code how to solve it?. D1′ was not declared in this scope
How’s to setting in IoT Blynk(new Blynk Version) ?