MLX90614 Infrared Temperature Sensor with Arduino, Circuit Diagram and Programming
Last Updated on August 17, 2024 by Engr. Shahzada Fahad
Table of Contents
MLX90614 Arduino, Description:
MLX90614 Non-Contact Infrared Temperature Sensor with Arduino– In this article, you will learn how to use the MLX90614 Non-Contact Infrared Temperature Sensor with Arduino. I have been using different temperature sensor “DHT11, DS18B20, LM35, Thermistors, MAX6675 Thermocouple, etc” with Arduino, ESP32, and Nodemcu ESP8266 for quite a long time. The MLX90614 Infrared Temperature sensor is quite different from the rest of the sensors, as it needs to physical contact with the object to measure the temperature.
As I am using this sensor for the first time, so I will cover the extreme basics including the MLX90614 Library downloading, MLX90614 basic connection with Arduino, and then how to write a very basic program to display the temperature on the Serial Monitor.
After cover the very basic things, then I will display the temperature on a display. Without any further delay, let’s get started!!!
Amazon Purchase Links:
Arduino Nano USB-C Type (Recommended)
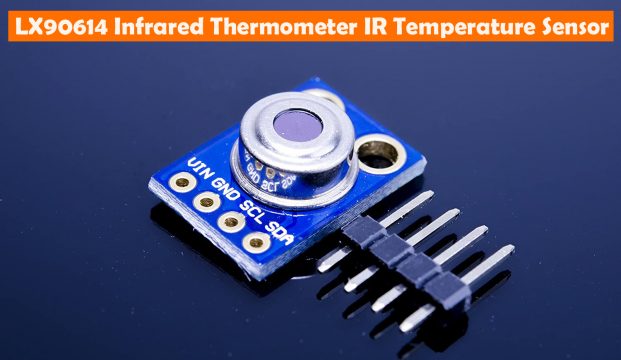
MLX90614 Infrared Temperature Sensor for Arduino
SSD1306 128×64 Oled i2c display Module
*Disclosure: These are affiliate links. As an Amazon Associate I earn from qualifying purchases.
MLX90614 Pinout and Technical Specifications:
- Read temperature without touching the object you’re measuring with the MLX90614 Infrared (IR) Thermometer Sensor
- Connect the two-wire interface (I2C) to your Arduino, ESP8266, ESP32, Raspberry Pi, etc.
- Supply voltage range is 4.5~5.5VDC
- MLX90614 includes a low noise amplifier, a 17-bit ADC, and a powerful DSP module in a TO-39 through-hole package
This breakout board provides a convenient way to start using the fantastic MLX90614 module, a high precision, small size, single-zone IR thermometer (temperature sensor)!
Want to read temperature without touching the object you’re measuring? Then the MLX90614 IR Thermometer is the sensor for you! By detecting the InfraRed (IR) light emitted by an object, The MLX90614 can read temperatures between –95 and 720ºF (–70 and 382.2°C) with a whopping 17-bit resolution. That’s 128 times more precise than the ADC on the ATmega328 microcontroller onboard an Arduino UNO, and implies that the MLX90614 infrared temperature sensor can distinguish temperatures between 25ºC and 25.02ºC without even coming in contact with the object!
This breakout board makes it easy to connect this sensor to your microcontroller board or single-board computer such as Arduino, ESP8266, ESP32, BeagleBone or Raspberry Pi! The four pins correspond to power (VCC, GND) and I2C communication (SDA, SCL). We’ve included in our design pull-up resistors on the I2C lines as customary. They can be disabled, as usual, by using the solder jumpers on the back of the board.
Features and Benefits:
Small size, low cost
Mounted on a breakout board with two types of pins
10k Pull up resistors for the I2C interface with optional solder jumpers
Easy to integrate
Factory calibrated in wide temperature range:
-40…+125°C for sensor temperature and
-70…+380°C for object temperature.
High accuracy of 0.5°C over wide temperature range
(0…+50°C for both Ta and To) High (medical) accuracy calibration
Measurement resolution of 0.02°C
Single and dual zone versions
SMBus compatible digital interface
Customizable PWM output for continuous reading
Simple adaptation for 8…16V applications
Sleep mode for reduced power consumption
Different package options for applications and measurements versatility
Automotive grade
Applications Examples:
High precision non-contact temperature measurements
Thermal Comfort sensor for Mobile AirConditioning control system
Temperature sensing element for residential, commercial and industrial building airconditioning Windshield
defogging
Automotive blind angle detection
Industrial temperature control of moving parts
Temperature control in printers and copiers
Home appliances with temperature control
Healthcare
Livestock monitoring
Movement detection
Multiple zone temperature control – up to 127sensors can be read via common 2 wires
Thermal relay / alert
Body temperature measurement
MLX90614 Interfacing with Arduino, Circuit Diagram:
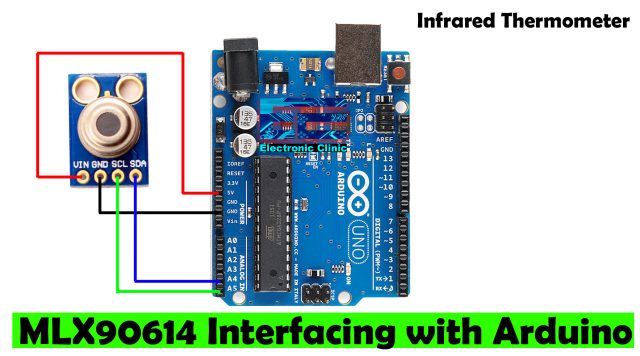
This is the most basic connection diagram of the MLX90614. As the MLX90614 is an I2C supported Infrared Temperature Sensor so it is connected with the I2C bus of the Arduino through A4 and A5 pins. A4 is the SDA and A5 is the SCL. You can clearly see in the circuit diagram above, the SDA and SCL pins of the MLX90614 Infrared Temperature Sensor are connected with the SDA and SCL pins of the Arduino, while the VIN and GND pins of the MLX90614 Non-contact temperature sensor are connected with the Arduino’s 5V and GND.
Before you start the programming first of all make sure you download the Adafruit_MLX90614 library otherwise you won’t be able to compile the program.
MLX90614 Arduino Programming:
|
1 2 3 4 5 6 7 8 9 10 11 12 13 14 15 16 17 18 19 20 21 22 |
/* * MLX90614 Non-contact Infrared Temperature Sensor (Gy-906) with Arduino * https://www.electroniclinic.com/ */ #include <Wire.h> #include <Adafruit_MLX90614.h> Adafruit_MLX90614 mlx = Adafruit_MLX90614(); void setup() { Serial.begin(9600); Serial.println("Arduino MLX90614 Testing"); mlx.begin(); } void loop() { Serial.print("Ambient = "); Serial.print(mlx.readAmbientTempC()); Serial.print("*C\tObject = "); Serial.print(mlx.readObjectTempC()); Serial.println("*C"); Serial.print("Ambient = "); Serial.print(mlx.readAmbientTempF()); Serial.print("*F\tObject = "); Serial.print(mlx.readObjectTempF()); Serial.println("*F"); Serial.println(); delay(500); } |
Testing:
After uploading this program, Open the serial monitor and you should be able to see temperature on the Serial monitor. Let’s take this to another level.
It seems quite impractical to use the Serial monitor at all times. We need to display the temperature on some sort of device. We have different types small size and low cost display modules. You can use the 16×2 LCD or you can also use the Oled Display Module. If you decide to use 16×2 LCD module then you will need more wires, but if you decide to use the I2C supported Oled display module like the SSD1306 then you will need only two wires. As the MLX90614 Infrared Temperature Sensor is an I2C supported device so it’s going to be really amazing if we use the I2C supported Oled display Module.
MLX90614 with Arduino and SSD1306 Oled Display Module:
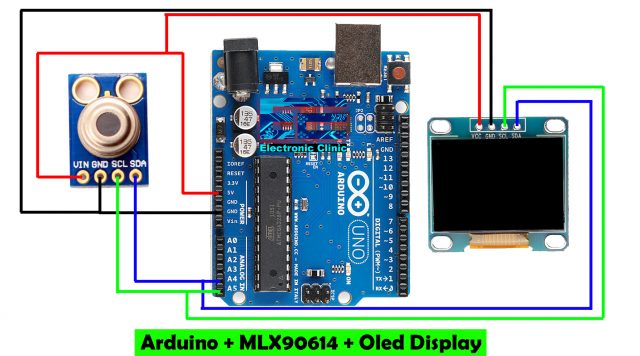
In the circuit diagram, you can clearly see the MLX90614 Non-Contact temperature Sensor connection with the Arduino remain exactly the same. As the MLX90614 and the SSD1306 Oled display Module both are I2C supported, so we can interface both the devices using only two pins the A4 and A5 pins. So, by using only two wires we can communicate with the MLX90614 and the Oled display module isn’t amazing? Of course it is.
You can start by doing temporary connections on the breadboard or you solder everything on a Vero Board or a PCB. Next, you can 3d print an enclosure to make a portable thermometer and then you can easily use this for measuring the temperature. You can power up all the electronics using a small battery. One more thing that I would like to say is, if you want to reduce the size then go for the Arduino Nano. The same code will work with the Arduino Nano as well.
MLX90614 and ssd1306 Oled Arduino Code:
|
1 2 3 4 5 6 7 8 9 10 11 12 13 14 15 16 17 18 19 20 21 22 23 24 25 26 27 28 29 30 31 32 33 34 35 36 37 38 39 40 41 42 43 44 45 46 47 48 49 50 51 52 53 54 55 56 57 58 59 60 61 |
/* * MLX90614 Infrared Temperature Sensor and SSD1306 Oled display Module with Arduino * Non-Contact Thermometer */ #include <Adafruit_GFX.h> #include <Adafruit_SSD1306.h> #include <Adafruit_MLX90614.h> // For the SSD1306 I2C supported Oled Display Module #define SCREEN_WIDTH 128 // OLED display width, in pixels #define SCREEN_HEIGHT 64 // OLED display height, in pixels #define OLED_RESET -1 // Reset pin # (or -1 if sharing Arduino reset pin) Adafruit_SSD1306 display(SCREEN_WIDTH, SCREEN_HEIGHT, &Wire, OLED_RESET); Adafruit_MLX90614 mlx = Adafruit_MLX90614(); double temp_amb; double temp_obj; void setup() { Serial.begin(9600); mlx.begin(); //Initialize MLX90614 display.begin(SSD1306_SWITCHCAPVCC, 0x3C); //initialize with the I2C addr 0x3C (128x64) Serial.println("MLX90614 Infrared Temperature and Oled display with Arduino"); display.clearDisplay(); display.setCursor(25,15); display.setTextSize(1); display.setTextColor(WHITE); display.println("Temp Monitor:"); display.setCursor(25,35); display.setTextSize(1); display.print("Initializing"); display.display(); delay(5000); } void loop() { temp_amb = mlx.readAmbientTempC(); temp_obj = mlx.readObjectTempC(); display.clearDisplay(); display.setCursor(25,10); display.setTextSize(1); display.setTextColor(WHITE); display.println("Temp:"); display.setCursor(25,30); display.setTextSize(2); display.print(temp_obj); display.print((char)247); display.print("C"); display.display(); delay(1000); } |
Discover more from Electronic Clinic
Subscribe to get the latest posts sent to your email.


Thank you very much . Really helped me on a project, I was using u8g2 to drive the OLED and it was conflicting with the MLX90614, Your code helped me a lot
Its not calculating body temp correctly. shows 32 C on the screen. its wrong. is there a way to calibration?