NRF24L01 Wireless Industrial Temperature Monitoring System using Arduino & Max6675
Table of Contents
NRF24L01 Wireless Temp Monitor:
Using the NRF24L01 transceiver modules you can monitor and control different processes.
You can either use a pair of the long-range NRF24L01 PA + LNA transceiver modules, or you can use a pair of the short-range NRF24L01 Transceiver modules. You can also make a pair by using the NRF24L01 PA+LNA with the regular small size NRF24L01 transceiver module.
In my tutorial, I used a pair of the long-range NRF24LO1 PA+LNA transceiver modules for controlling the RC Jet Plane. I was able to control the up-down and left-right movement of the RC plane. I was also able to control the speed of the Brushless DC motor.
So in this tutorial, I am going to use the small NRF24L01module as the transmitter and I will use the NRF24L01 PA + LNA as the receiver.
About the Sponsor, PCBWay:
High quality & Only 24 Hours Build time
The PCB board used in this project is sponsored by the PCBWay Company. Only 5 dollars for 10 PCBs and 30 dollars in total for 20 PCBs Assembly. Besides this PCBWay also provides a great variety of services including Aluminum PCB, Rigid-Flex, Metal Core, flexible, High Frequency, High-TG, Thick-Copper, HDI, and LED PCBs. The signup process hardly takes 1 minute and you are welcomed with a 5 dollars welcome bonus, what are you waiting for go and get your first prototype order for free.
Download Gerber files:
In this tutorial, you will learn how to make a long-range Wireless industrial Temperature monitoring system using Arduino Nano, NRF24L01 Transceiver modules, Industrial temperature sensor capable of measuring the temperature up to 1000 Centigrade, and an I2C supported Oled display Module.
If for any reason the transmitter is turned OFF or the transmitter is not in the range, then connection lost will be printed on the Oled display Module. There is a timer that monitors the data, so if the data is not received for 1 second, the connection lost will be printed. Then you can go ahead and check your transmitter side.
You can also use the smaller NRF24L01 Transceiver module on the receiver side. So it really doesn’t matter whether you are using the smaller NRF24LO1 modules or the bigger ones. If you are using the NRF transceiver modules for the first time then I recommend you should start with the smaller NRF24LO1 Transceiver modules.
So, this is the wireless Industrial temperature monitoring system which is very easy to build, and if you watch this video from start to the very end, I am sure in the end you will be able to add multiple sensors on the transmitter side. This way you can make some advanced level projects.
If you are using the NRF24LO1 Transceiver modules for the first time, then I highly recommend reading my getting started tutorial on the NRF24LO1 and Arduino. Because in this tutorial, I covered the NRF24LO1 Pinout and technical specifications. I also explained different Arduino codes.
Without any further delay, let’s get started!!!
Amazon Purchase Links:
Arduino Nano USB-C Type (Recommended)
MAX6675 k type thermocouple and driver:
SSD1306 128×64 Oled i2c display Module
Other Tools and Components:
ESP32 WiFi + Bluetooth Module (Recommended)
Super Starter kit for Beginners
PCB small portable drill machines
*Please Note: These are affiliate links. I may make a commission if you buy the components through these links. I would appreciate your support in this way!
NRF24L01 Interfacing with Arduino, Circuit Diagram:
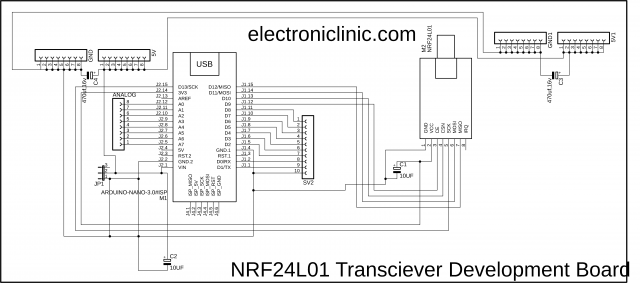
These connections are the same for both the transmitter and receiver sides. I added female headers on the left and right sides of the Arduino Nano for the 5v and GND connections. I also added headers for the Analog pins and the remaining digital and PWM pins. I added these male headers for connecting to the external 5v power supply. I also added 4 decoupling capacitors to further ensure the smooth operation. So, these connections are exactly the same for both the transmitter and receiver. Now let’s take a look at the transmitter circuit.
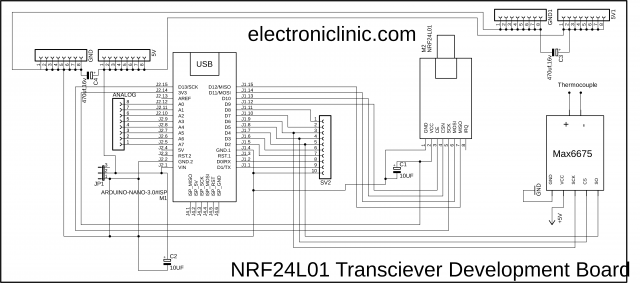
As you can see all the connections remains exactly the same, this time I added the MAX6675 to which a thermocouple “a temperature Sensor” is connected. The SO, CS, and SCK pins of the MAX6675 are connected with the Arduino pins 4, 5, and 6. While the VCC and GND pins are connected with the Arduino’s 5V and GND. So, this is the transmitter side. Now let’s take a look at the receiver side circuit diagram.
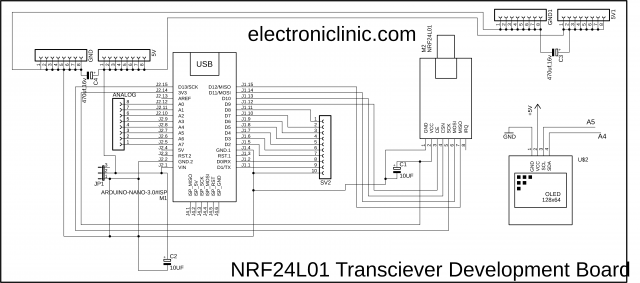
As you can see all the connections remains exactly the same, this time I added the SSD1306 Oled display module. This is an I2C supported display module. The SCL and SDA pins of the Oled display module are connected with the Arduino’s analog pins A5 and A4. A5 is the SCL and A4 is the SDA. The VCC and GND pins are connected with the Arduino’s 5V and GND.
PCB designing:
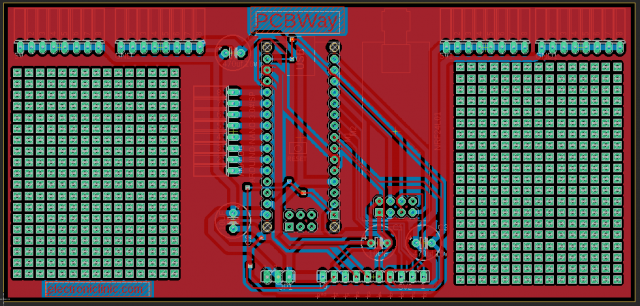
I performed some basic experiments to confirm all the connections and when I was 100% satisfied I designed a PCB using the Cadsoft eagle schematic and PCB designing software.
I added these extra holes on the left and right sides, so this way you can solder other electronic components. I double-checked all the connections and once satisfied, I generated the Gerber files.
Using the PCBWay Online Gerber Viewer:
For checking the generated Gerber files I used the PCBWay online Gerber viewer. After checking the top, bottom, and all the layers. Then finally, I uploaded the Gerber files and placed an online order on the PCBWay official Website.
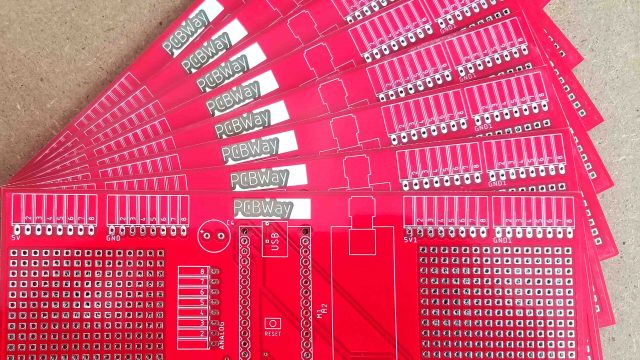
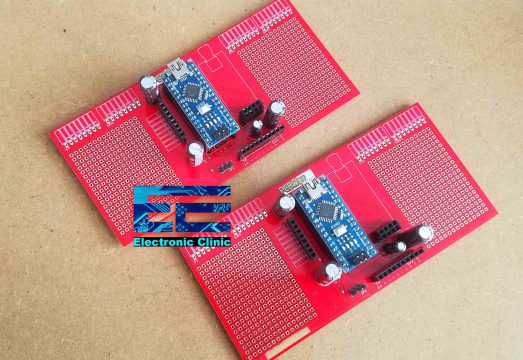
These are the PCBs I received from the PCBWay. As you can see the Quality is really great. The silkscreen is quite clear and the Red color solder mask looks amazing. The next step was to start the soldering. I carefully soldered all the components and double-checked all the connections. I also checked short circuits using a digital multimeter.
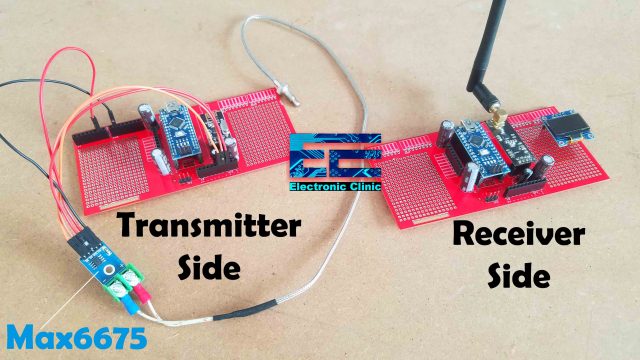
This is how both the circuits looks after soldering. You can use any of these as the Transmitter or receiver. Now, I can solder female headers for the I2C supported Oled display module with any of the two circuits, which later than I can use as the receiver. While with the transmitter side I will connect the MAX6675 and the thermocouple “Temperature Sensor”.
The SO, CS, and SCK pins of the MAX6675 are connected with the Arduino pins 4, 5, and 6. While the VCC and GND pins are connected with the Arduino’s 5V and GND. I have already explained the connections in the circuit diagram given above.
NRF24L01 based Wireless Industrial Temperature Monitoring Arduino Programming:
The NRF24L01 based Wireless Industrial Temperature monitoring system is based on two programs, one program is written for the transmitter side while the other program is written for the receiver side. As usual, before you start the programming, first of all, make sure you download all the necessary libraries.
NRF24L01 Arduino Transmitter side code:
|
1 2 3 4 5 6 7 8 9 10 11 12 13 14 15 16 17 18 19 20 21 22 23 24 25 26 27 28 29 30 31 32 33 34 35 36 37 38 39 40 41 42 43 44 45 46 47 48 49 50 51 52 53 54 55 56 57 58 59 60 61 62 63 64 65 66 67 68 |
//Transmitter coding for the nrf24L01 radio transceiver. //NRF24L01 and Arduino based Wireless Industrial Temperature Monitoring System //https://www.electroniclinic.com/ /* pins connections vcc 3.3 gnd gnd ce pin9 scn pin10 sck pin13 mosi pin11 moso pin12 */ #include "max6675.h" #include <SimpleTimer.h> #include <SPI.h> #include <nRF24L01.h> #include <RF24.h> #define CE_PIN 9 #define CSN_PIN 10 int thermoDO = 4; // SO int thermoCS = 5; // CS int thermoCLK = 6; // SCK float temp1 = 0; MAX6675 thermocouple(thermoCLK, thermoCS, thermoDO); #define Pushbutton 2 const uint64_t pipe = 0xE8E8F0F0E1LL; RF24 radio(CE_PIN, CSN_PIN); byte data[6]; // depending on the number of sensors used SimpleTimer timer; void setup() { Serial.begin(9600); radio.begin(); radio.openWritingPipe(pipe); timer.setInterval(1000L, tempdata); } void loop() { timer.run(); radio.write( data, sizeof(data) ); Serial.println(data[0]); } void tempdata() { temp1 = thermocouple.readCelsius(); data[0] = temp1; } |
I defined pins for the SO, CS, and SCK pins of the MAX6675. I also defined a variable temp1 which is of the type float. I also defined a unique pipe, use the same also on the receiver side.
The array data of the type byte is used to store the sensors values. The number inside the brackets can be increased or decreased as per the number of sensors you want to use. Currently, I am using only one sensor, I can still add 6 more sensors.
I defined a timer which I will use to control the tempdata() function.
Inside the void loop() function, I activated the timer and finally two instructions which sends the data to the receiver and print the data on the serial monitor for the debugging purposes.
Tempdata() function is a user-defined function and it has no return type. The purpose of this function is to read the temperature sensor and store the value in array at zero location. This function is called after every 1 second using the timer. Now, let’s take a look at the receiver code.
Receiver Side Code:
|
1 2 3 4 5 6 7 8 9 10 11 12 13 14 15 16 17 18 19 20 21 22 23 24 25 26 27 28 29 30 31 32 33 34 35 36 37 38 39 40 41 42 43 44 45 46 47 48 49 50 51 52 53 54 55 56 57 58 59 60 61 62 63 64 65 66 67 68 69 70 71 72 73 74 75 76 77 78 79 80 81 82 83 84 85 86 87 88 89 90 91 92 93 94 95 96 97 98 99 100 101 102 103 104 105 106 107 108 109 110 111 112 113 114 115 116 117 118 119 120 121 122 123 124 125 126 127 128 129 130 131 132 133 134 135 |
//Receiver coding for the nrf24L01 radio transceiver. //NRF24L01 and Arduino based Wireless Industrial Temperature Monitoring System //https://www.electroniclinic.com/ /* pins connections vcc 3.3 gnd gnd ce pin9 scn pin10 sck pin13 mosi pin11 moso pin12 */ #include <Wire.h> #include <Adafruit_GFX.h> #include <Adafruit_SSD1306.h> #include <SPI.h> #include <nRF24L01.h> #include <RF24.h> #define CE_PIN 9 #define CSN_PIN 10 const uint64_t pipe = 0xE8E8F0F0E1LL; RF24 radio(CE_PIN, CSN_PIN); byte data[6]; // depending on the number of sensors used unsigned long lastReceiveTime = 0; unsigned long currentTime = 0; #define SCREEN_WIDTH 128 // OLED display width, in pixels #define SCREEN_HEIGHT 64 // OLED display height, in pixels // Declaration for an SSD1306 display connected to I2C (SDA, SCL pins) #define OLED_RESET -1 // Reset pin # (or -1 if sharing Arduino reset pin) Adafruit_SSD1306 display(SCREEN_WIDTH, SCREEN_HEIGHT, &Wire, OLED_RESET); float temp; void setup() { Serial.begin(9600); delay(1000); Serial.println("Nrf24L01 Receiver Starting"); radio.begin(); radio.openReadingPipe(1,pipe); radio.startListening(); resetData(); display.begin(SSD1306_SWITCHCAPVCC, 0x3C); delay(2000); display.clearDisplay(); display.setTextColor(WHITE); } void loop() { if ( radio.available() ) { bool done = false; while (!done) { done = radio.read( data, sizeof(data) ); lastReceiveTime = millis(); // At this moment we have received the data temp = data[0]; if( temp == 0) { ; } else { Oled_display(); } } } else { currentTime = millis(); if ( currentTime - lastReceiveTime > 1000 ) { // If current time is more then 1 second since we have recived the last data, that means we have lost connection resetData(); // If connection is lost, reset the data. It prevents unwanted behavior, for example if a drone has a throttle up and we lose connection, it can keep flying unless we reset the values } } } void resetData() { display.clearDisplay(); display.setTextSize(2); display.setCursor(0,0); display.print("Connection"); display.setTextSize(3); display.setCursor(0, 28); display.print("Lost"); display.setTextSize(1); display.setCursor(0, 56); display.print("www.electroniclinic.com"); display.display(); } void Oled_display() { display.clearDisplay(); display.setTextSize(2); display.setCursor(0,0); display.print("Temp:"); display.setTextSize(3); display.setCursor(0, 28); display.print(data[0]); display.setTextSize(1); display.setCursor(0, 56); display.print("www.electroniclinic.com"); display.display(); } |
On the receiver side I added code for displaying the temperature value on the Oled display module and also added instruction for monitoring the connection. So, if the connection is lost a message is printed on the Oled display. This project was a great success. I tested it from different locations and I was able to receive the temperature.
Watch Video Tutorial:




Is it possible to operate the transmitter without connection to the pc?
Error during verify….
no matching function for call to ‘SimpleTimer::setInterval(int, void (&)())’
…please help.
Hi,
I would like to output the raw data from the thermocouple as SPI rather than I2C from the receiver to feed to a controller.
The inputs to the controller are to be identical to the MAX so as to mimic the max pins remotely. Is this possible?