Request Temperature Data Using GSM and Arduino
Last Updated on August 18, 2024 by Engr. Shahzada Fahad
Table of Contents
Request Temperature, Project Description:
Request Temperature using GSM– This project is based on the Temperature and Humidity monitoring using a Cell phone, Arduino, and the famous DHT11 Temperature and Humidity Sensor. In this tutorial, you will learn how to request temperature and humidity values from anywhere around the world using your cell phone. There are projects in which the Sensors data is sent after regular intervals, which I believe is not good. This project is different from the rest of the GSM-based projects, as in this project the Temperature and Humidity values are sent only when the owner sends a request message.
Watch the complete video tutorial.
Amazon Links:
Arduino Nano USB-C Type (Recommended)
DHT11 Temperature and Humidity Module:
*Disclosure: These are affiliate links. As an Amazon Associate I earn from qualifying purchases.
DHT11 Temperature and Humidity Sensor:
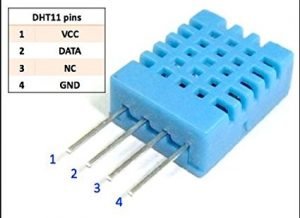
The DHT11 Temperature and Humidity module have a total of 4 pins, out of which only three pins are used. Pin number 3 is not used. The interfacing of the DHT11 temperature sensor with the Arduino can be seen in the circuit diagram. For the complete explanation, watch the video given at the end.
GSM SIM900A Module:

This is the GSM module that I will be using in this tutorial, in the market we have different types of GSM modules, the one I will be using today is SIM900A, the same code is also tested on sim900D, so if you want you can also use sim900D.
If you are from Pakistan, Bangladesh or India make sure you purchase the unlocked version of the SIM900A. This GSM SIM900A module the one we will be using in this tutorial, as you can see on the screen has no Onboard voltage regulator, so be careful while applying the voltage. The ideal voltage for this GSM module is 4.7v but you can also connect it with the 5v adaptor.
As the ideal voltage for this GSM module is 4.7v to 5volts, so any voltage above this can damage the GSM module. If you don’t have the regulated 5v adaptor then you can also use an lm317t adjustable voltage regulator. I have a very detailed tutorial on this. Watch the video.
As you can see SIM900A module has so many pins that are clearly labeled but we will be using only 5 of these pins, the power supply pins, GND, RXD 5v, and TXD 5v. The GND of the GSM SIM900A module will be connected with the Arduino GND, TXD of the GSM SIM900A will be connected with the Arduino pin7 and finally, the RXD of the GSM SIM900A module will be connected with the Arduino pin8.
GSM Sim900A and DT11 connections with Arduino:

For the complete circuit Diagram explanation watch Video tutorial given at the end of this article.
Request temperature data Arduino Programming:
|
1 2 3 4 5 6 7 8 9 10 11 12 13 14 15 16 17 18 19 20 21 22 23 24 25 26 27 28 29 30 31 32 33 34 35 36 37 38 39 40 41 42 43 44 45 46 47 48 49 50 51 52 53 54 55 56 57 58 59 60 61 62 63 64 65 66 67 68 69 70 71 72 73 74 75 76 77 78 79 80 81 82 83 84 85 86 87 88 89 90 91 92 93 94 95 96 97 98 99 100 101 102 103 104 105 106 107 108 109 110 111 112 113 114 115 116 117 118 119 120 121 122 123 124 125 126 127 128 129 130 131 132 133 134 135 136 137 138 139 140 141 142 143 144 145 146 147 148 149 150 151 152 153 154 155 156 157 158 159 160 161 162 163 164 165 166 167 168 169 170 171 172 173 174 175 176 177 178 179 180 181 182 183 |
/* commands v = feedback request */ #include <SoftwareSerial.h> #include "DHT.h" #define DHTPIN 12 // what pin we're connected to //Uncomment whatever the type of sensor we are using. #define DHTTYPE DHT11 // DHT 11 //#define DHTTYPE DHT22 // DHT 22 (AM2302) //#define DHTTYPE DHT21 // DHT 21 (AM2301) // Connect pin 1 (on the left) of the sensor to +5V // NOTE: If using a board with 3.3V logic like an Arduino Due connect pin 1 // to 3.3V instead of 5V! // Connect pin 2 of the sensor to whatever your DHTPIN is // pin3 of the sensor is not connected // Connect pin 4 (on the right) of the sensor to GROUND // Connect a 10K resistor from pin 2 (data) to pin 1 (power) of the sensor // Initialize DHT sensor for normal 16mhz Arduino DHT dht(DHTPIN, DHTTYPE); char inchar; // Will hold the incoming character from the GSM shield SoftwareSerial SIM900(8, 7); // gsm module connected here. String TextForSms ; String humidity = " Humidity: %"; String temperature = " Temperature"; String sign = " *C"; void setup() { Serial.begin(9600); SIM900.begin(9600); // original 19200 dht.begin(); pinMode(6, OUTPUT); digitalWrite(6, HIGH); // delay(10000); // give time to log on to network. randomSeed(analogRead(0)); SIM900.print("AT+CMGF=1\r"); // set SMS mode to text delay(1000); SIM900.print("AT+CNMI=2,2,0,0,0\r"); // blurt out contents of new SMS upon receipt to the GSM shield's serial out delay(1000); SIM900.println("AT+CMGD=1,4"); // delete all SMS delay(5000); Serial.println("Ready..."); } void sendSMS(String message) { SIM900.println("AT+CMGF=1\r"); // AT command to send SMS message delay(1000); SIM900.println("AT+CMGS = \"+923339218213\""); // recipient's mobile number, in international format delay(1000); SIM900.println(message); // message to send delay(1000); SIM900.println((char)26); // End AT command with a ^Z, ASCII code 26 delay(1000); SIM900.println(); delay(1000); // give module time to send SMS // turn off module } void loop() { if(SIM900.available() == 0) { // Wait a few seconds between measurements. delay(2000); // Reading temperature or humidity takes about 250 milliseconds! // Sensor readings may also be up to 2 seconds 'old' (its a very slow sensor) int h = dht.readHumidity(); // Read temperature as Celsius int t = dht.readTemperature(); // Read temperature as Fahrenheit int f = dht.readTemperature(true); // Check if any reads failed and exit early (to try again). if (isnan(h) || isnan(t) || isnan(f)) { Serial.println("Failed to read from DHT sensor!"); return; } // Compute heat index // Must send in temp in Fahrenheit! int hi = dht.computeHeatIndex(f, h); // Serial.print("Humidity: "); // Serial.print(h); // Serial.print(" %\t"); // Serial.print("Temperature: "); // Serial.print(t); // Serial.print(" *C "); TextForSms = TextForSms + "Humidity: "; TextForSms.concat(h); TextForSms = TextForSms + "% Temperature: "; TextForSms.concat(t); TextForSms = TextForSms + "*C"; Serial.println(TextForSms); delay(2000); TextForSms = " "; if ( t > 40 ) { Serial.println("Temperature Exceeded"); TextForSms = " Temperature Exceeded"; sendSMS(TextForSms); delay(5000); TextForSms = ""; } } if(SIM900.available() >0) { inchar=SIM900.read(); Serial.println(inchar); delay(20); if (inchar=='v') { delay(10); Serial.println(inchar); // Wait a few seconds between measurements. delay(2000); // Reading temperature or humidity takes about 250 milliseconds! // Sensor readings may also be up to 2 seconds 'old' (its a very slow sensor) int h = dht.readHumidity(); // Read temperature as Celsius int t = dht.readTemperature(); // Read temperature as Fahrenheit int f = dht.readTemperature(true); // Check if any reads failed and exit early (to try again). if (isnan(h) || isnan(t) || isnan(f)) { Serial.println("Failed to read from DHT sensor!"); return; } // Compute heat index // Must send in temp in Fahrenheit! int hi = dht.computeHeatIndex(f, h); // Serial.print("Humidity: "); // Serial.print(h); // Serial.print(" %\t"); // Serial.print("Temperature: "); // Serial.print(t); // Serial.print(" *C "); TextForSms = TextForSms + "HUMIDITY: "; TextForSms.concat(h); TextForSms = TextForSms + "% TEMPERATURE: "; TextForSms.concat(t); TextForSms = TextForSms + "*C"; sendSMS(TextForSms); Serial.println(TextForSms); delay(2000); TextForSms = " "; } } } |
Watch Video Tutorial:
Other GSM Related Projects:
How to use GSM and Bluetooth Together To monitor Any Sensors wirelessly using Arduino
RFID & GSM based student Attendance Alert message to parents
Arduino GSM Project: Security Alert message to multiple numbers
Arduino and Gsm based laser security system
Car accident location tracking using GSM, GPS, and Arduino
GSM Alarm System Using Arduino and a PIR Sensor
Arduino Gas leakage detection and SMS alert MQ-2 sensor
RFID based students attendance system with message Alert
Discover more from Electronic Clinic
Subscribe to get the latest posts sent to your email.


Hello,
I’m looking to build a project like this for my Apple Orchard. I would like to have 6 points around my farm to monitor temp and think this project would be perfect. Is this project possible with the parts available now, and workable in the US over our networks. Thank you
Hello
good Project ,do You have Simulation in Proteus ? thank you.