My Top 20 Projects | Best Projects of 2020, Arduino, ESP32, & ESP8266 Projects
Last Updated on February 24, 2024 by Engr. Shahzada Fahad
Table of Contents
Top Projects, Description:
Today, I am going to share with you my top 20 projects from the year 2020. These are mixed projects based on Arduino Uno, Arduino Nano, Nodemcu ESP8266, and ESP32 WiFi + Bluetooth Module. Different sensors are used with Arduino, ESP32, & ESP8266.
Long Range Wireless 12V Battery Voltage Monitoring System:

Long Range Wireless Battery Voltage Monitoring– In this tutorial, you will learn how to make a Long Range Wireless Battery Voltage Monitoring system using Arduino, HC05/HC06 Bluetooth Module, NRF24L01 Transceiver Modules, 0-25v Voltage Sensor, and Android Cell Phone Application.
pH Meter Arduino

pH Meter Arduino– This is the analog pH sensor kit from the DIY MORE which is a bit different from the one developed by the DFrobot which I have already used in some of my previous projects explaining what is a pH sensor, it’s working, Calibration, and how to use a pH sensor to find the pH value of different liquids. I also used the DFrobot pH sensor kit for measuring the water quality using the Arduino board and I also used the pH sensor kit from the DFrobot in an IoT based water quality monitoring system using the NodeMCU ESP8266 WiFi module. I have also used the same Diymore pH Sensor with the ESP32 and built an IoT pH Meter. So, if you want to learn how to use the pH sensor kit from the DFrobot then I highly recommend read my previous articles.
Lead Acid Battery Making

In this tutorial, you will learn how to make and repair any type of Lead Acid Battery using new and old positive and GND plates. I will also explain what are the necessary tools for making the Lead Acid Battery and how to use them? I will also explain how to make the Battery internal and external terminals using metal dies. I will also explain in detail how to internally connect the positive and GND plates in series? In the end, I will also explain how to prepare electrolyte for the battery using Sulfuric Acid, and how to test the specific gravity of the Lead Acid Battery electrolyte using a Hydrometer.
Read my article on the Basic Working principle of the Lead Acid Batteries. In this article, I explained what are primary and secondary batteries? The charging and discharging chemical reactions, the basic working of a Battery Cell, and so on.
Long Range Wireless Industrial Temperature Monitoring System

In this tutorial, you will learn how to make a long-range Wireless industrial Temperature monitoring system using Arduino Nano, NRF24L01 Transceiver modules, Industrial temperature sensor capable of measuring the temperature up to 1000 Centigrade, and an I2C supported Oled display Module. You will learn a lot of new things and you can easily modify the code to make other cool projects.
Blood Oxygen and Heart rate measurement
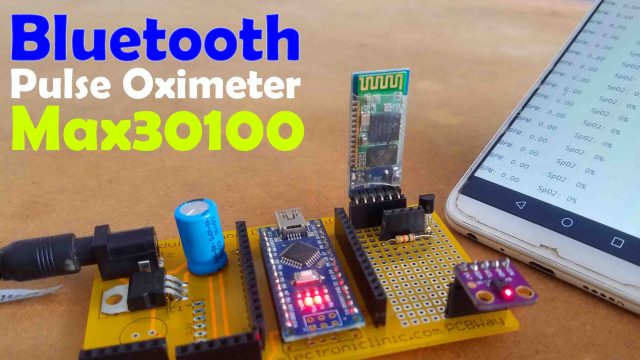
In this tutorial, you will learn how to use the Max30100 Pulse Oximeter with Arduino Nano and display the Heart Rate and Blood Oxygen on a 16×2 I2C supported LCD Module and also send the blood oxygen and heart rate or Pulse rate values to the android application designed in Android Studio using the wireless Bluetooth technology. The Heart rate or Pulse rate or Heart beat is measured in BPM which is also known as the beats per minute while the Blood Oxygen Concentration is measured in percentage.
ESP32 Cam face recognition Door Lock

In this tutorial, you will learn how to make Face Recognition based Door Lock Control system using ESP32 Camera Module and a 12V electronic lock. For the Authorized person, the onboard white LED is turned ON and also the electronic lock is opened. This ESP32 Camera based face recognition door lock control system depends on my previous two tutorials.
Smart Purse for Women Safety

Any Purse can be converted into a smart purse with the women safety device provided with a wireless receiver, GSM module, and a GPS Module. All these modules are interfaced with the Arduino Nano. All the electronics are powered up using the rechargeable Lipo Battery. The female safety device inside a purse, handbag, or school bag can be operated using a small wireless transmitter.
ESP32 and Lora based Smart Irrigation system

In this tutorial; you will learn how to make an IoT Smart Irrigation system using Nodemcu ESP8266 Wifi module, 15Km Lora Transceiver modules, Arduino Nano, and Capacitive Soil Moisture Sensor V1.2. The data is sent from the transmitter side to the receiver side using Lora module and then on the receiver side the data is uploaded on the cloud platform i.e Blynk.
IoT CNC Shield

In my previous tutorial “Arduino CNC Shield V3.0 and A4988 Hybrid Stepper Motor Driver + Joystick” I used the CNC shield with Arduino and covered the maximum basic things including the technical specifications and how to use the male headers and how to use the CNC shield in custom made projects. If you are a beginner and you have never used the CNC shield then I highly recommend read my previous article which also explains how to control the speed and direction of the stepper motor automatically and then how to use a joystick to control a stepper motor.
In this tutorial, we will control the same CNC shield using the Nodemcu ESP8266 Wifi Module this way the two Hybrid Stepper motors can be controlled from anywhere around the world using the Blynk application. You will learn a lot of new things in this tutorial, like for example, how to control the speed and limits of the stepper motor using the sliders, how to manually adjust the starting position of the stepper motor using a potentiometer, and how to control a stepper motor using the Joystick on the blynk application.
IoT TDS Sensor for Water Quality Monitoring using ESP32

In this tutorial, you will learn how to make IoT based Water Quality Monitoring System using TDS Sensor, DS18B20, and ESP32 Wifi + Bluetooth Module by the ESPRESSIF systems. As this project is based on the IoT “Internet of Things” based technology, so, the EC “Electrical Conductivity” and Temperature can be monitored from anywhere around the world using the Blynk application.
EC or Electrical Conductivity of water is its ability to conduct an electric current. Salts or other chemicals that dissolve in water can break down into positively and negatively charged ions. These free ions in the water conduct electricity, so the water electrical conductivity depends on the concentration of ions. Salinity and total dissolved solids (TDS) are used to calculate the EC of water, which helps to indicate the water’s purity. The pure the water, the lower the conductivity. To give a real-life example, distilled water is almost an insulator, but saltwater is a very efficient electrical conductor.
IoT Moving Display Notice board Project using ESP8266

In this tutorial, you will learn how to make an IOT “Internet of Things” based Notice Board using Nodemcu ESP8266 Wifi Module, Max7219 8×8 LED Matrix modules, and Blynk application. The scrolling text message on the 8×8 LED Matrix can be updated at any time from anywhere around the world using the Blynk application. The scrolling speed of the text message can be controlled using a variable resistor or a Potentiometer. This is version 3 of the 8×8 scrolling message which is entirely based on my previous two tutorials.
ESP32 Bluetooth Home Automation Project

ESP32 Bluetooth + Wifi Module by the Espressif systems come with the built-in Low Energy Bluetooth Module which can be used just like the standard HC-05 or HC-06 Bluetooth Modules. The ESP32 Bluetooth module can be paired with all types of cell phones, and special android cell phone applications can be designed for monitoring and controlling different types of sensors and electrical loads.
Advanced Countdown timer for electrical loads

In this tutorial, you will learn how to make an advanced level Countdown timer based on the Arduino, 16×2 i2c LCD, and a 4×3 keypad. This countdown timer is entirely different from the rest of the countdown timers available on the internet. This countdown timer can be used as the end product. With the help of this Countdown timer, you can control different types of electrical loads like for example Light Bulbs, Heaters, Water Pumps, Washing Machines, Fans, etc. in fact, this countdown timer can be used anywhere where you need to control anything on the time basis. This countdown timer is ideal for AC and DC loads.
IoT earthquake monitoring network

Real-Time Earthquake Detector Sensor Network is an advanced level research project which basically aims to develop a WIFI based Real-time Earthquake Detector Sensor Network which can be used at the Province level, Country-level or even at the Global level. With the help of this project, the earthquake detection system can be installed in every city which will make a complete network, and every earthquake detector monitoring device can be monitored in real-time using the IoT platform.
Due to the real-time monitoring, we can easily predict in which direction the earthquake waves are traveling, this way the people can be informed in time before the earthquake hits that area. Each earthquake sensor data will have the date and time information as well. The uniqueness of my research project is that it can be practically adopted. So that’s why I also made a Prototype model so that I can clearly explain my whole research work. During the practical installation, I will only consider two locations, Peshawar and Nowshera; later you can increase the number of locations to be monitored. I have also designed some high-quality PCBs for this which can be used to power up the Nodemcu ESP8266 WiFi Modules and the Vibration sensors.
DIY World Clock using ESP8266

Diy Digital World Clock using Nodemcu ESP8266 and HMI TFT LCD- In this tutorial, you will learn how to make a World Clock using a 10.1 inch HMI TFT LCD display module by the Stone Technologies and a Nodemcu ESP8266 Wifi Module by the ESPRESSIF systems. This is the smartest World clock; you don’t have to enter the hours, minutes, and seconds manually and there is also no need to use the RTC “Real Time Clock” Module.
Password Door Lock System using Arduino

Password Door Lock Security System using Arduino and Keypad- in this tutorial, you will learn how to make the most efficient Password protected door lock security system using Arduino and a keypad. When you enter the correct 4 digit password the door is opened for 5 seconds. Currently, the password is 1234, which you can change in the programming; you can even select a password consisting of more than 8 digits. I have checked this Password Door Lock Security System many times and it worked perfectly. If a wrong password is entered 3 times the person is locked out for 5 seconds and an LED is turned ON, which can be replaced with a buzzer. The number of wrong attempts can be increased or decreased as per the requirement.
Arduino HMI based Electrical Loads control system

Arduino HMI TFT LCD Module Electrical Load controller- The 10.1” HMI Intelligent TFT LCD Module used in this video is sponsored by the Stone Technologies. Stone Technologies is a professional Manufacturer of HMI Intelligent TFT LCD modules. Depending on the application the Stone Technologies offers Industrial Type, Advanced type, and Civil Type Intelligent TFT LCD modules available in different sizes. The one I am using in this series of videos is the Civil Type 10.1 inch HMI display Module. For more information visit stoneitech.com.
In this article, you will learn how to control electrical loads using 10.1” HMI TFT LCD Display Module and Arduino Uno. The control commands are sent serially from the HMI Touchscreen display Module through the max232 board to the Arduino. The Arduino then Turns ON and Turns OFF the desired load depending on the command. Using the same button you can Turn ON and Turn OFF the load, the buttons used on the HMI GUI works as the Toggle switches. For the demonstration purposes, I have connected 220Vac light bulbs which you can replace with other AC or DC loads. Be very careful while working on the 220Vac as it can be really dangerous, wear protective gloves. Make this project at your own risk. This project is entirely based on my previous three tutorials.
IoT Power Relay

IoT Power Relay Project using ESP32 Wifi + Bluetooth Module- This DIY IoT Power Relay based on the ESP32 WiFi + Bluetooth module can be used to control the High Power Devices like for example Water Pumps, Air Conditioners, Heaters and other High Ampere loads. The best thing about this IoT Power Relay is that it can be controlled from two different sources.
Firebase with ESP32 for Sensor Monitoring
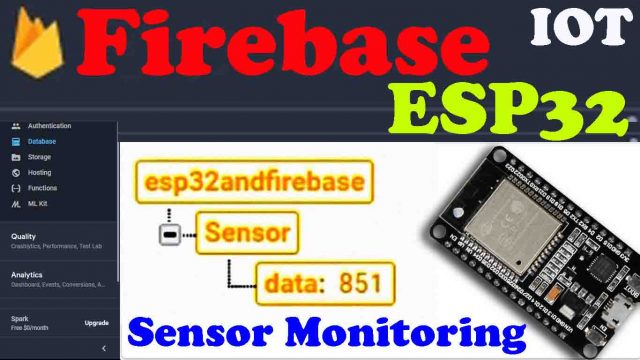
ESP32 Firebase- Before I am going to explain how to use the ESP32 with Firebase, first, I am going to talk about some of my previous projects based on the Google Firebase. In my last tutorial on the Google Firebase Database, I explained how to send a sensor value from the Nodemcu ESP8266 Wifi Module to the Google Firebase Database. If you want to use Nodemcu ESP8266 WiFi Module with the Google Firebase then read my article “Nodemcu Firebase Database Tutorial“, this is a beginners level project and explains the very basics like for example, how to setup your own Google Firebase account, How to connect an analog sensor with the Nodemcu ESP8266, and send the sensor data to the Firebase Database.
I also uploaded an advanced version based on the Nodemcu ESP8266 and Firebase Database. The advanced version is about the students’ attendance system using GSM sim900A module, RFID MFRC522, 16×2 LCD, and the Google’s Firebase Database. This is really an amazing project, you will learn a lot of new things like for example, how to use an RFID module, GSM Module, and how to send attendance data from the Arduino to the Google Firebase Database. But before you are going to make the advanced version first I recommend read my getting started tutorial on the Nodemcu Firebase Database.
In today’s tutorial, we will be using the ESP32 Wifi + Bluetooth Module by the Espressif Systems with the Google Firebase database. This is the same company that created the ESP8266 series of chips, modules, and development boards. Unlike the Nodemcu ESP8266 Wifi Module, the ESP32 Wifi + Bluetooth module is becoming very famous as it consist of more analog pins; while in Nodemcu ESP8266 there is only one Analog pin A0.
Distance measurement with Laser
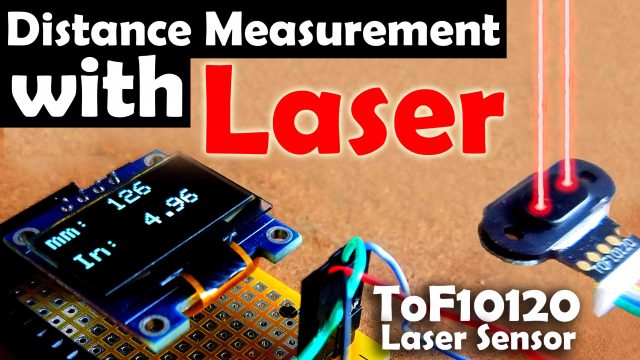
So far I have been using Ultrasonic Sensor for the distance measurement and used this sensor in so many amazing projects including the Ultrasonic Sensor based water level monitoring system, Social distancing project against the Covid-19 Corona Virus, in an Automatic car deceleration system to maintain the safe distance, Smart Dustbin, IoT based Flood Monitoring System, and in so many other cool projects. No doubt the Ultrasonic Sensor is an amazing sensor and is most frequently used throughout the world. If you compare the Ultrasonic Sensor with the TOF10120 you will find that the Ultrasonic Sensor is cheaper than the TOF10120 Laser distance sensor. But personally, the only thing I like about the TOF10120 is that the TOF10120 Laser range sensor is small in size and is very fast.
Discover more from Electronic Clinic
Subscribe to get the latest posts sent to your email.


Purplewave India Pvt Ltd. is an AV equipment manufacturing Company. We offer a range of high-quality products such as Active LED displays, video wall displays, digital kiosks, speaker phones, conference video cameras, interactive displays, and much more!
data. It is a factual and beneficial article for us. Thankful to you for sharing an article like this.
Very well written article. It was an awesome article to read about capacitive multi touch screen panel rich content and fully informative. I totally Loved it.
In love with this post, thankyou for the information.capacitive multi touch screen panel
Purplewave India Pvt Ltd. is an AV equipment manufacturing Company.We offer a range of high-quality products such as Active LED displays, video wall displays, digital kiosks, speaker phones, conference video cameras, interactive displays, and much more!